QX100 Steering Mod

Emeljay

WiskersBlowinInTheWind
I have started to acquire parts to modify the steering of my QX100 to be similar to the Vendetta and Silvio. I bought a 6061 aluminum tube from speedymetals.com (i'll post dimensions later), a fork riser clamp from CB, and slider tube clamp from speedwaymotors.com I already have a headrest and have several different handlebars if needed.

The inspiration came from several threads on this forum and my wanting to try direct tube steering on hillclimbing on either my Q or QX100. I chose to modify my X100 so as to keep my Q close to stock for those I have been letting to learn to ride it. But these parts and methods I will attempt should work on both the Q or X.
 

ratz

Wielder of the Rubber Mallet
If it works then it will be time to create a bill of materials (bom) and poof a conversion / upgrade kit is born.
 

Emeljay

WiskersBlowinInTheWind
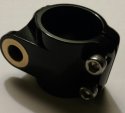
Slider tube clamp from speedwaymotors.comtmp_12193-Clamp4Slider-29206318.png...This part fits the new slider tube but not the stock fork riser clamp, so may make my own (not as durable), find another slider clamp and/or fork clamp, or have one made.
...
 
Last edited:

Emeljay

WiskersBlowinInTheWind
My ADEM headrest will be used, will need to transfer it's bracket from my Q to the X. Being ex-military equiptment tester (Guinea Pig) I have wondered if the X in QX100 meant experimental. For me it now does! Maybe subconsciously that's the reason I chose the X for this project!

I have experimented in the past with lower seat angles on the Q, but recently have had the seat angle set about 40 degrees on the X. It will need to be changed probably closer to 30 degrees with this steering modification. This will require the use of the headrest. And probably much parking lot practice to get used to a much lower seat angle.

I'm going to use the handlebar riser directly off the new slider tube. I have several different lengths of risers in spare parts so I can see where the handlebars work best feel better or something like that. I have been gleaning much from this forum including how parts fit and feel can be different for each of us and thus experimentation is a way of life for us Cruzbikers! Some of the more closely related threads I looked at were QBragBoard:Q Hybrid, Q:Turning a Quest into a Vendetta, Q:Could the Quest use the V20/S30 Boom, as well as much of the other threads re the Vendetta/Sylvio Brag boards, changing seats, handlebars, etc. But for now Titleist says it's time for a Deschutes Chainbreaker IPA!

tmp_12193-IMG_20151008_154530_225~2-1843574867.jpg

...
 

Rampa

Guru
This is something that I would be wanting to do if I got a Q. I currently ride my recumbent with a seat angle of about 30 degrees.

I just measured the ID of my Performer tiller, and it is only1.125. Bummer! :( That would have been a cool solution, as recumbent tillers are very stout and very light with a welded on handlebar clamp at the top.

Is the slider for the vendetta/Silvio available separately? and is it maybe 1.375 ID you would need to slide over the Q lower steering tube?

Edit:
The Performer tiller is 1.25 OD. So maybe it still would be a possibility. I see that's the OD of the tube you got. It's normally made to slide over another tube stub (1.125), but could just as well slide inside a larger tube.

Looking forward to seeing more! :)
 
Last edited:

Robert Holler

Administrator
Staff member
The sliders/front ends are not available separately for the V or the S. These items have been designed specifically to work with the geometry of their respective bikes.

Modifying the QX100 to fit a setup like the V or S is basically modding it to be more like the geometry of the older 45 degree seat angle Silvio V1.
 

mzweili

Guru
Modifying the QX100 to fit a setup like the V or S is basically modding it to be more like the geometry of the older 45 degree seat angle Silvio V1.
Although I'm not implicated in this issue, I think there is nothing wrong with it.
As I wrote earlier: Great to see people working on product improvement / modification.

The sliders/front ends are not available separately for the V or the S.
If they where, it could be interresting for Silvio 2 owners too.
 

Emeljay

WiskersBlowinInTheWind
This is a fun project for me! Don't have any time during my work week (I have Mon/Tue off so I'm off kilter with most peoples schedules so to speak). But i like riding when most are working as does one of my riding buddies. I knoe no pics it didnt happen. Sometime later i will have pics posted of rides.

Project update: Parts don't all fit together (not a surprise to me just a challenge!) which hi-lites the value of buying a complete product (i.e. complete bicycle), BUT... my reason for doing this is to see how straight or direct linkage from handlebars to bottom bracket on a Quest feels when putting the power on! So here is the current project status:

1. I thought that the slider tube would need sanding to fit into the tube from the bottom bracket. Sanding is taking awhile as I sand a little, then clean it up, and see how it fits. Doing this slowly and testing the fit so I don't sand off too much!

2. The stainless steel tube clamp may be a little too small if I use the stock fork riser clamp so drawing up diagram to have metal shop make one for me. Or maybe find different clamp. The net is my friend for searches for this, but also my time foe!

3. Also looking at ways to attach handlebars to slider that is non-standard size. The slider is 1 1/4 inch when standard is 1 1/8 inch. I may just cut up a riser and have it welded to the new slider tube. Already looking for volunteers from my spare parts box!

Be patient if you are watching this G rated show, I'm a slow worker who enjoys the process probably too much!
 

Rampa

Guru
I have an idea for the handlebar mount, if you don't go the welding route.

A very common handlebar clamp size is 31.8mm, and 1.25 inches is 31.75 mm. So maybe you can find a little stubby stem with the 31.8 handlebar clamp and use it "backwards. The part that would normally go over the steering tube of the forks will be 1.125 (or less). 1 1/8 is 28.574 mm, and 1 inch is 25.4 mm. Shims are often used for handlebars.

Here's a totally symmetrical one, so it wouldn't look funny.
http://www.amazon.com/Cycling-Bicyc...56802362&sr=8-8&keywords=short+handlebar+stem

You could probably fit a quill stem in the end of the tube as well.
 

Emeljay

WiskersBlowinInTheWind
Good tip Rampa, thank you, ordered one already to get it here all the way from China! Also I never even thought of the old tech quill stem. The power of brain storming is showing its force here with other's workable options.
 

SamP

Guru
I believe those really short stems are commonly used for "downhill" mountain bikes. I was using one backwards on my Conversion Kit along with a cruiser-style handlebar mounted upside down for awhile.
 

Emeljay

WiskersBlowinInTheWind
That'l work out fine cause I'll ride down hill any time, in fact, on my Pacific Coast trip what kept me going on all the uphills was knowing that since I started at sea level in Seattle and would end up at sea level in San Diego then for all the uphills there would be equal downhills!.

tmp_15636-aviary-image-14569685717091554035273.jpeg ...
 

Emeljay

WiskersBlowinInTheWind
Rampa: speedymetals has may different sizes of OD, ID, wall thickness, etc to suit the needs of many projects, but they also indicate that telescoping tubes is not what they are trying to sell...

..tmp_15473-aviary-image-14573174406233911621.jpeg .so I knew it would take some work to get the tube in "slider shape". I have been measuring things with a $20 caliper from a hardware store, which in all previous cases gave me measurements I needed. But here this caliper is not of a high enough resolution to even differentiate measures between the stock slider, my new tube (hopefully to be a slider in the future), and more importantly measurements taken after my most recent sanding session (which gave me blisters!) don't show any difference. But I know I am reducing my new tube's OD because a little dent in the tube from when I dropped it is not as deep after sanding, and when sanding rough sandpaper first leaving lines/grooves to medium then fine sandpaper the grooves are gone leaving a highly polished very shiny even beautiful surface at the sanded end of the tube.My sanding is beginning to let the tube partially insert but probable lots of sanding to go. Note that all my sanding is by hand which is probably good because my thoughts are unless one has EXPENSIVE shop setup/sanding equipment specializing in sanding tubes it would be too easy to go too far and have floppy telescoping tubes. At least that's what I keep telling myself as I continue to hand sand my beautiful mirror like aluminum tube!
 

Emeljay

WiskersBlowinInTheWind
Pay dirt, or in this case pay 6061 aluminum. After sanding the tube today it finally wiggled in the boom. Sometime during an earlier sanding session I thought "maybe I should have got a METRIC diameter tube!". Or maybe a power sander! So sanding off somewhere between the initial 1.25 inch 6061 tough aluminum to the sanded present 31 mm (I know - different measure systems, but you should see what this amount of sanding does to your brain, not to mention blisters on my hands). So anyway I will do the fine sanding to smooth out the surface and tomorrow see if I can get this thing together. It has been so long, what was the thing anyway? Oh yeah, what would a direct line from the handlebars to the bottom bracket on the Quest or QX100 feel like?
 

Emeljay

WiskersBlowinInTheWind
Stock QX100
..
tmp_15884-stockQX100115228768.jpg
..
modified X
..
tmp_15884-compare-1705873876.jpeg
..
tmp_15884-closeup-921062916.jpeg
..tmp_15884-side-792029439.jpeg
..
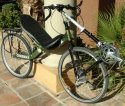
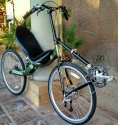
So here is the prototype steering mod on my X100 (i also have been riding a Quest for 14 months with mileage at about 8500 miles mainly commuting to work about 20 miles daily) in my continuing experimentation to see how I want to customize my ride. I have two similar Cruzbikers, a Quest 3 and a Quest QX100, so that I can ride to work on one and experiment on the other. I try to keep the Quest stock since I have found that when I teach others to ride the stock seems to be best. So why am I experimenting if the stock is best? Because trying something that may be better is why I tried my first Cruzbike and that was a winner so why stop now? :D

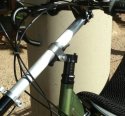
So the first pic is my stock X, and the second is my current config (not the final config I think). Then there is a close-up of the mod, and then a side view.

Basically I wanted to get this going, and document where I am before continuing.

It took a long time to sand the new slider tube so that it could fit into the stock boom. I blame whoever in the US who kept us from converting to the metric system (my thoughts only) because I like a good citizen ordered the tube using good ol' English measurements (but now my thinking 'stupid me' since the English were smart enough to switch to metric! So it took me a long time and many blisters to sand by hand the tube to fit into the boom, not to mention the pile of wore out sandpaper. Is that recyclable? I am thinking that there is still some sanding to go because I will need to treat the aluminum somehow so that it does not corode together with the boom in the long run. Paint? Anodize (whatever that is), or oil?

So today I stuck the new slider into the boom, clamped down the quick release, set and screwed tight the RD cable housing clamp thing that also helps clamp down the slider tube (if you did not know this this would be an extra step when making adjustments to slider tube - for me that is why I keep my Quest stock for introducing others to Cruzbikers).

Then the spacers added to the fork riser tube, and a different clamp than I thought I would use but came in handy from my odds n ends box. The tube clamp needed a shim - I used a piece cut from a plumbing rubber connector. Bolt to the clamp. Good to go!

Sort of, as the handlebar stem needed to be put on backwards to fit the new slider, and I needed to shim the handlebar into the stem. What to use? Hey I had to do it, as it was the only aluminum can in this place! And so not to waste the innards of the can I drank it all. Quite fast as I recall so that I could get this job done. (The job at the time on my mind was I had to drink so that I could continue with the investigation). I cut up the Fosters can to use as the shim - it sacrificed all! ;)
 

Rampa

Guru
That looks great! Looks like it can be adjusted a lot as well.

Anodizing might be best, as you really don't want to add the thickness of paint back onto the tube. Anodizing is essentially a rapid, controlled corrosion process. It gives a hard, durable coating of aluminum oxide that is very thin. This "seals" the tube from any further "natural" corrosion.
 

billyk

Guru
Something else to consider is that the ID of the boom widens out considerably (~1/8 inch) only a few inches below the clamp (Q2, at least). Try tightening the clamp just a bit, push the slider all the way down, and you can feel the play.

I found this out after buying the extra-length slider from CB, thinking it would give more rigidity. Nope. All it did was to let me hear/feel a little clang when the slider hit the inner wall of the boom when pulling hard uphill.

Klugy solution was to get some 1/16th slippery plastic sheet, cut it to size, slip it down the boom, insert slider (tight!). It definitely reduces the flex of the system.

Also consider what the legendary John Tolhurst said in one of those Q-mod threads: it's the accumulation of flex in the whole system. Every time you add a joint, you lose a little rigidity.

Billy K
 
Top