S30 Rear Triangle Noise

AlexisBV

Active Member
Hello everyone, first post in the forums!

I'm a relatively new owner of a S30 (got it about 2 months ago). I received the bike partially assembled from Cruzbike - some minor assembly required in the front (boom/triangle), as well as the seat, headrest, and of course the wheels.

While going for a ride on Sunday, I heard a hiss lasting for about a second (kind of like a shh-sigh), that appeared to come from behind me, though judging direction while riding in wind is sometimes tricky. I immediately suspected a flat, but upon inspection, both tires were normal. Unless I'm missing something brutally obvious, my S30 doesn't have front suspension. So I figured the noise I heard was not related to the bike, though no vehicles were behind me. When putting the bike back in the shed, I noticed some light noise when setting the bike down after picking it up. As a newbie, I'm not sure if that noise was always there and I'm just noticing it now, or if it's something genuinely new. I'm pretty sure it's from the seat/frame assembly contacting the rear triangle when it's own weight is applied. I made a short video - in the second half I lift the rear of the bike just off the ground, and set it down again.


Does this seem normal to you, or do I need to do something about it? The handling of the bike seems normal, but I haven't done much riding since. I'm not sure it makes noise while riding (with my weight on the seat), but I'll try that tonight.

Cheers,
Alexis

PS: I can't find any buttons to rename the thread to something more specific - mods, are you able to rename the thread (e.g. "S30 rear triangle noise")?
 

BrianA

Active Member
Doesn't look right to me. I've just looked at the rear suspension on my S30 and when the bike is sitting on the wheels normally there is no gap between the rubber mount in the frame and top of the titanium spring. Yours appears to have an uneven gap with the gap at the front being larger than the rear.
 

ratz

Wielder of the Rubber Mallet
I was thinking the same thing the two silver metal plates that are mounted to the leaf springs are different. one of them has a depression that the rubber dampener goes into and the other one is flat. My guess is that the two Silver squares are transposed and that is messing up the spring action.
 

AlexisBV

Active Member
Thanks for your input, I'm going to have a closer look at those components. That part of the bike actually came preassembled, so I'd be a bit surprised if it wasn't done right.. I'm looking at the assembly instructions for the rear triangle and the two link buffers should be identical as there is no differentiation between them in the instructions. However, the front and rear plates are different parts. I checked and they don't seem to be switched - the one with the slot/space to fit the rubber dampener is indeed in the front, and lined up with the "spike" on the dampener.

Unfortunately the instructions make no mention of what the spacing (if any) should be between the front link plate and the frame. I couldn't find any good close-ups of that part of the bike on the net, anyone care to share a pic of the rear suspension?

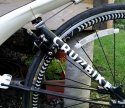
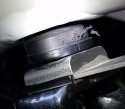
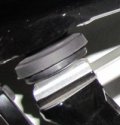
Here are a couple of close-up pictures I took of mine. The first 3 (with daylight) are unloaded, the last two (dark background) are with me in the seat, compressing down the suspension. Under load, there seems to be contact on the rear side (no gap), but no full contact between the frame dampener and the titanium link.

20160906_080521.jpg 20160906_080530.jpg 20160906_080541.jpg 20160906_214918.jpg 20160906_214924.jpg

I took off the seat to have a look at the "other side" of the elastomer, but I didn't see anything obviously adjustable. I'm pretty sure it was already that way when I received it, and I've done about 400km on it - hopefully that's not an issue. I'll get in touch with CB support to get their take on this (and see if any corrective action is required).
 

super slim

Zen MBB Master
Elastomer 001.jpg Silvio_HiRes_0026_Frame Suspension.jpg
There is (on Silvio V2.0) a threaded plug that is used to adjust the rear height , and so that there is full contact when the rider is not on the bike.
Also note that the Urethane spring thinner section is downwards near the titanium spring so that when there is suspension movement the Urethane is not sliced off.
 

Attachments

  • Elastomer 001.jpg
    Elastomer 001.jpg
    31.5 KB · Views: 20
  • Elastomer 002 (1).jpg
    Elastomer 002 (1).jpg
    31.9 KB · Views: 17

AlexisBV

Active Member
Super slim, the orientation of the elastomer is correct (spike towards the bottom). The alignment and length/position seem to be off. The top side of the suspension has two holes in it, which I suppose can be used to twist it so it moves up or down following its thread. I don't recall seeing specific tools for that, what should I use?


super slim

Zen MBB Master
You could use circlip pliers, or 2 Philips screw drivers to go into the two holes, and a third across them to turn the threaded plug down to a height where the plastic plug with a diamond shape on the top and the bottom is always engaged.
 

AlexisBV

Active Member
Good suggestions. I used needle-nose pliers to screw it down a bit more, and I don't hear rattling anymore when I lift and set down the bike. There's still an uneven gap however. Just to be sure I removed threaded cap that pushes down on the suspension to have a look, and it seems like the suspension itself is also "threaded" onto the frame, though it only has a round hole down the middle (looking at it from the top), so I'm not too sure how to best try and twist it as well without damaging it. Maybe with an adjustable wrench from the outside. From what I can see, it appears to be somewhat misaligned, but I'm not sure I can correct it without pulling the whole thing out and reinstalling it.
 

Robert Holler

Administrator
Staff member
Hmmm. That part is pre-installed from our factory and I did not see anything out of the ordinary when I did the build. Ill take a look at mine here and a few others to see if there is any difference.

Robert
 

ratz

Wielder of the Rubber Mallet
Hmmm. That part is pre-installed from our factory and I did not see anything out of the ordinary when I did the build. Ill take a look at mine here and a few others to see if there is any difference.

Robert

On a second look do I see a crack in the plastic piece and a tear in the rubber?
 

super slim

Zen MBB Master
On a second look do I see a crack in the plastic piece and a tear in the rubber?
Ratz I think the Urethane spring is upside down with the larger dia section on the bottom where it is rubbing against the frame threaded section, and being cut.
I your build photos, the smaller dia section was in the bottom position against the plastic interface piece.
 

AlexisBV

Active Member
ratz, the plastic piece isn't cracked, I suspect it might look that way from the pictures/video but I had a look just now and it looks OK. The rubber does have some scratches on one side that look like they were made by the threaded section of the frame.

It really seems to me like the rubber is misaligned, with the bottom part too forward, which makes a gap in the front while it touches the back. Thing is, I'm not sure it could be any different, since the centreline of the suspension housing appears to not be aligned with the plate on the ti link. The plate seems to be a bit forward of the centreline, which "pulls" the spike on the plastic part forward, bending the whole thing forward. First picture, the green line is the alignment of the suspension housing, the red line points to the groove on the link plate where the plastic part fits. It's almost like the ti link was a hair too long.

susp_angle.jpg 20160909_074600.jpg 20160909_074639.jpg

As for the urethane spring itself, I'm inclined to thing it's not upside down otherwise it would be loose in the frame and/or not fit with the plastic part? Note in these latest pictures it was twisted about half a turn compared to the earlier pictures (scratches are now on the rear side)
 

mzweili

Guru
Looking closely at the photos I have the impression that the cause of the misalignment might be the Ti spring blade length. Could you measure its length and confirm with Robert Holler?
 

AlexisBV

Active Member
Good idea. I just measured it at about 175mm. I used a caliper (accurate), but I took the measure without taking anything apart (less accurate), though it's probably good to within say +/- 2mm. I can take it apart tonight for an accurate measurement if required.

Note that a change in the ti link length would imply a change in the angle between the rear stay and the seat stay (or between the rear stay and the frame), though probably very little.
 

super slim

Zen MBB Master
If the screwed plug is further screwed down so half way, like the photo of Ivan's bike, then the angle of the rear stay will change to a more upright position, as it moves in a S curve, as pivots around the two suspension connections to the frame.
The rear suspension is meant to have 25 mm (I think) of travel, so a minimum of 25 mm of Urethane spring needs to be exposed, as I don't think the plastic end will fit into the threaded section of the frame.
 
Last edited:

AlexisBV

Active Member
So I'm reading ratz's build diary, and if I understand correctly, the elastomer should easily slide in/out of the frame through the bottom? Held in place of course by the rear triangle when assembled... Mine is strongly stuck on the frame's threads. Holding the suspension extended, I can't make it budge with my bare hands, only a very slight rotation is possible. I guess to get to the bottom of this I'll have to take it apart tonight, not something I was looking forward to! o_O
 
Top