Tiara Conversion

Kamatu

Well-Known Member
Of course, I'm getting all kinds of distractions here as I try to put the bike together between the baby and dealing with phone calls every time I sit down to try to tweak the brackets. :shock: So, I'm going to cheat.

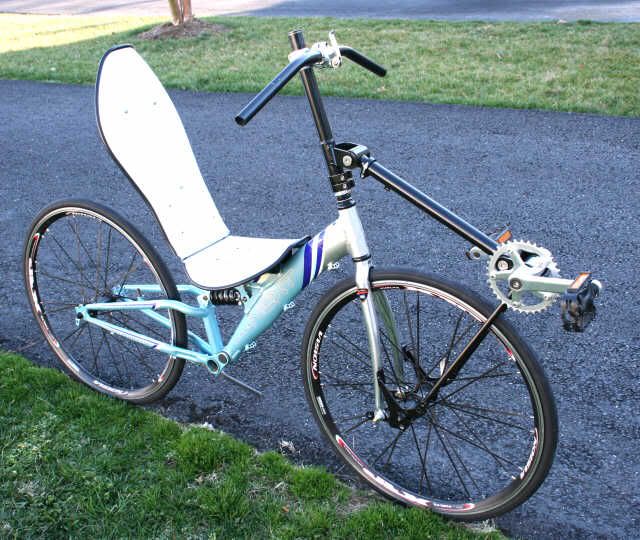
Let me tell you what I have and tell me if I just need to fiddle a bit more or if my setup is wrong. I'm bolting to the forks using the middle hole (examining the pics, it looks like some used the inner hole, some the middle). The setup is as follows, from outside to inside:

Bolt Head - Washer - Washer - Fork - Bracket - Nut. Currently that is great on the distance, but I'm getting some wheel strike on the brake bracket (I pulled the brake to make sure it wasn't that) even when I'm moved far out in the dropout. I'm not 100% sure if it is me or the setup right now.

I did Bolt Head - Fork - Washer - Washer - Bracket - Nut, which gave me nice straight brackets, but they were too narrow and a Bolt Head - Washer - Fork - Washer - Bracket - Nut should also be too narrow.

So, good setup and just keep tweaking the adjustment or redo?

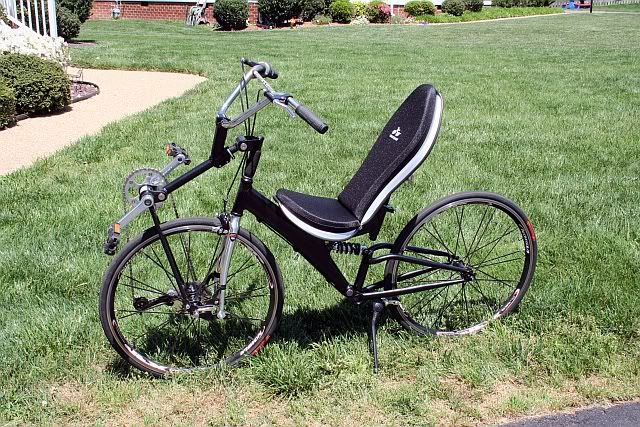
BTW, I'm using the original 24" tires right now. Looking at this photo http://sports.ph.groups.yahoo.com/group/Cruzbike/photos/view/cfde?b=2

My monitor isn't good enough for me to see the details when I zoom in close though.
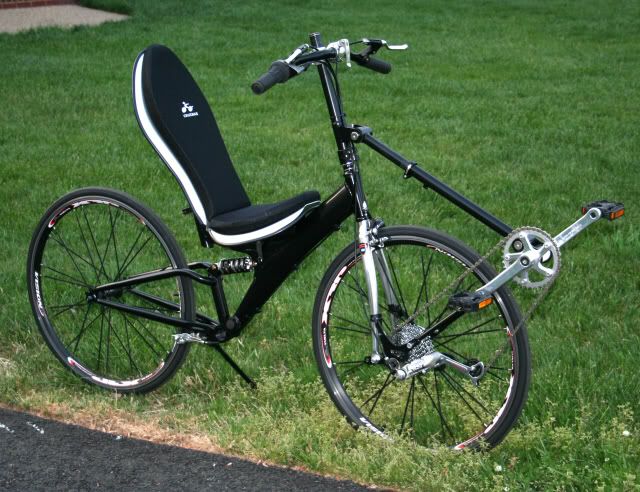
 

Doug Burton

Zen MBB Master
Hi Kamatu,

There should be nothing between the fork dropout and the bracket hole.


Parts installation order - outside to inside:
Bolt-washer-fork dropout-triangle bracket-washer-nut.

Use the bracket hole that places the triangle bracket clamp pad (the tab that's bent 90 degrees at the top of the bracket) as flat as possible against the fork leg, unless there is interference from the fork bottom.

You can reverse the direction of the bolt (put the nut to the outside and bolt to the inside) if you want to get more spoke clearance.

The fork should be turned around backwards - the brake bridge should be facing the rear of the bike and the brakes should be on the back side of the fork. Set up that way, you should be able to place the axle about mid-way down the triangle bracket dropout slot. It is very important for several reasons to rotate the fork 180 degrees - the trail dimension will be negative if you don't and the bike will be difficult to ride and unstable at speed.

Lemme know how you go...

Doug
 

Kamatu

Well-Known Member
Thanks, I'll try that configuration and move back to the inner hole where I had it first (places it real flat, middle hole is almost flat). I think I've got the phone calls calmed down now, they better be, I'm leaving all of them inside. :)

Hardtailcruzer wrote: Hi Kamatu,

There should be nothing between the fork dropout and the bracket hole.


Parts installation order - outside to inside:
Bolt-washer-fork dropout-triangle bracket-washer-nut.

Use the bracket hole that places the triangle bracket clamp pad (the tab that's bent 90 degrees at the top of the bracket) as flat as possible against the fork leg, unless there is interference from the fork bottom.

You can reverse the direction of the bolt (put the nut to the outside and bolt to the inside) if you want to get more spoke clearance.

The fork should be turned around backwards - the brake bridge should be facing the rear of the bike and the brakes should be on the back side of the fork. Set up that way, you should be able to place the axle about mid-way down the triangle bracket dropout slot. It is very important for several reasons to rotate the fork 180 degrees - the trail dimension will be negative if you don't and the bike will be difficult to ride and unstable at speed.

Lemme know how you go...

Doug
 

rearengine

Active Member
78_90306bcba46ef7bda4465f685bcc4f1f
Is this of any help? Bill
 

Kamatu

Well-Known Member
What is that mounted on the right side Bill? Aye, yours was clearly mounted on the center hole where I put mine at first. Doug's method using the inner hole makes the brackets point just slightly inward (stock forks have a slight bulge where the bracket wants to angle out) so that the axle doesn't quite slide in the dropouts, less than an eighth on either side, but get past that and it slides right in perfectly. It made it tight on the chainstay(?) (forks up to BB) fitting, but it all still lined up nicely and the wheel comes in and out fine. I'm glad I'm double checking everything, I got myself backwards and had the wheel on the wrong way so the gears were on the side without the d?railleur mount. :oops:

At least half and probably more than half of my "issues" are me being too delicate. Not that they are big issues except the bracket adjustment and I just got saved some fitting and fiddling time.

Only complaint I have right this minute is that I have some copper/brass bushings and sleeves that don't appear to go anywhere I can find yet, but then I'm just getting to putting the headtube back on after I get something to drink. Ouch, just remembered a second one, for the three part bolt connecting the chainstay to the top tube with BB, the female side requires an Allen wrench larger than what comes with my sets. I got past that problem, but it could be an "oopsie".

Instruction improvement: for the chainstays, a diagram showing from outside to inside:
Bolt Head - non threaded (outer) chainstay hole - steel washer - nylon washer - fork bracket - nylon washer - threaded (inner) chainstay hole would be good. Might be me, but I read that thing several times and I can still read it where the steel washer goes outside the chainstay. It just doesn't fit there when you start tightening down.
 

Kamatu

Well-Known Member
ACK! I need a quill to Ahead converter and such. Hmmm, I wonder if I have some spare conduit lying around here, maybe some PVC. I know I could rig something up to hold the BB up in place. Just get a head start on no hands steering, right?

Oh well, I'll get to pick out some new handlebars and some 1" conduit for a longer seatpost since that seems to be an issue for some of the Tiara's. Bad part is, it will have to be tomorrow and I definitely need to get up early to do some other stuff. It is that time of year and I have to do the final fertilize and till on the garden, we are a week late. At least the wife has volunteered to do the planting while I finish up the bike, although she has already called me several times and asked about how "her" bike is coming..... :eek:

I still don't see what to do with those brass bushings and spacers. The only place that it looks like they could go is when you fit the top tube (TFT Arm) to the headstem tube clamp (Pivot Clamp). The bushings fit right into the top tube (1 on either side of each hole?) and the spacer goes loosely inside the hole. If I put the provided steel washers in between the TFT Arm and the Pivot Clamp, that might even make some sense. I just cannot find these brass bits in any of the pictures. Another spot for an exploded diagram I think if I am right about these.
 

rearengine

Active Member
Kamatu!! Two more pics. to confuse you. The knob on the fork bolt is something I had laying around here. I thought it might help save the derailer if it tipped over. Take care Bill
78_7f8c8b88ef0dec21693c8dec6e980849
78_884184e73182758420827e92dc2d5145
Brass bushings in pic #28
 

Doug Burton

Zen MBB Master
Kamatu.

The brass bushings and spacers are not needed for your conversion. They are used in the assembly of the chainstay to the fork on a Freerider or Sofrider.

As you can probably tell, we get kits by overproducing parts that are part of the full-up bikes. The contract that specifies the TFT-related parts includes the bushings, and they just end up in the kit, where they do nothing but confuse people. Sorry 'bout that, when you deal with producers that usually fill orders in quantities of 5 figures, some of the economies of scale are hard to figure out from our point of view.

Yes, you will need a 1" to 1-1/8" ahead stem adapter.

"although she has already called me several times and asked about how "her" bike is coming..... "

This is a very good sign and bodes well for your future ability to invest in more toys.

Let us know what else you need.

Doug

I love me a Tiara donor bike...

New-1.jpg


Toms-Bike1.jpg


Toms_New_Bike002a.jpg
 

Kamatu

Well-Known Member
Ok on the brass, I was just fiddling with them.

Oops, I posted over on justicezero's thread instead of here by mistake:
Quote: So, in the bike shop wasteland here, nobody has an adapter. Upon further review, the original Tiara stem fits nicely into the kit stem, with the minor problem of the side tube welded to it for the original handlebars. So, wait several days more or fabricate? I've waited long enough.

A little sawzall work takes care of most of the problem. Digging out my old and unused wimp bench grinder and putting an old cutoff wheel to work solves a bit more and wearing out the old, soft and aged stones (that really needed replacing anyway) got closer. Tomorrow, a run to Home Depot for some new grinding wheels, need to go down there for some conduit anyway. I've been too spoiled the last decade, my uncle has a serious bench grinder I've been using for all my grinding jobs that got past a little file work. Unfortunately, he is out of town....

I did do a little research on Sheldon Brown's site and a few others and since I'm going with threaded I shouldn't need to use the long bolt since I'm not going to have one of the star lock washer things, the clamp on the bottom should do the job. If not, I'll let you know.
 

Doug Burton

Zen MBB Master
"since I'm going with threaded I shouldn't need to use the long bolt since I'm not going to have one of the star lock washer things, the clamp on the bottom should do the job."

Correct. It works fine. I've done it that way before; as a matter of fact the black Tiara above was done that way. Tell you the truth, I prefer that arrangement to using the rod to tighten an Aheadset.

Be well,

Doug
 

Kamatu

Well-Known Member
End of day report: Not as much done as I hoped. We slept in since it was pouring a flood outside, had to take care of some biz and did some extra shopping while we were out. Some of it not planned since it took three hardware stores to find new stones for my bench grinder and only by chance did I discover some in the last one buried under some other stuff.

Well, now I can say I have all the parts to at least put it on the road here now. My mod to the original quill stem worked perfectly and the entire front end is now assembled. It didn't help that right after I had cleaned and greased the crank, here came the baby and the new puppy to check on what I was doing. So, after recleaning and greasing the crank, I continued onwards. The kit BB had some burrs on the threads so it was a bit rough to get the bearing cups started. It felt like it was crossthreading and I was worried that maybe my memory had tricked me, but finally I said to heck with it and used the big wrench to crank them in. Then I pulled them out and made sure it wasn't crossthreaded. :p

Seat is prepped, need to fiddle with the pipe I'm using as a seatpost to get it the right length, going to have to mod the base plate so that I can get one of the hose clamps to reach. Hmmm, maybe I'll reverse and notch the other side. Once I have the seat I'll figure out where I want the handlebars. Then it is run cables and adjust the d?railleur some, I set it too high and it is hitting the bike. The bad part is that it may be Monday before I'm back at the house during daylight. :(
 

Kamatu

Well-Known Member
Got home late last night and put the seat on just hand tight. Redid the back support and got it adjusted so it looked good today and added the handlebars. Tried out the fit and I'm going to have to redo the seat, it was real comfortable as a position, but I think I'm just a bit far forward, at least I don't like my crotch that close to the steering column.

Oh, don't forget that the kickstand is down when you are testing the seat. I almost didn't have to try to ride it to bust my butt. Ok, maybe it was talking on the cell while trying to dismount as I tripped over the kickstand. I remembered just in time to simply stand up. :oops:
 

Kamatu

Well-Known Member
Decided against moving the seat just yet, it is comfortable and ought to be good enough for now and I don't want to have to fiddle with bending the seat post and not having a spare. I tried two Home Depots and they were out of the conduit size I needed so I faked up one that is long enough out of a piece of pipe.

Set up and rough adjusted the rear brake, put the front brake on and decided to do the rear d?railleur cable (just going to run without the front one on the middle chainring) before hooking up the front brake. I found out why I was "stupid" enough to set the rear so it was hitting the chainstay. The screw from the Tiara isn't the same size as the screwhole in the fork bracket. Close, but no cigar. It tightens down fine and then as soon as you put any extra tension on the chain, bam, back into the chainstay. The threads in the hole look fine, I'll just have to pick up a bigger size bolt the next time I can get into town. :cry:
 

Kamatu

Well-Known Member
Finally, after a couple of more adventures I'm not going to get into here, it is done. Ok, well, I can sit on it and pedal it anyway, zip strips and stray loops of cable in all their glory. I need a new brake cable for the rear and I still need to work on learning some more about indexed shifter adjustment. I need to find the right size conduit and readjust the seat, my package is waaaaay too close to the steering tube. Reflectors, lights, etc. But it did get on the road and go. Downhill on the little slope isn't bad at all, some wobbles, but they calmed down, but I don't suggest trying to learn going uphill. Main shock was how much and how fast the front end can swing around on you as soon as it starts to lean. Minor shock was how much of a Bad Thing (TM) it is to have your knees start hitting the handlebars, inducing said lean. Good news, when I did dab a foot down, it tried to go right back up. Bad news, the foot wasn't real sure where the pedal was.

Oh, I'm out of shape too..... :oops:

That was fun. :mrgreen:
 

Kamatu

Well-Known Member
Ok, got the seat readjusted, didn't feel quite so comfortable at first as it is much more laid back, but was good riding around. If nothing else, it will do for now. I did discover another problem:

I NEED MORE GEARS! :mrgreen:

Ok, I need to actually learn how to calibrate my d?railleur to my click shift, but that will be for tomorrow.
 

Kamatu

Well-Known Member
I think life is getting busier by the day.... I decided to replace all the cabling and tear down the gripshift (I forgot the "f" the first time, Freud at work) to see how they do their thing. So, now I have some gears, but I have to try something else on the adjusment since it is being a bit flaky, but I do have some choices now. Had a bit more fun on the flat and some quick up and down slope runs in front of my house.
 

Kamatu

Well-Known Member
Ok, finally got around to getting them taken and uploaded. Still more fiddling to do, but I at least cut off some of the more "decorative" bits. My problem is that when my choice is "ride" or "fiddle with bike", I'm choosing ride.

http://www.flickr.com/photos/8024150@N07/2472806127

http://www.flickr.com/photos/8024150@N07/2472806133

BAH! Couldn't get the img function to work, so there are the links. Oh well, you can look at my goats and a picture from a year ago of my boy.
 

John Tolhurst

Zen MBB Master
Mark B wrote: That's looking derned near like a Cruzbike! :lol: Nice job!

Mark
One day, a sweet 8 year old Tiara rider is going to see one of these conversions and have nightmares for a week, about Sid from Toy Story. :eek:
 

Kamatu

Well-Known Member
Ok, I'm having an issue that won't go away. I keep meaning to ask about it, but getting too busy to get around to it (like the wife just wanted me to come troubleshoot the watering system in the garden).

I'm using the stock Shimano grip click shifters (yes, I might change later, no, it isn't going to be in the next few months). New cable fitted on nicely, cable pulled tight, barrel adjust on the d?railleur backed out two turns. H and L adjustments done. No problem dialing in the other gears except....

When I'm clicking the shifter, I can get in every gear except the next to highest (second smallest cog) and adjusting the barrel down as far as I can get it doesn't move it far enough. The "extra" click is appearing in the next to the lowest (second largest cog). Even when I manually switch from the middle to the big chainring, this stays the case (although I cannot use the larger cogs in actual riding since it cross chains on them). I'm thinking that I actually have the shifter cable too tight and need to give it just a bit of slack and start all over again, but I'm going to let you bike guys who actually have worked on these things before give me some input. With the cable disconnected, I get distinct movement of the cable for every click.
 
Top