Andrews V20C Build 2025 discussion (1st time building bike)

kizarmynot

Active Member
What do you mean by struggling?
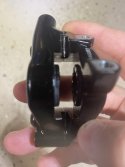
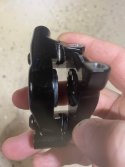
There has to be some space between the cassette and frame or the chain will rub. For reference, that is a 3 mm hex showing gap for my bike. (boy, the closeup shows me I need to do some cleaning)IMG_6695.jpeg
 

Andrew Roerkohl

Well-Known Member
Thank you for the pic, and yes mine matches. Now another question, the sram instruction say your supposed to have a 7mm gap between the casserole and the idler sprocket. I do not think this applies to our cruzbikes. Where is everyone else at for tension? Do you use the gauge and advice of sram? Or do you just know when it feels good? Gonna end my day here, I have the gears dialed in pretty nice. Tomorrow I do what everyone advises for tension and start installing my brakes. Thank you all.
 

Attachments

  • IMG_4487.jpeg
    IMG_4487.jpeg
    1.8 MB · Views: 7

kizarmynot

Active Member
the sram instruction say your supposed to have a 7mm gap between the casserole and the idler sprocket. I do not think this applies to our cruzbikes.
I'm not sure why the instruction wouldn't be applicable for a Cruzbike. I followed the SRAM installation instructions for setting gaps and limits for my mechanical GX and the electronic AXS upgrade. For this component group a gauge is included that makes the gap adjustment easy. As for the gap you have shown, if shifting is sloppy then make an adjustment.
 

Rolling Along

Active Member
Looks that way on my stock V20c. I just put a new wheel on yesterday and moved the 11 speed cassette over. No issues.
Oh, I see more posts. This was in response to cassette space.
 
Last edited:

Andrew Roerkohl

Well-Known Member
Bled my brakes this morning, process went smoothly for once, but the brake pads are still rubbing a bit. Will this very slight rubbing go away as soon as I “bed” in the brakes or should I keep trying to make adjustments. Never done HRD brakes before and they are working and I followed procedure with ease, it just seems the pads are not opening enough after actuation. I will wait till tomorrow to bed them in and see whate everyone says.
 

Rolling Along

Active Member
I watched the video and what I like about the tool is that it stays in place while you tighten the brakes.

I just did the same process on 2 new wheels after moving rotors from old wheels. I did not have to move the brake left/right on one wheel, but I did on the other. I had some old healthcare cards (old credit card would work the same). So I loosened the brake, slid a credit card on each side and tightened. The healthcare cards can fall out. I ended up loosening the bolts and manually sliding the brake left/right as needed. Got lucky. Checked by sliding healthcare cards next to rotor on each side. After that I made very minor tightening adjustments making sure the wheel spun free.
 

Andrew Roerkohl

Well-Known Member
Been following this step by step procedure but the pistons will not gently return to inside the caliper at all. Gonna stop trying and start over. And the pad spacer that came with the brakes looks nothing like the one pictured below
Related Image

Sticky Pistons/Excessive Dead Stroke

Over time, dirt and grime can keep pistons from moving freely. This can result in pads not advancing far enough to provide adequate brake power, or pistons not retracting . To correct this, follow the pad advance procedure as described on page 6 of our eTap AXS HRD Service Manual:
  1. Remove the wheel from the frame and remove the pads from the caliper.
  2. Install the proper pad spacer for your model of caliper.
  3. Gently squeeze the brake lever several times until the pistons have advanced and contact the pad spacer. One piston will always move slightly faster than the other; don't worry about that. Continue to squeeze the lever until the pistons touch the spacer.
  4. Remove the pad spacer and gently push the pistons back into the caliper with a plastic tire lever.
  5. Repeat steps 3 and 4 until the pistons move smoothly and evenly. This can take several repetitions!
  6. Reinstall the pads and wheel and loosen the caliper bolts.
  7. Lightly squeeze the brake lever several times to position the pads correctly.
  8. Center the caliper and tighten the bolts.
 
And the pad spacer that came with the brakes looks nothing like the one pictured below
The photo shows what SRAM calls a “pad spreader.” They make some different ones that do the same thing. I use these sometimes when transporting the bike with the wheels off.

The new caliper pistons are probably a little too stiff for the spring clip to completely push them back in. I’ve never had to perform the “pad advance procedure.”
 

Rolling Along

Active Member
If your brakes are dirty don't forget to clean everything thoroughly while brake pads are removed. I watched a video for disc brakes rubbing that may help, but may be for mechanical. I think the procedure is similar. You can skip to 7:12 in the video (sticky pistons).
Disc Brake Pads Rubbing
 

Andrew Roerkohl

Well-Known Member
Confused again, took brake off bike and all hydraulic lines and calipers will still not recess. They will not move back.
 

Attachments

  • IMG_4489.jpeg
    IMG_4489.jpeg
    1.3 MB · Views: 4
  • IMG_4490.jpeg
    IMG_4490.jpeg
    1.4 MB · Views: 4

Andrew Roerkohl

Well-Known Member
Had to take caliper apart to get the pistons back in, they are brand new, guess they need some working in?
 

Attachments

  • IMG_4491.jpeg
    IMG_4491.jpeg
    1.9 MB · Views: 9

Andrew Roerkohl

Well-Known Member
Well it only took me about 1 hour to bleed and adjust my rear brakes. One suggestion i could of used was you really need to squeeze the brake lever hard when adjusting your gap. I struggled for about 20 minutes trying to keep my brakes rubbing. I mean you really need to squeeze the lever to make sure your distances are set. Gonna redo my fronts after lunch and possible go for a ride (very short) FINALLY!
 

Henri

scatter brain
For setting up brakes first I read about the trick to put something like a credit card either side, pull the lever, tighten the screws. I thought, this was a hard thing to do and wasn't content with the results. Then soneone ranted about how stupid that was: Just put it on straight and screw it on. Now I do it visually, without any aids other than maybe a light, and it works like a charm and my braks are all straight. (I don't use brifters and the corresponding brakes, though.)
 

Andrew Roerkohl

Well-Known Member
Whomever suggested to go for small rides to get the fluid in your tires to plug the holes is a genius. It worked very very well and only took me a few attempts to get it right. I also bought a fluid injector which worked better as well. @Frito Bandito , please do not be afraid of HRD brakes, i am probably the worst bike builder in the world, but I did it, got an 1100 hours appointment at my local bike shop to go over everything and make sure i have everything set up right. Had a lot of difficulty but learned a lot. I am done for the day, gonna spend tomorrow to make all the adjustments to fit me right. Below is a snapshot of my first 10 feet i ever rode on the new baby.
 

Andrew Roerkohl

Well-Known Member
Quick question on handlebars......I bought set of aero handlebars and they are 31.8 but they were slipping at 5nm tightness and yes the space was even on the bolts. I tightened them equally as well. In a crisscross pattern i had to tighten them up to 10nm tightness before they would not budge when lifting myself up. and i did use assembly gel for carbo fiber parts sparingly.....are you supposed to use a lot of it?
 

chicorider

Zen MBB Master
Quick question on handlebars......I bought set of aero handlebars and they are 31.8 but they were slipping at 5nm tightness and yes the space was even on the bolts. I tightened them equally as well. In a crisscross pattern i had to tighten them up to 10nm tightness before they would not budge when lifting myself up. and i did use assembly gel for carbo fiber parts sparingly.....are you supposed to use a lot of it?
Glad the go-for-a-ride tubeless tire setup suggestion helped. Setting up hydraulic brakes is often a fiddly business, especially if your rotors aren't dead-straight (and they hardly ever are). Patience usually wins in the end. And a light coating of carbon paste should do the trick. I also tighten my stem bolts closer to 10nm than 5nm. Glad you're about ready to ride.
 

Andrew Roerkohl

Well-Known Member
So glad you felt the need to tighten handlebar clamps to 10nm as well. Went out and rode bike for a few miles. Got everything super close to perfection. Still got a very slight rotor rub, and still need a very minor adjustment on the derailure, and the brakes work decently. I know I bled them correctly but the part where you “charge” the system after the bleed I may not of squeezed the lever hard enough. So I do have an appointment at my local bike shop where I bought all my stuff so they are gonna help me fine tune it. Would like to say the process was fun but it wasn’t. This winter I plan on tearing everything apart and rebuilding it and will do it every winter until I know how to do it. Thank you all for your help.
 
Top