Lief
Guru Schmuru
Getting a cover for a non-drive wheel can be tricky. It's usually the front wheel for old fashioned bikes (OFB) and perhaps for liability reasons (or because most folks don't want to hurt themselves in the wind) there isn't much of a market.
Ratz and Larry pointed out a couple of options here (http://cruzbike.com/forum/threads/fun-with-wheels.8223/#post-30328) and here (http://cruzbike.com/forum/threads/front-disc-wheel.7896/#post-28705) but I chose to make mine using lessons learned from this site:
http://midwesttrilife.blogspot.com/2013/07/diy-aero-wheel-cover-tutorial.html
The difference I had was I didn't use ABS - because I thought it was too thick/heavy.
I tried Polyethelene (PE) first - there are glues made specifically for PE and even they didn't really work (you can read the science behind why PE doesn't glue well on The Google). Those new glues MIGHT work if you were way better at the scuff, heat, treat, apply, clamp process than I was. Even when I did it *pretty good* I could still pull it apart with my hands. Didn't want that to happen at 45MPH thankyouverymuch.
So I switched to Polypropylene (PP) - because it was thin enough, somewhat light, and seemed seriously rugged - and the glue wasn't glue but rather "weld". Which means it melts the plastic, evaporates, and leaves the two pieces *almost* as joined as if they were originally pieces of the same part.
I chose the transparent one because it was in stock and I wanted them *today* - fast food culture style.
The glue can be kinda messy - but as long as the mess is inside it doesn't much matter.
Some lessons/observations:
* You'll want to try and make your wheel kinda balanced so put the seams in opposition to each other (one at 12:00 and on the other side at 6:00.
* Don't forget to account for the dish of your wheel.
* The folks at catalyst (mentioned in the links above) pointed out that just using electrical tape to mount the covers to your wheels is good enough - they weren't kidding. I've had mine up to almost 50mph, and even with a little wobble in the dish (high spot) they are still just as good on there as they were when I put them on.
* Might want to watch the tape for delaminating over time - but I think it's fine.
* lastly - PP is extremely tough but it appears to be "brittle". By that I mean once a crack gets started it travels easily. My access hole for my valve stem is shaped like an A rather than a U and at the point of the A it started a small crack - then just handling the cover, showing people, setting it down a few times - that crack developed about 1/2 inch, I tugged on it purposefully and it move another 1/4 inch without much effort.
So I welded it to itself (to keep it from progressing and it's fine now - just watch out for sharp inner angles and repair them sooner than later - especially in the inner hub-hole. I suppose using a sharp drill might work great here but I didn't have one the right size.
oh - one more thing. PP cuts like glass. With a sharp utility knife you only need to really score it maybe 1/4 of the way down, then bend it away from the cut and it snaps off nice and clean.
Naturally I failed to take pictures as I did this - I'm just not that organized I guess?
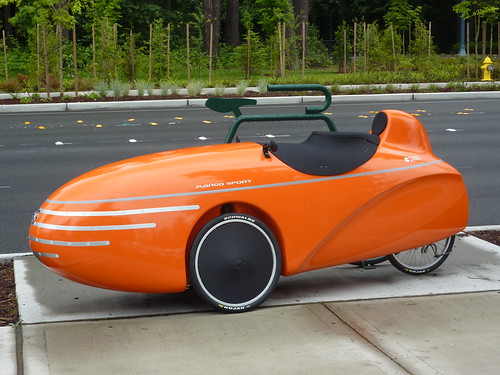
But you can see the good side of the final product in this pic.

And if anyone is interested in the hand-covers I made there too - let me know and I'll post something on that as well.
Ratz and Larry pointed out a couple of options here (http://cruzbike.com/forum/threads/fun-with-wheels.8223/#post-30328) and here (http://cruzbike.com/forum/threads/front-disc-wheel.7896/#post-28705) but I chose to make mine using lessons learned from this site:
http://midwesttrilife.blogspot.com/2013/07/diy-aero-wheel-cover-tutorial.html
The difference I had was I didn't use ABS - because I thought it was too thick/heavy.
I tried Polyethelene (PE) first - there are glues made specifically for PE and even they didn't really work (you can read the science behind why PE doesn't glue well on The Google). Those new glues MIGHT work if you were way better at the scuff, heat, treat, apply, clamp process than I was. Even when I did it *pretty good* I could still pull it apart with my hands. Didn't want that to happen at 45MPH thankyouverymuch.
So I switched to Polypropylene (PP) - because it was thin enough, somewhat light, and seemed seriously rugged - and the glue wasn't glue but rather "weld". Which means it melts the plastic, evaporates, and leaves the two pieces *almost* as joined as if they were originally pieces of the same part.
I chose the transparent one because it was in stock and I wanted them *today* - fast food culture style.
The glue can be kinda messy - but as long as the mess is inside it doesn't much matter.
Some lessons/observations:
* You'll want to try and make your wheel kinda balanced so put the seams in opposition to each other (one at 12:00 and on the other side at 6:00.
* Don't forget to account for the dish of your wheel.
* The folks at catalyst (mentioned in the links above) pointed out that just using electrical tape to mount the covers to your wheels is good enough - they weren't kidding. I've had mine up to almost 50mph, and even with a little wobble in the dish (high spot) they are still just as good on there as they were when I put them on.
* Might want to watch the tape for delaminating over time - but I think it's fine.
* lastly - PP is extremely tough but it appears to be "brittle". By that I mean once a crack gets started it travels easily. My access hole for my valve stem is shaped like an A rather than a U and at the point of the A it started a small crack - then just handling the cover, showing people, setting it down a few times - that crack developed about 1/2 inch, I tugged on it purposefully and it move another 1/4 inch without much effort.
So I welded it to itself (to keep it from progressing and it's fine now - just watch out for sharp inner angles and repair them sooner than later - especially in the inner hub-hole. I suppose using a sharp drill might work great here but I didn't have one the right size.
oh - one more thing. PP cuts like glass. With a sharp utility knife you only need to really score it maybe 1/4 of the way down, then bend it away from the cut and it snaps off nice and clean.
Naturally I failed to take pictures as I did this - I'm just not that organized I guess?
But you can see the good side of the final product in this pic.

And if anyone is interested in the hand-covers I made there too - let me know and I'll post something on that as well.


 Mango Parked
