First Flight

arharker

Member
So, I managed to do this and have two days under my belt. I was going to convert my wife's bike first but am still waiting on parts. I got antsy and finished off my Joshua XO in one evening with a little polishing on the cable adjustments the next morning. I haven't posted a picture because it looks exactly like the other two already on the conversion page (this almost sounds religious).

I have a greater appreciation for everything I have previously read on this forum!!!

The instructions are inadequate. I spent far too much time pondering orientation and engineering; picking the most plausible of several options. Somebody needs to rewrite these from a newbie's perspective! More pictures would be helpful.

I have a question. Instruction number 67 states "If you have an ahead type, place the Insert Collar (Part C6) inside the top of the fork neck tube. Tap it down so that at least 2/3 is inside." Is this really going to work? The OD of the insert collar is just marginally smaller than the OD of my fork, let alone the ID. This is not tapping, I am going to need a sledge hammer.

I am riding this around the parking lot without the insert. I will not put any real torque on the headset until I get some guidance from you all.

BTW - After my first two rides, I also gained a quick appreciation for all the entries under riding technique. My first attempt was so ugly it was embarrassing. I didn't want to shame the neighborhood, so I loaded the bike in my truck and headed over to the high school parking lot (anonymity is soothing to the soul). I was real wobbly to start with and wondering if I had made a very expensive mistake. Within a couple of minutes I was doing nice lazy circles around the lot. I quickly realized I was only turning left and burning that into muscle memory. I forced myself to make right turns, which by this time were much more uncomfortable. I was soon doing figure 8's, wide slalom, straight lines following the lines in the lot. I am by no means ready for prime time (traffic), but this morning I brought the workout back to the neighborhood and managed to get a half hour in without making a fool of myself. Starts and stops are still less than graceful, but I figure that is a matter of achieving a new sense of balance.

The lazy initial workouts are also good for working out the bugs on the setup. I have found the brakes, especially on the reversed front fork have required some attention.

This is going to be fun! I hope I can talk my wife through the first two minutes.

Thanks for your help.

Alan
 

Mark B

Zen MBB Master
Alan,

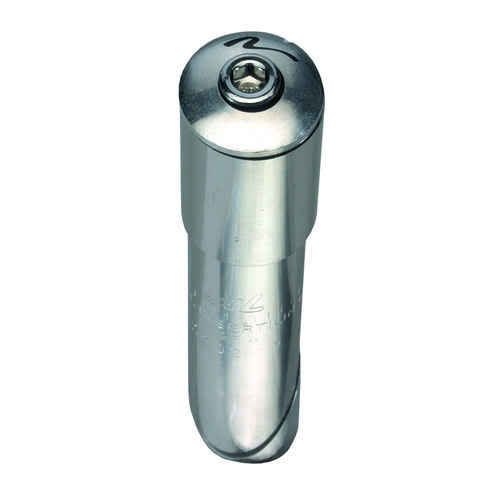
The insert is for 1" steer tubes to adapt them to 1-1/8", which it sounds like you already have 1-1/8".

I'll tell you the truth, it's a rare occurence when a person can jump on a Cruzbike and ride like they've been doing it for years. I have seen it happen, but most of us experienced just the same as you. I was dumb enough to keep my initial meanderings on my own street, though, for God and everybody to see! The first trip, doing well to keep it between the curbs and each subsequent trip narrowing the path until I felt good enough to take to the streets. It takes awhile, trust me. There is no substitution for saddle time, but then again, that's where the fun is!

Welcome to the world of Cruzing! It's good you're dragging your wife along for the adventure. Otherwise, you might not see much of her!

Mark
 

Doug Burton

Zen MBB Master
Well done, Alan. Sounds like you are picking the technique up quite rapidly.

I believe the insert you are referring to is a short reinforcing tube provided for the fork steerer tube. If the steerer tube on your fork is thicker than typical, the insert may not fit.

There are quite a few conversions running around without one; my red bike is one of them. If you are uncomfortable without the insert, you can cut it length-wise and compress it slightly to fit it in the steerer.

If you have a caliper lying around, or some means of measuring the parts, if you could measure the OD of the insert, it would be a good field check for me.

The Joshua makes a great conversion bike. I think you'll be very pleased.

Always, let us know if you need anything or have questions.

Best,
 

John Tolhurst

Zen MBB Master
We can specify the OD of the insert, but the matching ID of the fork neck is something we guess at. If it won't fit, the fork may be strong enough without it.
 

arharker

Member
I pulled the steering tube and checked the measurements. The ID on my fork is 25 mm. The OD on the reinforcement tube is 25.5 mm.

More Questions:

I received the second kit this afternoon and started in on my wife's bike (a Tiara from WalMart). I am cannibalizing components from an old Giant hardtail MTB. The Tiara has the 1" threaded fork. I have traded it out for a fork that will take a 26 " wheel (also 1" threaded) and topped it off with the suggested quill to threadless adapter. I am assuming that since none of the threads match up that there is no attempt to thread the extra long headset bolt all the way to the quill wedge. If this is the case do I just finish off the top of the steering tube with a star nut and a dummy cap?

The brake discrepancy between 24" and 26" wheels is taken care of in front with the new front fork. The back, however, is another issue. Are you aware of anyone who makes brake levers that have enough strength and adjustability to span the 1" difference?

Thanks for the encouragement and help.

Alan

PS - My wife is looking at her emerging bike with a great deal of skepticism. Any pointers on helping someone else to get over the initial jitters?
 

Mark B

Zen MBB Master
You will need a quill stem to 1-1/8" adapter; a pretty common piece at any bike shop.

Just have her watch you having fun, she'll come around as she sees you buying into it.

Mark
 
arharker wrote:

The brake discrepancy between 24" and 26" wheels is taken care of in front with the new front fork. The back, however, is another issue. Are you aware of anyone who makes brake levers that have enough strength and adjustability to span the 1" difference?"

This brake might work? http://www.paulcomp.com/motobmx.html
Peder
 

Doug Burton

Zen MBB Master
Hi Alan,

As Mark says, you'll need one of these:

NS-TSA-NCL-ANGLE.jpg


The stem tube clamps over it.

There are several solutions for the brake match-up.

The brakes Mark listed work; they're also beautiful and unfortunately pricey; these will do the same thing for a little less money:

http://www.danscomp.com/482050.php?cat=PARTS

The third solution is what I used for the Tiara I built for my son:

Toms-Bike1.jpg


I used a road caliper by benting the fender tab on the swing arm 90 degrees to horizontal; it accepts a road caliper very nicely.

Toms-Bike007.jpg


Toms-Bike008.jpg


swingarm1.jpg


swingarm2.jpg


swingarm5.jpg


Let us know what you need...

Best,
 

MagneO

Member
Hello!

I didn't get the bushing to fit either. So far I have ridden only about 100 km but at least there are no problems so far.

I agree to the opinion the manual could have been better.

However, I have a theory about this. Some people think "bottom-up" and others are "top-down". The "bottom-up" people will typical make a manual like this. One step after the other and suddenly the product is complete. However if you are a "top-down" person (like I am to a large degree) you implicitly expect the manual to present the goal (the finished article in other words) FIRST. This is what we are going to do, and THEREAFTER how you are to reach that goal.

The above is perhaps not of much use, so I will offer a concrete suggestion. Include a "exploded view" drawing. This drawing could presumably identify all the parts and how they are to fit together.

But do not misunderstand me I love the bike, my riding technique is getting better and there is no doubt the cruzbike is very comfortable to ride.

Best Regards,

MagneO
 

Mark B

Zen MBB Master
I think all of us struggled, to some degree, with the construction of our bicycles. I found that most assemblies were detailed in photos in one fashion, or the other, if you flipped through the manual enough. I agree it probably could have been done better, but it seems adequate. The construction is pretty straight forward. The problem lies in trying to make the kit universal enough to work on many bicycles. To do this, they have to include widgets you may or may not need in your particular build.

Mark
 

John Tolhurst

Zen MBB Master
I'm very much a top down person, but had to write the manual step wise. If you study the many pictures, the top down concepts are represented, an exploded view would be good, that is true.
 

arharker

Member
Thanks again for the advice and ideas.

On the stem issue, I already had the adapter in place. I was asking about finishing the top of the extended tube and whether that needed to be connected to the fork the way my Joshua XO did. I think I worked through that one adequately.

I really appreciated Doug's suggestion on the road brake for the Tiara conversion. I did not have the convenient tab for the fender, but it was fairly simple to fashion a bracket out of some 1/4" steel that drops right into that kickstand bracket. I kept the tolerances pretty tight and notched the piece on either side to keep it from rotating. A road brake then dropped right in and works perfectly. I am still waiting on a stem and handlebar in order to finish this one up.

Here is my next question:

On the Joshua, it is clear that this bike was never designed to go as fast as I am currently capable of traveling (high pressure tires, etc.). I am by no means flying down the road, because my confidence level is not at full strength yet. I do find, however, that going downhill even on modest slopes my pedaling speed exceeds the maximum gear ratio. The Joshua is set up with an 11-30t 8-speed rear cassette (pretty standard stuff), but the front rings are small (20/32/42). I have never used the 20t ring. Any suggestions on a more reasonable chainset for this bike? I have never changed out a chainset before. Are there compatibility issues that I need to watch out for? I am currently set up with Sugino cranks on a square taper bb.

BTW, riding is getting much better. I still feel that I am going to slide out of the seat on my turns, so I am not trusting the lean as much as I should. This too shall pass. No crashes to date, just clumsy starts and stops.

Alan
 

Mark B

Zen MBB Master
I would find a road crankset. With the rear cluster you have, a standard road double (52/39) would probably suffice, but because of the bottom bracket you have, I'd go with a road triple (52/42/30). You may or may not need to change out your front derailleur. If you're willing to change out the bottom bracket, then I would go with the road double. I would not go with the new "compact" cranksets as they are designed for ten speed, much thinner chain. The 39-30 combination wil allow you to climb just about anything and the 52-11 will give you real good top end.

Mark
 

arharker

Member
Did some self instruction (actually a great Sheldon Brown article). I have a compact crankset (94/58). The best I can do in changing the rings is to push a 46/36/24 chainset. I do not think that buys me much. It is time to look for a compatible road crankset.

Alan
 

Mark B

Zen MBB Master
arharker wrote: Did some self instruction (actually a great Sheldon Brown article). I have a compact crankset (94/58). The best I can do in changing the rings is to push a 46/36/24 chainset. I do not think that buys me much. It is time to look for a compatible road crankset.

Alan

Right, yes... If you don't want to change out the bottom bracket, find you a road triple crankset (52/42/30) and like I said, you may have to change out the front derailleur. That should get you all the gearing you need and more!

Mark
 

arharker

Member
So I took the next step. I found two Campy cranks (52-42-30). The cranks arms are 170's rather than the 175's that were on the GF Joshua. I like the shorter crank. It feels more natural and keeps my knees that much further from the handlebars.

My new problem is the derailleur. The relatively cheap Shimano STX that was on the Joshua took up the new crank just great. It handles the large chainring and the 22T differential. I had a Deore on the Tiara conversion and it can't handle it. Other than finding another STX on Ebay, any suggestions on a moderately priced derailleur (35mm, top pull, 52T max, 22T differential, triple)?

Thanks once again for the advice. I love the tinkering, but it has been 15 years since I immersed myself this deep in the components. A lot has changed.
 

arharker

Member
Here is the real problem with the derailleur geometry question. I do not think that even the STX will work on this bike when it is set up for my wife. When I test-ride my wife's bike the chainstay angle is about 66 degrees (I am 6' 2"). That is within the recommended range for most front derailleurs. When my wife rides the bike (she is 5'4") the front bracket is pulled way in and the chainstay angle is almost 90 degrees. This rotates the cage around towards the top of the crank and diminishes the effective range the chain can travel up and down. The chain drags on the cage crossbar when I try and shift down to the small chainring. Is there a triple that is flexible enough to tolerate such a range? Or am I doomed to putting the MTB crank back on her bike?
Thanks for any advice you can offer.

Alan
 

arharker

Member
So here is what I learned in tinkering with the front derailleur and the front triangle geometry:

This is all set up with a Shimano STX TP triple front derailleur (adjusted as close to the top ring as I can possibly get it) and a 52/42/30 crankset.

With the adjustment tube set at 9, the chainstay angle is about 65 degrees. The chain can sit on the 30T small ring and still make it to the smallest sprocket (no I don't ride here) but the chain starts to barely bump the outside cage wall. In this configuration, shifting through the entire range of gears is smooth and everything runs like a charm.

With the adjustment tube set at 6.5, the chainstay angle is about 75 degrees (most derailleurs recommend a range of 66-69 degrees) and the derailleur relative to the chain has been rotated towards the top of the crank rings. This diminishes the vertical fall the derailleur can allow the chain. With the chain on the 30T ring, I can shift down to the fifth sprocket (of 8) before the chain starts to drag on the cross piece. Set at 6.0 and sprocket 5, it drags on the crosspiece. BTW - this was measured on my Joshua conversion. Although I have not done the specific measurements on my wife's Tiara, the chainstay angles are approximately the same.

What this all tells me is that if you are relatively short (is that PC?) and are going to be setting the adjustable bar at less than 6, there is no way to run a triple road crank with anything near 22T differential. A double will work. A triple MTB crank with a smaller differential might work as well. I have given up on this one (for my wife's bike) and purchased the FSA RPM dual crank that was recommended in another thread.

The only other alternative is to find a derailleur with a deeper tail on the cage, or find a way to adjust the derailleur away from the mounting tube to compensate for the unusually large chainstay angle.

Alan
 

arharker

Member
Trying to figure out this picture thing. Hope i get it right. Here is my Joshua conversion

This is how it began, or ended its life, depending upon your perspective.
162_f370a09cddd238d41b026c85873e2109


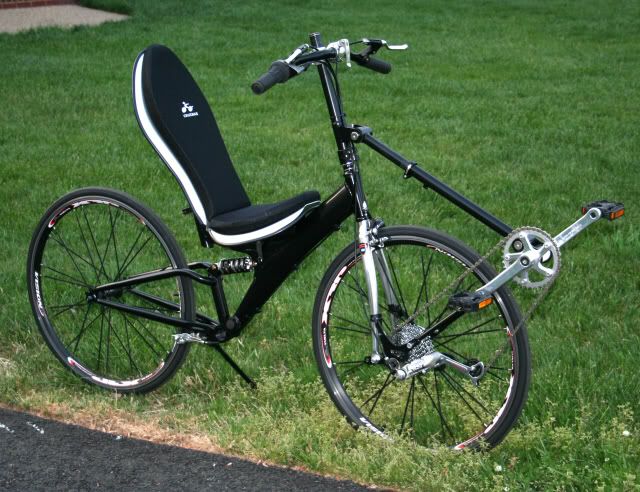
And here is how it looks today:
162_d88b032804af69c4fc1e95a73e7d1076


Pretty straightforward conversion. I have changed out the Sugino MTB front triple with a Campagnolo road triple. This one was easy and I have been riding for over a month now. Feels more natural every day.

Alan
 

arharker

Member
And this is my wife's bike, which has been a more difficult project.

This is its former incarnation straight out of our local big box WalMart for $98.57

162_90b352dbc1533ce8a44de0b7d519c401


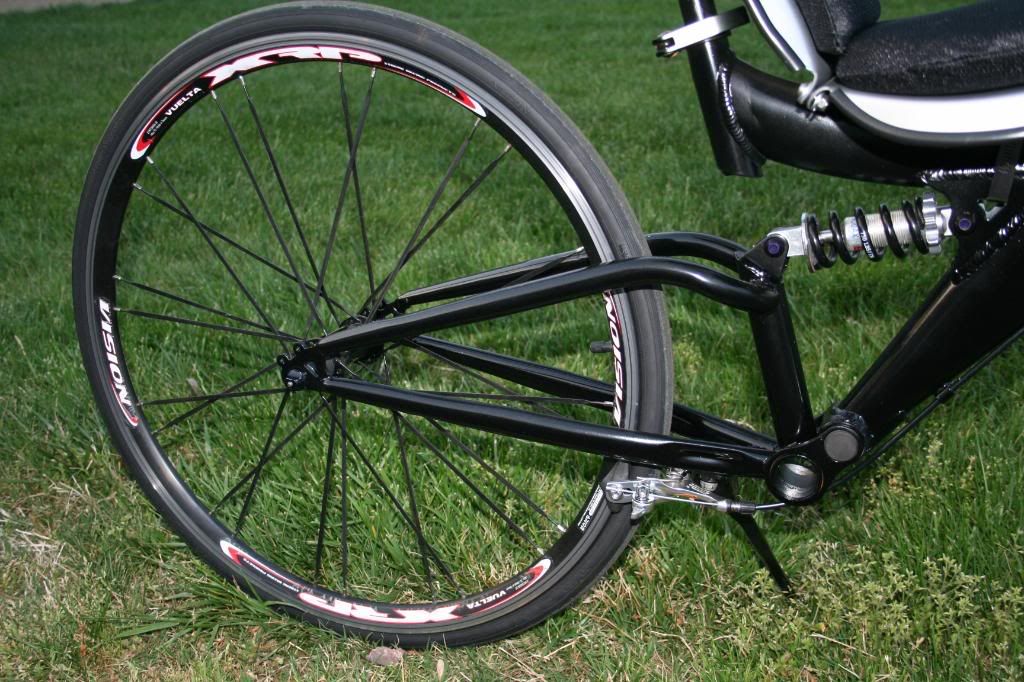
The bike was basically stripped to the frame and all of the clunky components donated to repairing my grandkids bikes. We then rebuilt from the ground up to the point you see here.

162_c1a234080f3dd74e08eb4b8e0aa43dd3


If you look closely you will see the same Campy road triple on this bike that is on my Joshua, and no derailleur. Because of the open chainstay angle, there isn't a derailleur alive or dead that will handle the small crank ring. So I am in the process of switching out the 52/42/30 triple to a 50/36 double. Should do the job and will work with the Deore front derailleur that I have on hand.

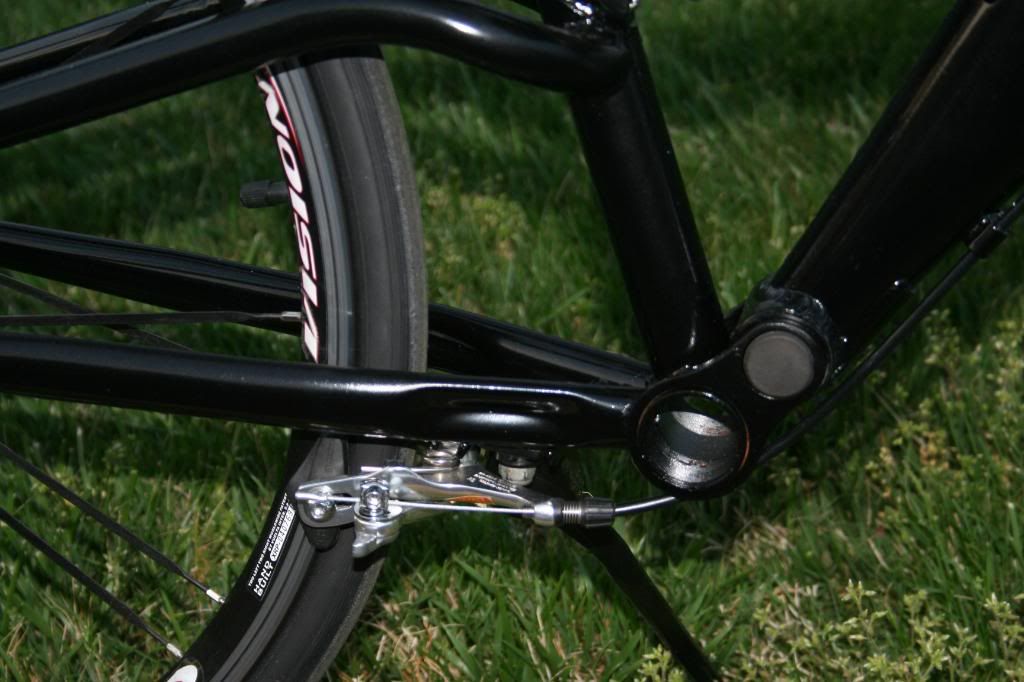
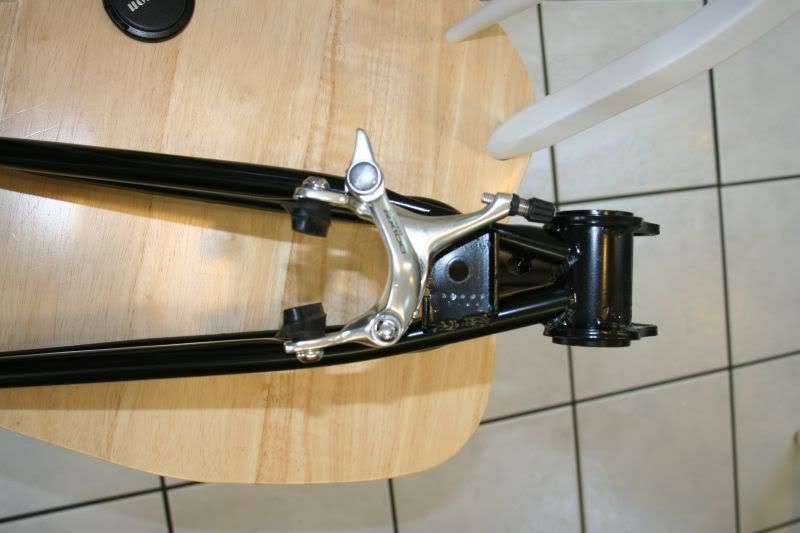
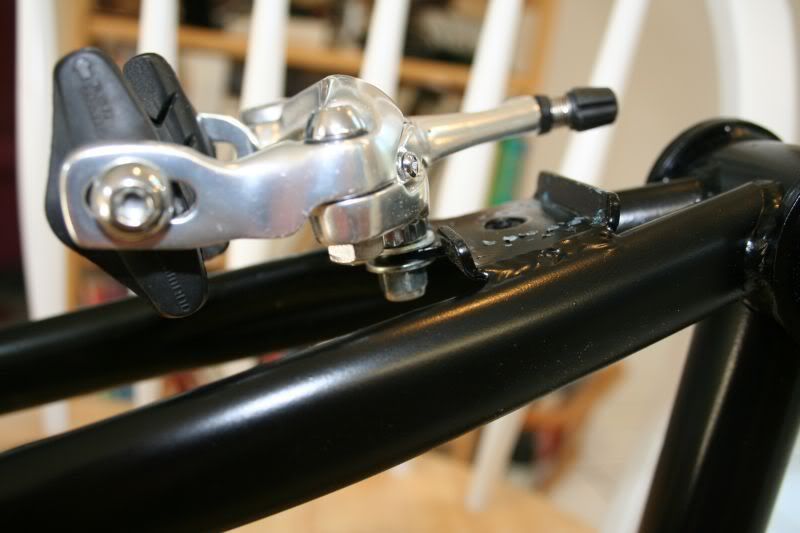
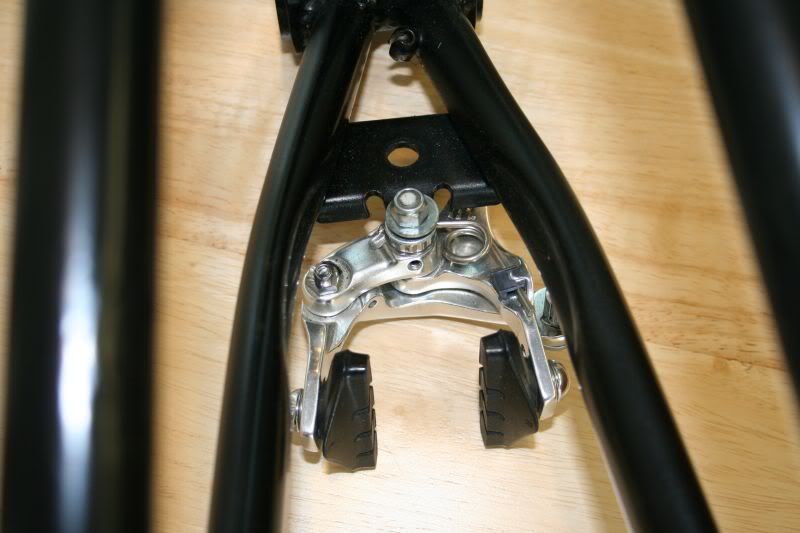
I also converted this bike from 24" to 26" wheels. That necessitated a "new" front fork (ebay $10.50). That also messed up the rear brake configuration. Doug suggested bending the fender tab out, but this version of the bike didn't have a fender tab. I therefore removed the kickstand and manufactured an extension to the kickstand mount that would hold a nice road brake.

162_a29ae03d980798c9d7d59d19718041f8


I bought steel stock that was thick enough to withstand bending under braking pressure and wide enough to require notching to fit in the bracket. This prevents any slippage or rotation. The piece is just a few inches long. I tried aluminum, but the braking pressure did a number on it. The steel bracket required a slight bend in the middle to orient the brake properly to the rim. Works like a charm.

Getting lots of looks here, but no responses, so I guess I am launched.

Thanks for all your help.

Alan
 
Top