Giane Suede as a donor?

Gumby_Mac

New Member
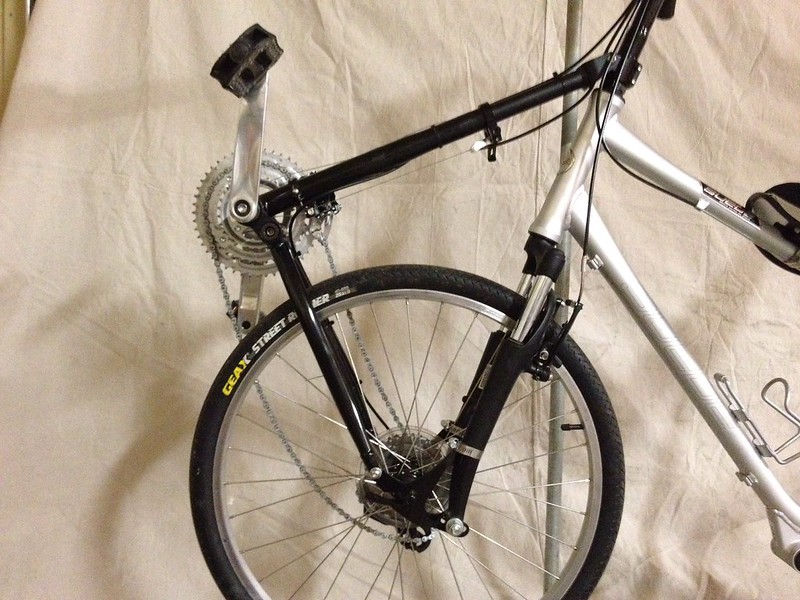
I've had a Giant Suede DX for several years and I've been wanting a Cruzbike for the last year or so. I've been reading the conversion board for the last few weeks and I'm still trying to figure out what all I need for a good donor bike. Then it occurred to me, maybe I've already got a good donor in the garage!

This is a picture of my bike (taken from the web).

Giant-Suede.PNG

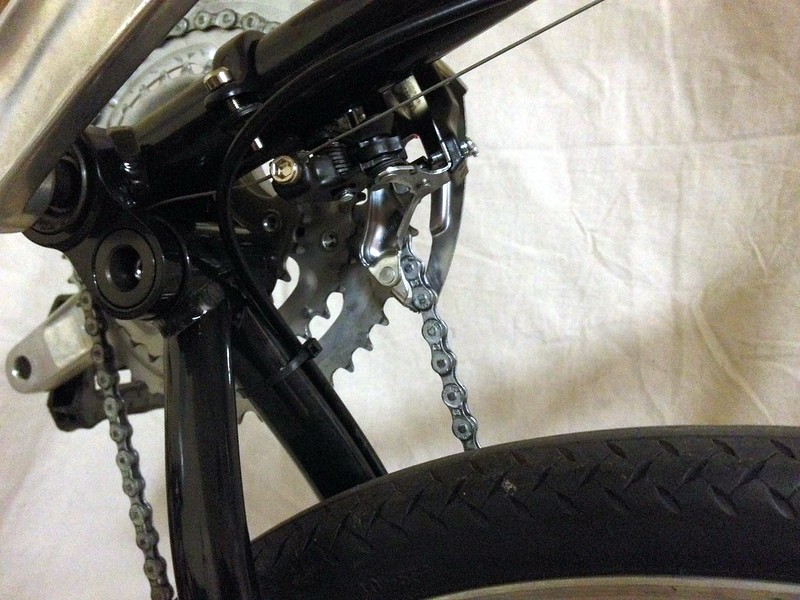
It seems like the top tube is perfect... it's lower than the top of the rear tire, the cable guides are on the bottom. The brakes are linear pull. The headset is not threadless if I understand the threadless/non-threadless part. I already put some high-pressure tires and tubes on last summer. I would think the components on this bike are better than anything I could find on a low-end bike at a big box chain store. Am I missing anything else?
 

Charles.Plager

Recumbent Quant
As you pointed out, seat

As you pointed out, seat height is the biggest issue and you're probably fine there (depending on your height).

I don't see any show stoppers here and if it turns out that for whatever reason it doesn't work, you can find another frame to try easily enough. I'd say go for it.
 

Jake

Member
I'd be happier if it were a

I'd be happier if it were a steel frame, but as long as you're not too heavy it'll probably be fine.

Looks like you'll need a new seatpost though.

Jake
 

Gumby_Mac

New Member
I thought an aluminum frame

I thought an aluminum frame was preferred since they were lighter? I will probably need a new seatpost nad definitely need a new headset.
 

Charles.Plager

Recumbent Quant
The Sofrider and Quest are

The Sofrider and Quest are both aluminum frames as are most donor bikes. Unless you are close to the weight limit of the bike (usually but not always ~ 250 lbs), I wouldn't worry about it too much.

Yes, you'll need a new seatpost, but I don't think you'll need a new headset, but rather a threadless headset adapter.
 

Gumby_Mac

New Member
I received my conversion kit

I received my conversion kit last week and I started the install last night. Luckily I had all of the Park bike tools to convert the front wheel and remove the crank arms and bottom brackets. I tried to take a lot of pictures and I have a few questions.

I had a hard time getting the seat pan bolted to the back rest. There was barely enough thread on the bolt for the nylon lock nut to grab ahold of. The rubber "washer" (grommet) may have been too thick too. The instructions say I can loosen these two bolts to adjust the backrest angle, but if I do, they're going to pop out. Maybe I just need to get some longer M6 bolts at Lowes.

9624269831_0a1c40cbaf_z.jpg


I have a problem with the seat post and seat tube. The seat post that came off my donor bike was 30.8 and it was a weird suspension post. The top doesn't taper down to 1" to fit the back rest clamp. I have a 1" seat post, and I can order a shim, but I'm wondering if I need to get a lay back seat post. The only laid back seat posts I can find are 7/8". Here's my seat pan and back rest mocked up.

9624384099_aed57e7e1c_z.jpg


9624384759_bba6c592a9_z.jpg


I also had to flip around the seat pan mounting bracket. The instructions called for the high side to be facing the front, but that seemed to kick the front of it up too high. I tried to mount the bracket so that the trailing edge was 8" from the seat tube as called for in the instructions. How does it look to you guys?

Other than that, it looks like I'll need to order a new front derailleur. The one from my donor was too small for the front tube on the kit.

Here's a link to my build photos on Flickr: ?http://www.flickr.com/photos/gumby_mac72/sets/72157635289786869/
 

Charles.Plager

Recumbent Quant
For the laid-back seatposts,

For the laid-back seatposts, I use a seatpost shim (even less of a concern than usual as your whole weight isn't on the seatpost).

As far as the bolts attaching the seat pan to back - yes, get longer bolts. :)

Otherwise, looking good. Keep the updates coming.
 

Ian Smith

Member
Handle Bars

Take the handle bars off, turn them around 180 degrees (so the left is on the right) and then turn them upside down. This will place them around 50mm further forward (2" for those that aren't metric) anda little lower. The seat post location will be better and you may not require a layback seatpost initially, although if the position of the BB is anything to go by then you may still require the layback seatpost and to retain the current handle bar location.
 

Doug Burton

Zen MBB Master
the Seat pan mount...

... is designed to allow use in either direction; this installation looks fine.

Sometimes the "weird" seat posts' clamps have enough angular adjustment range that they can be turned almost 90 degrees and used directly on the seat back rails in place of the clamp we provide.

There are shims to mate 7/8" (22mm) seat posts to 31mm seat tubes; you can usually find one on Amazon, or at Problem Solvers.

This bike looks like it's coming together well. Good luck on finishing, and send pictures!

Best,

Doug
 

Ian Smith

Member
Been there done that

Give it a try wit hthe bars as they are. If you feel like the blood is draining from your hands or you feel cramped (and you have sufficient knee room, turn them around and upside down. Doug, I've had to do exactly that for comfort.
 

bladderhead

Zen MBB Master
So many minutely different

So many minutely different designs of mountain-bike. I had to use home-made wooden spacers to make my conversion-kit work. I turned the handlebar stem forwards and backwards, and the bars up and down, innumerable times. I made it work by fitting a sloping handlebar stem. I had to cut and drill the frame to make the gears work. The bike hasn't collapsed yet.
 

Gumby_Mac

New Member
I got the Cruzbike finished

I got the Cruzbike finished enough to take it for a quick spin about 10PM last night. SO. AWESOME. It's very weird at first since it's front-wheel-drive and the cranks are part of the steering system. I almost spilled it when trying to do a donut at the end of the street but it's a super comfortable ride. I have plenty of room in the cockpit too. Knees don't hit the handlebars and I don't feel cramped.

I do have a few problems left to resolve. The angle of the chainstays relative to the seat tube seems to be too large (nearly 90 deg) so the chain is dragging on the bottom of the front derailleur cage. Not sure what I can do about that, it seems to be a common problem amongst conversion kit owners. From what I've read on the forums, I need to move the seat forward so that I can let out the TFT and lower the BB. The angle of my top tube on my donor is kinda steep and I'm worried that moving the seat pan forward is going to move it up and make it hard to straddle at a stop. Can you buy a top-pull derailleur with a longer cage? I noticed a few years ago, folks were recommend a 2 & 10 drive setup (two chainrings and a 10-speed cassette). Right now I have a 3 & 7 setup. Since I can't stand over the frame to climb a hill, wouldn't a smaller chainring be important?

Finally, my crank to rear axle length is shorter now (by about 3") so I need to break the chain again and take out some links.

Now for pictures!

9687024270_31ea7d8172_c.jpg


9683785175_4376fc45f1_c.jpg


9683783949_99c071be65_c.jpg


9687020900_268fd19f21_c.jpg


9687019762_558093e6b2_c.jpg
 

Gumby_Mac

New Member
Upgrading conversion kit to V2/K frame set

I really enjoy riding my conversion kit, but after installing the front derailleur, I had to make adjustments to the front drive train which meant moving the bottom bracket further out and moving the seat forward and up the top tube. I'm now sitting pretty high up and I'm thinking it might be time to fully invest in the Cruzbike Kool-Aid and move my conversion kit components to a V2/K frame set. I assume a lot of my components will move over, but I'm not so sure about the front fork. It's threaded and I have an adapter on it now. It looks like the head tube on the V2/K is not long like on my Giant Suede either. So do I need to purchase a suspension front fork with a 1/18 threaded steerer tube? Something like this:[URL='http://www.jensonusa.com/Bicycle-Suspension-Forks/Rockshox-XC28-Suspension-26-Fork" text-decoration: underline;">http://www.jensonusa.com/Bicycle-Suspension-Forks/Rockshox-XC28-Suspension-26-Fork[/URL]

Here's my build album with close-ups of my current front fork: https://www.flickr.com/photos/gumby_mac72/sets/72157635289786869/
 

SamP

Guru
A suspension fork is not

A suspension fork is not necessary but probably desirable. However a lot of forks will have disc brake mounts which are incompatible with the FWD brackets. I bought a RockShox fork and cut/ground off the tabs with a dremel-clone tool. That chain seems awfully loose.
 

Gumby_Mac

New Member
RockShox

I was actually looking at a RockShox fork on Nashbar. Seems like a good balance of fit/quality/price. There's a lot of carbon fiber options but those obviously won't hold the weight of the CB drivetrain.

The chain has since been tightened. The LBS fixed my front derailleur and got everything tightened up. The only problem I'm having now (aside from riding up so high and close to the stem is the creaking coming from the stem area. With every down stroke I get a "torque creak." I don't know if it's coming from where the handlebar is connect to the stem or where the threadless adapter goes into the head tube.
 
Top