seat angle adj. 2022 Q45; shock creaking

ReklinedRider

Zen MBB Master
Liking this Q more and more, so I'm interested in getting the seat back angle a good bit lower. Ideally I'd like to get it to 45degrees since that was what was on my Silvio 1.5 and to me was ideal because i did not need a headrest ever and it was way more aero than bolt upright. I seem to be maxed out at around 57 degrees. Does anyone know the lowest this seat angle can be within the limits of this bike and if so, how to get there? If I remember correctly, some of the earlier Q's could go back further but not sure on this 2022.

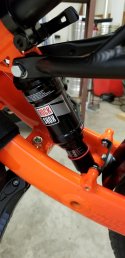
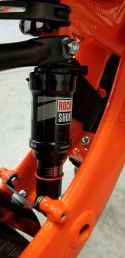
Also.....the spring shock creaks a lot, mostly when going over minor road bumps. After all the other creaks I initially had were fixed, now the shock has chimed in! Can it or does it need lubrication? If it can't be fixed I'll just live with it, but it would be great to get rid of the creaking.
 

cpml123

Zen MBB Master
Liking this Q more and more, so I'm interested in getting the seat back angle a good bit lower. Ideally I'd like to get it to 45degrees since that was what was on my Silvio 1.5 and to me was ideal because i did not need a headrest ever and it was way more aero than bolt upright. I seem to be maxed out at around 57 degrees. Does anyone know the lowest this seat angle can be within the limits of this bike and if so, how to get there? If I remember correctly, some of the earlier Q's could go back further but not sure on this 2022.

Also.....the spring shock creaks a lot, mostly when going over minor road bumps. After all the other creaks I initially had were fixed, now the shock has chimed in! Can it or does it need lubrication? If it can't be fixed I'll just live with it, but it would be great to get rid of the creaking.
Oh I guess they didn't change the seat support tube angle for 2022 model to the pre 2021 model? :-( I was hoping they would. I heard it used to recline much lower to something like 35 deg.
 

ReklinedRider

Zen MBB Master
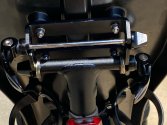
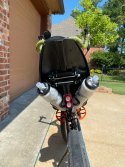
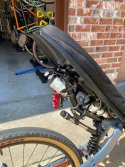
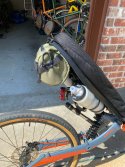
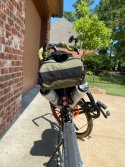
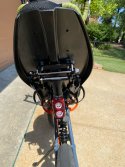
So.....never mind on the 'how to change seat angle to 45degrees' question. Found an earlier discussion and went from that. Took the U-shaped hoop or bracket out and connected the seat post directly to the bracket on the back of the seat as suggested by Robert Holler using some washers I had in the parts bin. Worked just fine. The maximum lowest seat angle doing this turned out to be 44degrees at the lower end of the backrest and 47degrees at the top (both measured without the cushion). I can certainly live with that for my purposes.
Photos attached. Obviously, when doing this the second quick release skewer isn't necessary but I left it in place to provide a secure anchor for the bungee cords that came with my bag.

BFFB48A0-2D55-43E0-B751-92CBFDC87448.jpegEB54A2B2-BCD6-4CD1-B360-A66189542DC5.jpegB524490E-8E4F-404E-9248-5DA905214B37.jpeg13AE8827-B58F-4F27-8BF7-7F25B67B6016.jpegD3977703-81AC-491A-B7D1-A9054DDADEC8.jpeg7BC2E5C1-767C-4B17-8A47-0CF88A930F02.jpeg
 

cpml123

Zen MBB Master
So.....never mind on the 'how to change seat angle to 45degrees' question. Found an earlier discussion and went from that. Took the U-shaped hoop or bracket out and connected the seat post directly to the bracket on the back of the seat as suggested by Robert Holler using some washers I had in the parts bin. Worked just fine. The maximum lowest seat angle doing this turned out to be 44degrees at the lower end of the backrest and 47degrees at the top (both measured without the cushion). I can certainly live with that for my purposes.
Photos attached. Obviously, when doing this the second quick release skewer isn't necessary but I left it in place to provide a secure anchor for the bungee cords that came with my bag.

View attachment 13538View attachment 13539View attachment 13540View attachment 13541View attachment 13542View attachment 13543
Ok... that's what I did too. I was hoping there is some magic to make it go lower so that I can make it a Q35 with a Thor seat. That would be really sweet - fast, climb, and cushy with suspension! And can travel in a luggage! Oh well.
 

Rampa

Guru
It look like the bracket has two slots. Put the seat-brace end in the upper slot (where the extra skewer is in the pics), and you may gain another couple degrees.
 
@rfneep was able to lay back some more by replacing the seat post with a steering stem.
I wonder how well this has held up. I'd be concerned about having more weight on a potentially weak stem.

And, yeah, even though most Q45 users prefer the more upright position, the newer seat tube has limited the ease of personalization.
 

Parker135

Member
I just did the same to my 2021 Q45, doing away with the bracket and connecting directly to the seat post. I asked Robert about future availability of a different seat post as was discussed last year, but they haven't ordered new frames since then, and he didn't commit about there being a replacement any time soon. Like you, I'm finding the seat angle pretty comfortable now.

I believe I read about the squeaking shock problem which someone tried curing with silicone spray, which made it worse. If I remember correctly, an aerosol oil lube cured it. I'm planning to switch to an air shock after I sort out what kind of additional mounting hardware I may need. Currently looking at the Rockshox.
 

billyk

Guru
Currently looking at the Rockshox
Never used the Rockshox so I can't compare directly, but many here have used the Kind shock A5 RR1. See lots of discussion here over the years. It's possible some are better but the Kind has three things going for it:
- Very light
- Very cheap
- Easy to tune the positive and negative chambers to minimize rebound
- (bonus) Holds air for at least 2000 miles over city streets and potholes. (Seen on my two generations of Q, with two different-length shocks).

I have a pump for it but really don't need it in the city since any bike shop would let me pump it up with theirs ... not that I've needed it.

Pumping it up has been more or less a spring and fall checkup thing. Yes, the inlets aren't conveniently placed - you have to undo one end of the shock to reach both - but it's such a rare task that it's not a big deal.

I could definitely believe that some more expensive shocks are "better" in some ways, but the points above mean the Kind is in the running.
 

1%Grade

Member
The upper shock mount holes on my 2021 Q45 are too big for the shock mounting bolt. The excessive play results in a very aggravating rattle and squeak. I think the only solution is to replace the shock, and drill out the mounting holes for the next size up mounting bolt (10 mm?).
 

Parker135

Member
How loose are the holes? Can you tighten down more on the quick release to apply more side pressure on the shock? How many miles on your bike? This is a bit worrying.

If possible, I would try reaming the holes to a standard size to insert bushings in each side before going to a larger bolt.
 

Parker135

Member
You happened to catch me in the middle of changing to a Rockshox. On my 2021 Q45, the quick release bolt has worn down to about 7mm in diameter. I've been hearing a rattle sometimes also, and that's probably it. I tried the lower trunnion bolt in the upper position, and the frame holes don't seem to have much wear. I'm going to change the upper to a standard bolt. I don't care for the way the shock bushing rests on the threads of the quick release, and after seeing this much wear, I'm going to change it.
 

1%Grade

Member
The threaded end of the bolt bears on the frame mount hole, and it does seem to have worn down. Possibly the bolt has worn inside the shock “bushing” as well. I tried to replace the bolt with a new 8mm bolt, but there is still a good 1mm of play in the frame holes. I bought the next size up english size bolt and it’s better but still rattles and squeaks. This is a poor design that has all hard mating surfaces. Even the shock bushing is hard. I’m sure your Rockshox mount will have polymer isolators, this isn’t high tech. If your Rockshox works well, please post a little info and I’ll copy what you did.
 

Parker135

Member
I completed the Rockshox installation, at least for now. I ended up using an 8mm bolt (50mm long, I believe) for the upper connection. I'll probably convert to an Allen head, but this gets me back on the road. I found a Chinese source for titanium Allen head screws; the trick is to get enough grip length so the shock bushing isn't resting on threads. I agree that it would have been better for the upper mount to be thicker or have pads welded on to provide more bearing surface.

I'm also curious about the lower mount. I found that if I reef down too much on the lower shock mount, it bows the rear fork legs together enough that it's difficult to remove and install the wheel. A couple of very thin washers on either side of the shock might work as well, but I'd almost have to cut something from shim stock. I'm going to Loctite the screw into the end of the trunnion bolt and just snug it up. This is still an open issue depending on how the dropout spacing is affected.

I didn't order a bushing kit along with my shock, thinking I could re-use the originals. It turns out the 8*48 mm bushings kits are difficult to source. I got an inexpensive set off Amazon that fit beautifully, but they're hard plastic. Time will tell how they work out. Here's a link: https://www.amazon.com/dp/B07MP3FK5G?ref=ppx_yo2ov_dt_b_product_details&th=1&psc=1

After getting everything together, I find that it takes close to 250 psi in the shock to keep the sag at a reasonable level (I weigh 170-175). After riding the local streets and alleyways, it seems like the travel is about right. Not sure how it will be with loaded panniers, though.

Good luck with your installation. By the way, the rear rack dictated the orientation of my shock to clear the air valve.
 

Attachments

  • Rockshox Left Side.jpg
    Rockshox Left Side.jpg
    813.8 KB · Views: 13
  • Rockshox Right Side.jpg
    Rockshox Right Side.jpg
    754.5 KB · Views: 13

cpml123

Zen MBB Master
I completed the Rockshox installation, at least for now. I ended up using an 8mm bolt (50mm long, I believe) for the upper connection. I'll probably convert to an Allen head, but this gets me back on the road. I found a Chinese source for titanium Allen head screws; the trick is to get enough grip length so the shock bushing isn't resting on threads. I agree that it would have been better for the upper mount to be thicker or have pads welded on to provide more bearing surface.

I'm also curious about the lower mount. I found that if I reef down too much on the lower shock mount, it bows the rear fork legs together enough that it's difficult to remove and install the wheel. A couple of very thin washers on either side of the shock might work as well, but I'd almost have to cut something from shim stock. I'm going to Loctite the screw into the end of the trunnion bolt and just snug it up. This is still an open issue depending on how the dropout spacing is affected.

I didn't order a bushing kit along with my shock, thinking I could re-use the originals. It turns out the 8*48 mm bushings kits are difficult to source. I got an inexpensive set off Amazon that fit beautifully, but they're hard plastic. Time will tell how they work out. Here's a link: https://www.amazon.com/dp/B07MP3FK5G?ref=ppx_yo2ov_dt_b_product_details&th=1&psc=1

After getting everything together, I find that it takes close to 250 psi in the shock to keep the sag at a reasonable level (I weigh 170-175). After riding the local streets and alleyways, it seems like the travel is about right. Not sure how it will be with loaded panniers, though.

Good luck with your installation. By the way, the rear rack dictated the orientation of my shock to clear the air valve.
Hi @Parker135, could you please share the specific model or link to the Rockshox you used? Thank you.
Michael
 

Parker135

Member
Hi cpml234. I installed the Rockshox Monarch R, 165 mm. This model does not have the lockout feature. After discussing it with my mountain bike racing son and the owner of the LBS, this seemed like the most practical choice. After a few rides, I agree. They're available online for less, but I went through my local bike shop that I try to support. It did not come with the bushings, which I had a little trouble finding. I ordered "Dioche Rear Shock Mounting Hardware" from Amazon: https://www.amazon.com/dp/B07MP3FK5G?ref=ppx_yo2ov_dt_b_product_details&th=1&psc=1. They fit perfectly.

Hope this helps. I'm selling the bike now, sadly, but I found the shock to be a very worthwhile upgrade.
 

cpml123

Zen MBB Master
Hi cpml234. I installed the Rockshox Monarch R, 165 mm. This model does not have the lockout feature. After discussing it with my mountain bike racing son and the owner of the LBS, this seemed like the most practical choice. After a few rides, I agree. They're available online for less, but I went through my local bike shop that I try to support. It did not come with the bushings, which I had a little trouble finding. I ordered "Dioche Rear Shock Mounting Hardware" from Amazon: https://www.amazon.com/dp/B07MP3FK5G?ref=ppx_yo2ov_dt_b_product_details&th=1&psc=1. They fit perfectly.

Hope this helps. I'm selling the bike now, sadly, but I found the shock to be a very worthwhile upgrade.
Thank you!
 
So.....never mind on the 'how to change seat angle to 45degrees' question. Found an earlier discussion and went from that. Took the U-shaped hoop or bracket out and connected the seat post directly to the bracket on the back of the seat as suggested by Robert Holler using some washers I had in the parts bin. Worked just fine. The maximum lowest seat angle doing this turned out to be 44degrees at the lower end of the backrest and 47degrees at the top (both measured without the cushion). I can certainly live with that for my purposes.
Photos attached. Obviously, when doing this the second quick release skewer isn't necessary but I left it in place to provide a secure anchor for the bungee cords that came with my bag.

View attachment 13538View attachment 13539View attachment 13540View attachment 13541View attachment 13542View attachment 13543
What holes are you using to connect the seat bottom to the frame in this configuration?
 
Top