What did you do to your Cruzbike today?

super slim

Zen MBB Master
Slider is up by the handlebar;
boom is the end by the feet;

just to keep people from getting confused; Cutting the slider not recommended; cutting the boom is a safer bet.
The Boom (connected to the BB) does not have the single slot.
If you cut the slider, then the 4.8 mm wide slot will need to be extended to 28 mm, to allow the clamp to work!
 

ratz

Wielder of the Rubber Mallet
Do you have older Yellow Vendetta?

Bladderhead has an S30 with the new version of the silvio booms.

I cut the one that ends at the bars. There was no problem. Maybe they changed the design.

That works it's usually just not effective for many people. The Boom (the end by the bottom bracket) will bottom out for most people when it hits the water bottle braze-on bolts in the Slider up by the handlebars. If you cut the boom down then it becomes possible to slide it in much farther. If you cut it a lot you can slide it in so far that the curved part will get to the slider and it can jam; if that happens and it's still too short you have to cut the slider down so that you can go smaller. If you do cut the slider it's important to recreate the compression "notch" so that you can tighter the clamp without bending or deforming the cylinder as such deforming might weakened it.

The reason people are confused by this part of the thread is that for most people cutting just the slider won't allow them to slide the boom in further because the braze-on are still the limiter to insertion. i did chat with one user that couldn't push the boom in because they had the pivot clamp so tight it blocked the boom sliding in. So I could see a situation where someone cut the slider and in the process released the pivot clamp and then could slide together further without noticing that was the cause.

End of the day doesn't matter; if it worked for Bladderhead that all the matters, there were some booms that didn't have the water bottle braze-ons.....so that could be it too..... But for all the other new users cut the Boom first; it's easier, safer and faster. Cut the slider if you are really short and you have no choice; but be sure to put the notch back in for best clamping force. Just trace it on paper before you cut; and then recreate it.
 

super slim

Zen MBB Master
For us OLDER folks who have OLD cruzbikes Silvio V1.0, Softrider V1.0, and Quest V1.0, then the Boom is LARGER than the slider, and has the slot and clamp on it, so in this case the Slider needs to be cut!

Always cut the smaller Tube!
 

bladderhead

Zen MBB Master
It was a Silvio2, all black. The frame snapped under the seat, so Cruzbike sent me a replacement, which was wonderful of them. They sent me the seat, the bit underneath, and the back triangle, which are white. The front end is original, including the cut slider. I never did the notch thing. Since I cut it I have done 2000 miles. Is something else going to snap?
 

ratz

Wielder of the Rubber Mallet
It was a Silvio2, all black. The frame snapped under the seat, so Cruzbike sent me a replacement, which was wonderful of them. They sent me the seat, the bit underneath, and the back triangle, which are white. The front end is original, including the cut slider. I never did the notch thing. Since I cut it I have done 2000 miles. Is something else going to snap?

Oh I remember that; I was looking at pictures of your white bike and I thought it was an optical illusion. that the boom looked small.

The reason for the slot is to the metal can "deform" in a predictable and consistent manner under a clamping load; that prevents the tube from "buckling" under load in an unpredictable orientation. That would cause the tube to no longer be round and thereby lose strength. If you have 2000 miles on it that's a good sign that you didn't over tighten it; and that you don't often change it.

The next opportunity to clean and inspect I would suggest notching it just because it's the smart thin to do. I can measure a 2.1 boom notch tonight. You simply Drill a round hole at the end-depth; then use a hack saw to cut a straight line from the end of the slider to the sides of the hole. easy and a picture will make it obvious.


Always cut the smaller Tube!
Smaller tube is always the "boom" :) at least in the manuals I've read; but you have been around longer and seen more so maybe something I've not read......?
 

PeteClark

Active Member
Installed new headrest and Perez clamp. Drilled a new hole in the frame so I could extend the headrest 1 cm.
IMG_0533.JPG
 

Bill K

Guru
Also installed a new Perez clamp, headrest, and race case.
The backing plate for the race case takes up the spot where you would want to mount the headrest, but you can mix and match parts and it works very nicely.
For this, the race case 3" x 4" backing plate is not needed. Use the outer plate from the headrest to secure the top of the race case, and then bolt the headrest mount into the lower mounting hole in the race case (see attached photos).
My taillight (which was attached to the headrest tubing) did not fit the OD of the race case light mounting shaft. I cut a 1" piece off the headrest tubing to replace the 1 1/8" taillight mounting tube that came with the race case.
 

Attachments

  • Disassembled.jpg
    Disassembled.jpg
    66.8 KB · Views: 57
  • Assembled.jpg
    Assembled.jpg
    45.1 KB · Views: 69
  • Taillight.jpg
    Taillight.jpg
    36.6 KB · Views: 58
Also installed a new Perez clamp, headrest, and race case.
The backing plate for the race case takes up the spot where you would want to mount the headrest, but you can mix and match parts and it works very nicely.
For this, the race case 3" x 4" backing plate is not needed. Use the outer plate from the headrest to secure the top of the race case, and then bolt the headrest mount into the lower mounting hole in the race case (see attached photos).
My taillight (which was attached to the headrest tubing) did not fit the OD of the race case light mounting shaft. I cut a 1" piece off the headrest tubing to replace the 1 1/8" taillight mounting tube that came with the race case.
I like your solution of using the Suspension Adjustable Headrest clamp in place of the backing plate to mount the Race Case. For now I'm back to the inner tube/mesh sock to rest my head.
As you did I also changed out the light mount with a narrower and longer tube.
http://cruzbike.com/forum/threads/new-cruzbike-accessories.11529/page-2#post-132701
 
I changed my front tire after reviewing the video done by Trplay. Excellent video. It is the second time changing my front tire and was easier this time. The valve stem was leaking. Luckily, the flats have happened where I can change the tire in my garage. The more miles I ride the more flats I change. I am ok with that deal.

I then cycled and completed week 4 of the couch to a century training plan. Having the plan gives my riding some structure.
 

RojoRacing

Donut Powered Wise-guy
Oh relive looks fun unfortunately it won't do past rides and I don't have a lot of time for riding ATM due to possible imminent arrival (although I wouldn't mind a few more weeks of cooking) of twin boys so I won't get a chance to ride for a while

I've tried everything to try and reload this one particular Mtb ride back onto my garmin with a today's date via third party software and then upload to strava but sadly all attempts have failed. It's a 100 mile epic with 22,000' of climbing so it'll just have to wait till I'm completely heal and back up to par on the Mtb. If anyone figured out a way to relive an old ride let me know because I'd love to show off this one ride.
 

trapdoor2

Zen MBB Master
Also installed a new Perez clamp, headrest, and race case.
The backing plate for the race case takes up the spot where you would want to mount the headrest, but you can mix and match parts and it works very nicely.
For this, the race case 3" x 4" backing plate is not needed. Use the outer plate from the headrest to secure the top of the race case, and then bolt the headrest mount into the lower mounting hole in the race case (see attached photos).

I took a different tack and used the race-case mount as delivered. I inverted the headrest...the clamp is now in the curve of the headrest tube above the race-case plate. I had to re-position the headrest tube out about an inch...but it fits nice and comfy. I'll post pix later.
 

RojoRacing

Donut Powered Wise-guy
Send me fit file and I'll run it through the time machine; aka fit file repair tools.

I already tried all that but it seems like the program needs to see it upload from a device as new. Give it a try with any of your old rides and see if you can get it to work and if you can I dig up my old fit file. It doesn't help that it always takes at least an hour to receive the email link for when it does work, makes testing a lengthy process.
 

trapdoor2

Zen MBB Master
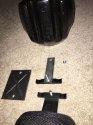
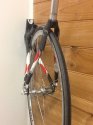
Finished up my 'race-case' install. Took a pic of the way I mounted my headrest.
View media item 273I had to buy a new Camelbak to fit the race-case, it is too small for the bladder I've used for years but one of the new 1.5l bladders fit perfectly.

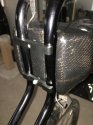
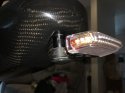
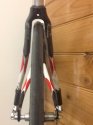
I also installed my DS-500 tail-light on the provided post. I can see where others have had to extend or change the provided post. I was fortunate to find a clamping solution that was a good fit. Now I need to drill a hole in the race-case to feed the wires from the light to the battery. Right now I have the battery strapped to the headrest tubes (you can see it underneath) but there's room in the race-case for it under the Camelbak bladder. Water-cooled. ;)

Having the headrest mounted this way is kind of neat, it sits in the curve and very small movements along the curve change both the position and angle of the rest. I haven't ridden it in this config yet but I don't expect getting it 'perfect' will be much of an issue. Just gotta take the right wrenches along.

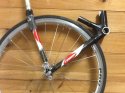
Oh, and I just snagged a 26" solid front fork offa ebay for a few bucks. Got my old conversion stripped of all usable parts and have one of my V2/k sets in the bike-stand ready for conversion to "MUT Cruzer" I'm probably going to hang a set of Schwalbe "Big Apple" tires on it...nice and cushy. Single chainwheel up front (a 46, IIRC) paired with the 3sp Sturmey Archer hub and wheel. This was a 3sp fixie hub (SX3) but I'm adding a freewheel (which seems silly but I'm not buying another 3sp SA hub).

I'm seriously considering doing the "Silvio/V" top-tube steering conversion per @Emeljay. Although I rode the V2/k for years with the std. steering setup, the V20 has gotten me addicted to that setup. Seat angle will probably be something like a Silvio...I don't want to lean so far back that I need a headrest.
 
Last edited:
Top