Electric Silvio

brokemyback

Well-Known Member
Edit:
Prices and links to all source parts have been added to the bottom of post #1.

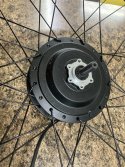
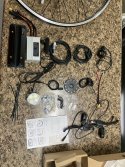
I got out of shape with the Covid silliness, and now I can't hang with the fast group any more. I'm too impatient and lazy to train hard, so I'm going for electric assist. With knowledgable direction from Rogerreece (many thanks!!) I ordered a "front hub wheel motor", a battery and a carry box. I have zero experience with electric bikes so here goes.

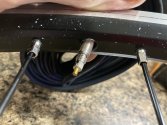
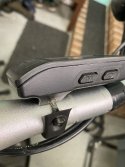
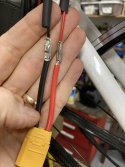
I plan to mount the wheel on the back and use a thumb throttle only. I want to keep all the electrics as removable as possible, so I'm thinking of mounting wire bundles with velcro straps.

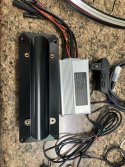
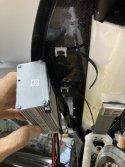
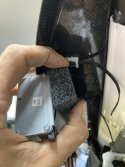
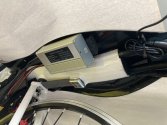
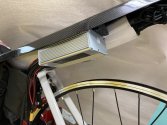
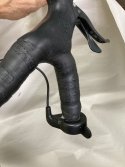
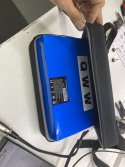
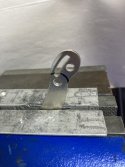
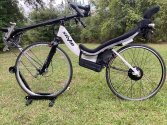
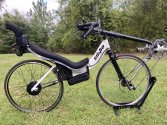
The battery carry box arrived first and I'm super excited to get the project started, so I mounted it. I'm pretty happy with the appearance - unobtrusive and out of sight. My Silvio has four rivnuts already shot into the frame, in perfect locations for suspending the battery box. I used some stainless steel M5x0.8 "Thumbscrews" from McMaster.com. I stitched up some 1" wide nylon suspension straps and sewed in some salvaged "sewable buckles". I sewed some guide straps to the bottom of the box to keep the straps positioned. The box appears to shift around a little, so I think I'll add some velcro between the box and the frame (to keep it from chafing the paint. )

Hopefully some more parts will arrive soon. More updates then.

IMG_4542.JPG

IMG_4541.JPG

IMG_4526.JPGIMG_4530.JPGScreen Shot 2022-08-17 at 5.05.44 PM.png

Prices:
Total cost $662.46.
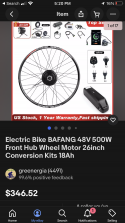
Motor: eBay Bafang front wheel w/ hub motor 48V 500w 700c w/o battery $346.52
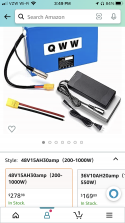
Battery Amazon QWW battery 48V15ah30amp $278.98
Velcro strips Amazon Reusable Cable tie 20 pack $9.99
Storage box Amazon co2Crea hard EVA carry case $16.99
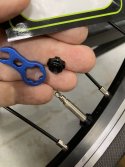
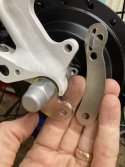
Torque strap Amazon Bafang torque arm kit $9.98
Thumbscrews McMaster
Zip ties
½” PVC scrap
1” nylon strap


Sources:

Bafang front wheel with hub motor:
(Specify 700c rim, 500c display, “no battery”. Request Rim Brake via message to seller if desired!)

https://www.ebay.com/itm/3535852933...ar=623632761934&widget_ver=artemis&media=COPY

Battery (48v15ah Li Ion):

QWW 36V10AH 700W Lithinum ion Battery for Electric Bicycle Scooter Tricycle Motorcycle
https://a.co/d/b6nGeFZ

Bafang Universal TorqueArm Kit:

BAFANG Torque Arm Kit Universal... https://www.amazon.com/dp/B09LD2H3DR?ref=ppx_pop_mob_ap_share

Velcro tie-strap kit:

Reusable Fastening Cable Straps... https://www.amazon.com/dp/B071DGMNMX?ref=ppx_pop_mob_ap_share

Carry box that fits battery:

co2CREA Hard EVA Carrying Travel... https://www.amazon.com/dp/B017U0GCSQ?ref=ppx_pop_mob_ap_share
 
Last edited:

Rampa

Guru
Nice. You might want to put some grommets in those holes, or melt around the circumference so it will not unravel. Maybe both for best durability.
 

brokemyback

Well-Known Member
I doubled the ends over and stitched to make two layers, plus melted the holes. But I couldn’t find any grommets in my supplies. I’ll definitely keep an eye on them!
 
Very nice. I may have to add assist to my rides one day so I will be watching this with interest. Your bike looks in great shape. I have one like it. Please, take us along on your electrifying journey! I am always amazed at someone’s skills to visualize and bring to life a project. All the sewing and stitching is great work.
 

brokemyback

Well-Known Member
Wheel/motor arrived today from Las Vegas (eBay purchase). The wheel assembly is HEAVY. I must find a place to mount the chunky controller box, I just learned. The wheel spokes look like 1/8” diameter rods, very heavy! And the axle nuts look like they belong on a Motorcycle. BD7BFB0A-E1CF-4EB3-9481-D725FF0AE2E0.jpeg
 

Attachments

  • 5A02BE30-3772-4074-9DDD-848C4B7E4BD3.jpeg
    5A02BE30-3772-4074-9DDD-848C4B7E4BD3.jpeg
    2.9 MB · Views: 14
  • 05ACF47E-94D6-4B4A-B684-53F9F5BA14B3.jpeg
    05ACF47E-94D6-4B4A-B684-53F9F5BA14B3.jpeg
    2.8 MB · Views: 12
  • 598419BF-FE80-426D-9B9A-1997297B2FB9.jpeg
    598419BF-FE80-426D-9B9A-1997297B2FB9.jpeg
    3 MB · Views: 14
  • E45E19DF-D932-4F93-9A2F-58938BBC523A.png
    E45E19DF-D932-4F93-9A2F-58938BBC523A.png
    1,023.2 KB · Views: 15

brokemyback

Well-Known Member
Connections look simple: color coded and idiot proof. Hopefully the cable lengths will be sufficient to reach where I need. I don’t really want to cut/splice a bunch of tiny wires. I already see I will be modifying the thumb throttle. The return spring is too strong. It would be a chore to fight that thing.
 

brokemyback

Well-Known Member
And the rim is drilled for a Schraeder valve instead of presta. Dang.
 

Attachments

  • 8D0D4FF2-83F3-4769-BBE9-ADDAC5E0A867.jpeg
    8D0D4FF2-83F3-4769-BBE9-ADDAC5E0A867.jpeg
    1.9 MB · Views: 5

brokemyback

Well-Known Member
More than enough cable length to put the controller anywhere you like, and reach cables to the handlebars for display and throttle. In fact I’ll have coils of excess cables to hide somewhere. I see heat sink fins on the controller, I assume it needs some cooling air (and not mounted inside a plastic box like they provide(?). I wonder if it needs protection from water damage?5FFA951B-ADC9-4915-9260-AEAC75054629.jpeg
 

brokemyback

Well-Known Member
Nuts supplied with the kits are more chunky pieces! After getting the torque arm evaluated I may cut off some the excess axle length.550CCC5A-B069-440B-9992-7C3AA22F2231.jpeg
 
Last edited:

brokemyback

Well-Known Member
Widening the dropouts was a nerve wracking job. I mostly cut the forward face (more meat there). I did some crude alignment checks to make sure I wouldn’t hurt wheel alignment. They need 10mm width to accept the new axle. I mostly left the upper radius alone. ED38E1C8-C7FB-4C96-A3A4-A758C7699F5C.jpeg
 

Attachments

  • 89B42D47-3DEF-4AA6-BF79-F28F95071235.jpeg
    89B42D47-3DEF-4AA6-BF79-F28F95071235.jpeg
    1.8 MB · Views: 6

bladderhead

Zen MBB Master
Expect the unexpected. Did you know that the axle was too wide before you started? This is turning out to be one of the great Cruzbike modification projects.
 

brokemyback

Well-Known Member
Expect the unexpected. Did you know that the axle was too wide before you started? This is turning out to be one of the great Cruzbike modification projects.
Yeah, Rogerreece warned me about the axle width. It was more cutting than I expected though.
 

brokemyback

Well-Known Member
Lots of mods to get this kit installed. Today it was the controller mounting. I decided to hang it under the seat. The kit comes with a silly plastic box to hold the controller. But none of the holes align so it would just be rattling around in there. The controller box itself appears to be well sealed for weather, and it has cooling fins so I presume it should have some fresh air. So I mounted it “bare”. The brackets on the controller were useless to thread any screws so I just used them to hold zip ties. I used a thick piece of foam to cushion it a little.
 

Attachments

  • 198C787A-B994-46A5-A20E-7A6A0CE3A487.jpeg
    198C787A-B994-46A5-A20E-7A6A0CE3A487.jpeg
    1.7 MB · Views: 14
  • C81169D6-C02E-4E4C-B654-82202913BFD1.jpeg
    C81169D6-C02E-4E4C-B654-82202913BFD1.jpeg
    1.5 MB · Views: 14
  • 5FBBAD52-2495-4B04-BC93-A967624BC5AB.jpeg
    5FBBAD52-2495-4B04-BC93-A967624BC5AB.jpeg
    3.3 MB · Views: 13
  • 83D87916-48BE-4A13-9512-47E7DA0B885F.jpeg
    83D87916-48BE-4A13-9512-47E7DA0B885F.jpeg
    2.4 MB · Views: 13
  • CE306D06-C569-4C32-9167-B0E4FFA7F720.jpeg
    CE306D06-C569-4C32-9167-B0E4FFA7F720.jpeg
    3.3 MB · Views: 11
Last edited:

brokemyback

Well-Known Member
Handlebar controls: They are all too small diameter for the cruzbike bars. The controller display mount wasn’t too hard to fix, a longer bolt and elongate the hole in the clamshell plastic mount.
The thumb throttle was more difficult. No simple clamshell to modify, it is a complete ring so it must be threaded onto the bars. However, I couldn’t see any position that would work well for thumb access.
The other thing it didn’t like was the killer return spring on the thumb throttle! I can’t see fighting a tough spring for hours. I yanked the spring out and pushed a piece of foam inside the throttle. Now it’s a friction throttle - stays where I leave it. Which brings up the mounting position. I stuck it on the bar end. I can reach it with the heel of my hand and my wrist or forearm without taking my hand off the brake/shifter. I hope it works!
Of course the throttle wouldn’t fit over the bar, so I used a piece of 1/2” pvc. I sanded off the OD to almost fit inside the bar. Then sawed a split. And crammed it inside the bar end. It seems solid. If it starts to come loose, I’ll put a wedge inside and pull it down with a sheet metal screw. A7F4A276-7EEB-4987-90AB-240E50C313F5.jpeg
 

Attachments

  • 77058E60-2A19-403E-9306-8AE643063591.jpeg
    77058E60-2A19-403E-9306-8AE643063591.jpeg
    1.8 MB · Views: 8
  • 6ECB1231-27EE-4FC6-A2AA-B4911745D525.jpeg
    6ECB1231-27EE-4FC6-A2AA-B4911745D525.jpeg
    1.3 MB · Views: 9
  • EC76D9D7-0E4C-4CB1-923E-C09EAA53AC08.jpeg
    EC76D9D7-0E4C-4CB1-923E-C09EAA53AC08.jpeg
    1.8 MB · Views: 10

brokemyback

Well-Known Member
Battery finally arrived. Yet another chunky component! It sure feels funny bolting all these heavy parts to a bicycle (with carbon fiber pieces designed to save weight).
9.7 lb battery and case! 5B5E393A-C762-432C-91D7-429380489687.jpeg
 

Attachments

  • B0C0516F-7147-488C-A409-6CA9F747F6B9.png
    B0C0516F-7147-488C-A409-6CA9F747F6B9.png
    1.1 MB · Views: 3
  • 10D9F271-FB35-4B47-8137-D09C8603AB4C.jpeg
    10D9F271-FB35-4B47-8137-D09C8603AB4C.jpeg
    1.7 MB · Views: 3
Last edited:

brokemyback

Well-Known Member
It’s alive! Wow what fun. It really feels like cheating. I can set the throttle to any speed up to 28mph, and it will work to hold that speed, adding more power the further I drift below the set speed (or tapering off power as I approach the set speed). I can’t feel any assistance (or drag) above the set speed. And I’m happy with the noise level too. Just a quiet hum when it’s adding power, slight volume changes follow assist level I think.
No real surprises with the final mounting bits. I installed a torque arm - mostly because I ordered one. I’m not really sure it was needed. It will only “hurt” when it comes time to change a flat tire adding more nuts to remove when changing a flat. Speaking of which, I will now have to carry a 19mm axle wrench to allow removing the rear wheel.
The power connector that came with the battery was a different size, but they provide a pigtail with the battery. So that‘s the only electrical work I had to do with the entire kit. Not bad. I bought a pack of velcro strip ties that work well to keep wires organized.
The presta “adapter” I ordered was just a little nut the centers the stem in the rim. No parts to cushion the inner tube where it touches the extra large hole in the rim.
The rear of the bike is quite noticeably heavier when moving/lifting it around the garage. I’m accustomed to the feather weight rear wheel. However I could not really feel any change in handling.
I got a 28mm wide rear tire (instead of my normal 23mm wide) to handle the extra weight.
The 500C display is pretty nice, quite a bit of information in a nice compact (color!) display for the handlebars.
I think I’ll make a spreadsheet of all the parts, part numbers, sources, and prices while it’s fresh in my mind.
Many thanks to Rogerreece for answering all my pesky questions during this little project!
 

Attachments

  • 2202E594-119D-405F-AD1C-68E56C970DA7.jpeg
    2202E594-119D-405F-AD1C-68E56C970DA7.jpeg
    1.6 MB · Views: 29
  • 4893246C-BA54-4518-A667-A880C5A13C22.jpeg
    4893246C-BA54-4518-A667-A880C5A13C22.jpeg
    1.8 MB · Views: 18
  • 899651C6-0BB6-411B-ACA2-8937D6D145C7.jpeg
    899651C6-0BB6-411B-ACA2-8937D6D145C7.jpeg
    1.6 MB · Views: 17
  • E990DB3E-684A-4150-B9C3-529A59646C56.jpeg
    E990DB3E-684A-4150-B9C3-529A59646C56.jpeg
    1.5 MB · Views: 18
  • 0451BC4B-76C3-4D95-B3D8-A103D2D0740F.jpeg
    0451BC4B-76C3-4D95-B3D8-A103D2D0740F.jpeg
    1.8 MB · Views: 17
  • 25F665F4-DED4-43E8-9AE1-120C07C9F800.jpeg
    25F665F4-DED4-43E8-9AE1-120C07C9F800.jpeg
    1.7 MB · Views: 18
  • AF7328C2-9F34-45F3-8387-0624A70201EF.jpeg
    AF7328C2-9F34-45F3-8387-0624A70201EF.jpeg
    2.1 MB · Views: 27
  • 61373E9B-9242-4A9B-A9B7-69E8F5AE7047.jpeg
    61373E9B-9242-4A9B-A9B7-69E8F5AE7047.jpeg
    6.9 MB · Views: 31
  • 7D00CDEE-EA7B-4D85-A91C-08B9230DDDF1.jpeg
    7D00CDEE-EA7B-4D85-A91C-08B9230DDDF1.jpeg
    4.4 MB · Views: 30
  • AA73A0F6-3C85-43E9-AD5C-8C75B6B58E68.jpeg
    AA73A0F6-3C85-43E9-AD5C-8C75B6B58E68.jpeg
    6.7 MB · Views: 30
Top