CruzinCambridge
Active Member
My longest ride to date and I hit a "lip" in the pavement. It's a 1-1.5" bump where they had ground away the pavement to repave the transition from the road onto a bridge.
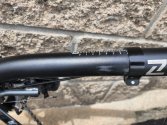
When I hit the lip hard, at about 15-20 mph, my boom slides out about 3cm from 4 to 7 (see photo). With my ankles at full extension and already in a lower gear I was able to keep going which was good as it's a busy section of road. No damage to my rims and no sealant issues.
Question for the experienced riders... is this common? I have the plastic collar on the boom cranked down pretty tight (est 7 nm?) but I've been wary of clamping it down too hard since reading @Robert Holler's post on not breaking the bottom bracket. Is this common? Is there anything I should be doing? Clamping it harder? Grip paste on the inside of the upper boom? Am I positioning the clamp at the right spot (at the very end of the upper boom)?
 Just do it right or have it done right and if right does not work, it should not be your problem to fix.


