Happen to Anyone? Boom Slips on Bumps

CruzinCambridge

Active Member
My longest ride to date and I hit a "lip" in the pavement. It's a 1-1.5" bump where they had ground away the pavement to repave the transition from the road onto a bridge.

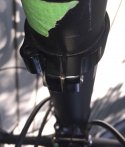
When I hit the lip hard, at about 15-20 mph, my boom slides out about 3cm from 4 to 7 (see photo). With my ankles at full extension and already in a lower gear I was able to keep going which was good as it's a busy section of road. No damage to my rims and no sealant issues.

Question for the experienced riders... is this common? I have the plastic collar on the boom cranked down pretty tight (est 7 nm?) but I've been wary of clamping it down too hard since reading @Robert Holler's post on not breaking the bottom bracket. Is this common? Is there anything I should be doing? Clamping it harder? Grip paste on the inside of the upper boom? Am I positioning the clamp at the right spot (at the very end of the upper boom)?
 

Attachments

  • 20220611_103453.jpg
    20220611_103453.jpg
    3.4 MB · Views: 13

LarryOz

Cruzeum Curator & Sigma Wrangler
This used to happen to me on my very first Vendetta 8 years ago. Sometimes adding some grease to the slider before you insert it into the boom before tightening it also helps. I think also sometimes just a slight variation in the sizes of the boom and the slider happen and you might get a slightly large boom and a slightly small slider. I eventually had to tap a hole through both a inserted a bolt to keep them from moving. Try the grease and make sure you tighten the screws in the clamp well first.
 

chicorider

Zen MBB Master
The most obvious issue is that 7nm is not quite enough clamping force. But you are right about being careful not to overtighten. I would apply a thin layer of carbon grip paste and 8nm of force. If it still slips, go up to 8.5nm, and so on in small increments until it no longer slips. That number will be your minimum required torque for that bolt.
 

Henri

scatter brain
Before just adding more torque, look up the cheat sheet for your specific model and the specific clamp, use a proper tourge wrench (!) (You can borrow one from a neighbor, friend, your work, a shop with any kinds of mechanics) and clean and greased theads (Clean male and female thread! Cleaning and grease help to make sure, that your torque is used for clamping, not wasted in friction.) and clean the surfaces with alcohol. I guess, grip paste can't do any harm, but I am not sure. Maybe not carbon grip paste, if you are not using carbon parts, I think there are specific ones, too?
If your best attemps if following spec don't work, ask a bike shop or other qualified mechanic for help (supply them with the correct torgue value from the cheat sheet). If the problem persits, even when spec is surely adhered to, you have a point to make against Cruzbike. If you tighten your bolts by feel or otherwise don't make sure to adhere to spec, you do not have a point to make and may be at a loss for any damage, including a slip in tolerances from Cruzbike, if you damaged the evidence.
Well, that sounded more grim than necessary. :p Just do it right or have it done right and if right does not work, it should not be your problem to fix. ;)

With that out of the way: If the problem should really be a fluke in slack tolerances, a layer of aluminium foil might work to fill the gap an create the right mounting pressure. - But of course this is not advice and I do not take any responsibility. :D
 

CruzinCambridge

Active Member
I added some grease and torqued down on that bolt. The (obvious) problem is that I don't have a proper torque wrench. I have a 5nm wrench that found its way to me, so I know what I'm doing has been about 50% more than 5nm. Now I cranked it down like 2x.

@Henri I didn't know there were spec sheets for things like torque recommendations. I'll go look for that! I may even get a torque wrench. And good point too, that if I do all this and it doesn't work, I should look at a new slider.
 

Henri

scatter brain
I didn't know there were spec sheets for things like torque recommendations.
At least my brand new V20c had ine right in the box and I think I have seen them mentioned to be available on the website. A manufacturer must provide them, I would think. Otherwise it is really not the user's fault if they damage something or injure someone due to wrong torque. The best way is of course writing it right in the part in a durable way, as many parts like brake rotors and headsets have it.
 

chicorider

Zen MBB Master
A clarification on what "grip paste" is (because that name is a little misleading). It is basically a combination of grease and fine grit. The grease keeps parts from fusing together over time, as repeated rounds of water, weather, road grime, and sweat can do, especially with aluminum-on-aluminum. And the fine grit helps smooth, fragile surfaces that cannot take much torque, specifically carbon, have a little more texture to help prevent slipping. The stuff is specifically marketed for carbon parts, but it's pretty handy when building up a bike, regardless of a part's material. I use a little bit of it wherever parts join statically and there aren't bearings nearby--mostly seat post/seat tube, handlebar/stem, and boom/slider junctions.

A while back I did some research on torque wrenches and found that it's a "you get what you pay for" proposition. The adjustable dial models make the most sense for a home mechanic--one wrench that can dial up a full range of torques. But the reviews that I read pointed out that the cheaper models were less accurate and less consistent than the pricier brands. Even worse, two of the same cheap brand might be both inaccurate, but not in the same way. One might be above spec, and the other below. And as you travel up the dial, the degree of inaccuracy might fluctuate, which makes such a tool pretty much useless.

I decided to take the guesswork out of it and bought a set of torque keys, where each small wrench is set to one specific torque. It takes up a little more space and the cost of a full set, from 4 to 12nm, does add up a bit. But I like that I don't have to worry as much about overtightening fragile parts.

 
The park tool SUPERGRIP™ CARBON AND ALLOY ASSEMBLY COMPOUND says it works for carbon, aluminum, and steel. Here is a link to the ParkTool description: https://www.parktool.com/product/supergrip-carbon-and-alloy-assembly-compound-sac-2

On painted surfaces this may cause minor cosmetic blemishing. At least it did when I mounted AL areobars on my DF bike.

As far a torque wrenches the clickers are more convenient to use but should be periodically calibrated. As long as you are willing to learn and use proper technique I prefer the beam type wrenches for infrequent home use. These don't typically require periodic recalibration (dropping the wrench is not recommended). Using them is not quite as easy as the clicker and sometimes requires odd body positions to both see the scale and apply the torque in an even and consistent fashion.

Here is Park's low torque version: https://www.parktool.com/product/beam-type-torque-wrench-0-14-nm-tw-1-2#tabbed-section

Both of these items should be available locally or online (I think amazon has them both).
 

Henri

scatter brain
which makes such a tool pretty much useless.
Well no. Unless the error is really high. Mots torque specs I see give ranges like "6-8nm". Aim for 7nm and you have nice tolerance. And to be worth a cheap price they only have to be better than hand feel, what they will most oftne be. (Especially when screwing in different positions and with different keys/spanners.)
Otherwise thats exactly why I suggested going to a shop to borrow their expensive, calubrated tool. (Or rather have them quickly do the bolt up to the right torque for you, because they don't want you to drop their torque wrench.) Should be quick and cheap, most places won't even bother to register a transaction for such little things, so it's on you to put a bit into the tip jar.
 

benphyr

Guru-me-not
A machinist friend frequently reminds me that torque values are fairly vague suggestions because they presuppose perfect conditions: perfect measurements, perfect tolerances, perfect uniform smoothness, texture, perfect cleanness/ even matching lubricant, no wear, perfect use of tool, such as orientation, calibration, angle of force on bolt, etc. etc.
 

benphyr

Guru-me-not
@LarryOz In post #2, are you suggesting to grease the two mating surfaces? Can you or an engineer or machinist explain this to us that think that would let it slip even easier?
 

LarryOz

Cruzeum Curator & Sigma Wrangler
@LarryOz In post #2, are you suggesting to grease the two mating surfaces? Can you or an engineer or machinist explain this to us that think that would let it slip even easier?
I am probably mistaken - someone suggested that to me back when I had my issue. Maybe they meant the "grip paste" that someone else mentioned. Although I tried everything. I think for me it was just a case that the tolerances were just wrong in one of my pieces and I and I cold end up doing was bolting them together. I have have many Cruzbikes since then and not had that problem either, so I think it is kind of rare.
 

benphyr

Guru-me-not
My longest ride to date and I hit a "lip" in the pavement. It's a 1-1.5" bump where they had ground away the pavement to repave the transition from the road onto a bridge.

When I hit the lip hard, at about 15-20 mph, my boom slides out about 3cm from 4 to 7 (see photo). With my ankles at full extension and already in a lower gear I was able to keep going which was good as it's a busy section of road. No damage to my rims and no sealant issues.

Question for the experienced riders... is this common? I have the plastic collar on the boom cranked down pretty tight (est 7 nm?) but I've been wary of clamping it down too hard since reading @Robert Holler's post on not breaking the bottom bracket. Is this common? Is there anything I should be doing? Clamping it harder? Grip paste on the inside of the upper boom? Am I positioning the clamp at the right spot (at the very end of the upper boom)?
Re: clamp position

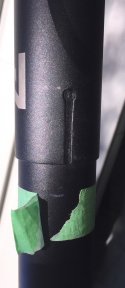
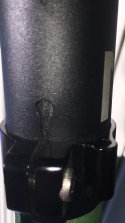
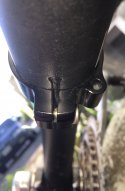
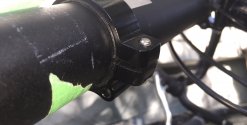
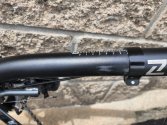
There should be a key hole gap in the larger tube. (It might be facing up or down. If you prefer the other orientation I think you can loosen the clamps, remove the handlebars, rotate it 180 degrees, and re-clamp everything.) The clamp gap should be flush to the end of the tube and lined up with that slot so that the clamp squeezes the gap together. Here is an essay (in pictures)

1.Key hole slot

6FDBD3A0-673C-4C59-B188-4597A83D1C46.jpeg


2 & 3. Looking towards pedals

5988C826-66AA-42B8-A0A4-3D9C22BEE504.jpeg

12548FEF-D1FE-4E56-9CA7-92FC828A95F2.jpeg

4 & 5. looking towards handlebars

FDD2DB0C-4709-45FD-BE7B-CA6A02948E7C.jpeg

64931CC6-D7A2-4D14-A6BE-78779964BE2D.jpeg


From the perspective of the pictures it appears as though I may have over tightened the clamp in the past.
 

billyk

Guru
Good advice @benphyr . Yup, those slots are designed so that when the clamp opening and the slot are aligned the outer tube can actually narrow, and thereby grip the inner. Worth checking.

Once that is dialed in, then a tiny bit of grease keeps the metals from bonding and allows adjustment. It's possible this advice came from the manual for the Q559, 11 years ago. I think the grease was called "carbon", but I'm not sure so ... pay no attention to this ...

Early in my CB career I had a related mishap. I hadn't tightened the much-hated Diatech headset enough. Tried to do a quick u-turn in a busy city street. Whoops! The bars turned about 45 degrees but the wheel, not a bit. There I was, still going straight but leaned over as if to turn. Managed to stay upright!
 

CruzinCambridge

Active Member
@chicorider - The reason I have a 5nm torque wrench in the first place is the carbon fiber seat tube junction on my DF has a strict warning to use grip paste and not tighten past 5nm or you'll crack the frame. I bought the wrench and even carried it with me on rides until I got the seat height fine tuned. Good dialog on the cost/precision of torque wrenches. I've been around bikes enough I have a good feel for how much torque to apply to standard road bike parts based on whether they're steel or aluminum, load bearing or not, etc. so didn't want to shell out the money and was never too concerned till I splurged on carbon fiber and now with this odd junction of aluminum steel and plastic. I'm interested in the specs though... especially given the warning not to over-tighten the bottom bracket clamp... when that's an area that's so prone to creaks and loosening.

@benphyr - I was careful to have the slots aligned. When I got the bike (used) I reversed the slider/stem from how I received it and might not have paid enough attention initially to that junction. Based on advice here I greased the sleeve as far as the keyhole goes before tightening the collar.
My theory was that maybe the outer sleeve was binding and ovalizing and with better lubrication will be able to tighten evenly and create a better junction with more contact. So far, no problems! (Did I just jinx myself?)
 
Top