New and Improved Headrest Clamp

ratz

Wielder of the Rubber Mallet
I was wondering what ever became of that conversation I had with the powers to be. I never heard back about whether or not they secured a line on mass producing the clamp for future bikes. I'm sure some out that can make them for pennies on the dollar it cost me.

We got the to pet the prototype at the retreat; the elegance of your design was a point of discussion to highlight the contributions owners make to the product line evolution.
 

DavidCH

In thought; expanding the paradigm of traversity
If Jason carries on as being Jason, I think I will frame mine and put it on the wall.
 
Hi
I was wondering what ever became of that conversation I had with the powers to be. I never heard back about whether or not they secured a line on mass producing the clamp for future bikes. I'm sure some out that can make them for pennies on the dollar it cost me.
I would be interested in how that conversation went. I would like to think the ingenuity of our communities engineers are being rewarded. Unless it is covered by NDA
 

RojoRacing

Donut Powered Wise-guy
no idea, I don't have the stock one handy anymore and I have no more new ones at this time to weigh.
 

Ivan_Liew

Member
I've been been using the Rojo clamp on my Silvio 2.0 for some time. It's definitely better than the original and reduces headrest movement and rattling when I hit a bump - so it's not only for ease of adjusment.

My Silvio only had one hole so I just used one bolt so far, and will consider drilling a second hole in my frame but it's not urgent. Now my seat is more firmly attached to the frame which is a plus. The only downside to this is that it is harder to take my saddlebags on/off but it's a small trade off. Highly recommended! :)
 

scabinetguy

Well-Known Member
Not that I have ever had a complaint concerning the stock head rest on the Silvio or Vendetta, I decided to make an "adjustable" head rest. I don"t know if Maria is still pursuing this design or not, she did have some interest a while ago. I made it out of an ADEM head rest pad and fastened it with a water bottle cage type mount. This mount makes it possible to adjust the head rest not only in and out but up and down. You can actually make quick adjustments during a ride. DSC_5449 copy.jpg DSC_5454 copy.jpg
 

ReklinedRider

Zen MBB Master
Very ingenious! Have been about to go the Thor seat mod route but think i will try your solution first. Thanks for posting.
 

tiltmaniac

Zen MBB Master
Nice! I wouldn't mind getting two of those too! ;)

If Maria and Jim don't decide to do this, hopefully they'll consider at least shipping with some modded screws (I got frustrated with this for my bikes and got some longer bolts which I modified to make a 30 minute long process of getting the seat on into a 30 second long process).
I like the scissor-clamps from a mechanical point of view (not likely to squeak, etc), but as shipped stock with the short screws, they're a royal pain to deal with.
I've been been using the Rojo clamp on my Silvio 2.0 for some time. It's definitely better than the original and reduces headrest movement and rattling when I hit a bump - so it's not only for ease of adjusment.

My Silvio only had one hole so I just used one bolt so far, and will consider drilling a second hole in my frame but it's not urgent. Now my seat is more firmly attached to the frame which is a plus. The only downside to this is that it is harder to take my saddlebags on/off but it's a small trade off. Highly recommended! :)

If you're using(/have) only one screw, I wouldn't be surprised about the headrest rattling. It really needs two mounts (i.e. both clamps/screws) to be secure in both dimensions in which it might (attempt to) move.
 

tiltmaniac

Zen MBB Master
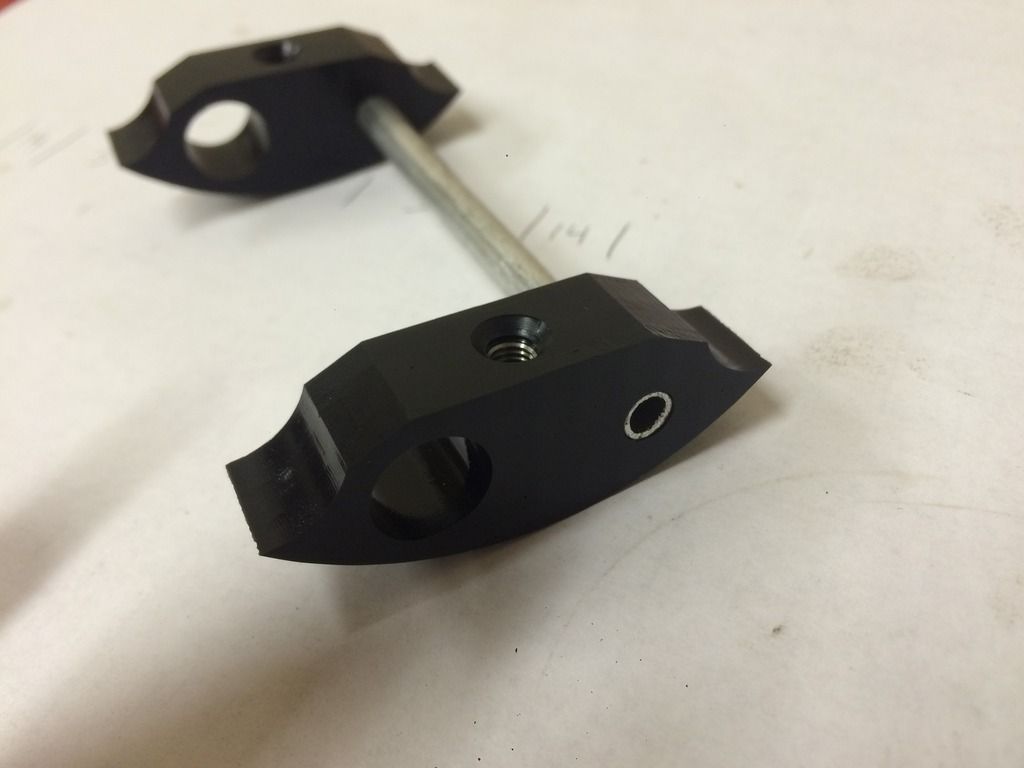
I just got my Perez clamps recently, but they're a different design than Jason's original: these new ones have the connecting rod on the centerline of the clamp body, preventing the screw from going through the clamp body, and providing only about 3/8 of threading depth total.

I find them very difficult to use-- you have to lift the clamp up in order to get the short (which is all that will fit inside the clamp body) screw to catch its first threads.
With the provided screws, there is a good few millimeters between the bottom of the screw head and the frame top for the rearmost screw-- providing no clamping action whatsoever! While I'm not sure how else I could be doing it, I'm open to suggestions about how I'm doing it wrong...
(It is entirely possible that, being an older frame, things have shifted...)

And, before anyone asks, no, you cannot use a longer screw unless you wish to place many washers/spacers above the frame (where it'd poke holes into your spine).

Any chance I can convince folks that Jason's original design (the rod which spaces the clamps out is to the side of the screw-hole) is superior, and we should go back to it?
With that design, where the screw can poke out the bottom of the clamp, screw length is not nearly so critical...
 
Last edited:

RojoRacing

Donut Powered Wise-guy
I just got my Perez clamps recently, but they're a different design than Jason's original: these new ones have the connecting rod on the centerline of the clamp body, preventing the screw from going through the clamp body, and providing only about 3/8 of threading depth total.

I find them very difficult to use-- you have to lift the clamp up in order to get the short (which is all that will fit inside the clamp body) screw to catch its first threads.
With the provided screws, there is a good few millimeters between the bottom of the screw head and the frame top for the rearmost screw-- providing no clamping action whatsoever! While I'm not sure how else I could be doing it, I'm open to suggestions about how I'm doing it wrong...
(It is entirely possible that, being an older frame, things have shifted...)

And, before anyone asks, no, you cannot use a longer screw unless you wish to place many washers/spacers above the frame (where it'd poke holes into your spine).

Any chance I can convince folks that Jason's original design (the rod which spaces the clamps out is to the side of the screw-hole) is superior, and we should go back to it?
With that design, where the screw can poke out the bottom of the clamp, screw length is not nearly so critical...

Sounds like the CruzBike version would be more difficult to install initially but it shouldn't be any harder to adjust the headrest after the fact. I'd be more worried about riders over tightening the bolt and pulling out the threads if too little thread engagement was used.

So deal with it once and it should be equally good after the fact.
 

super slim

Zen MBB Master
Can you drill new hole in the clamps where Jason had them and move the rod off centre?
Jason's rod location offers more resistance to the bolt tightening torque rotating the clamp!

Can you take a photo of one of the new clamps, as I have just ordered one, so I can plan to modify it.
 

RojoRacing

Donut Powered Wise-guy
Can you drill new hole in the clamps where Jason had them and move the rod off centre?
Jason's rod location offers more resistance to the bolt tightening torque rotating the clamp!

Can you take a photo of one of the new clamps, as I have just ordered one, so I can plan to modify it.

Based on his description you could but it would only get you half way their. Repositioning the rod to the side would let the bolt travel deeper into the clamp so you could use a slightly longer bolt but you'd still need to drill thought the other side and add threads to have the bolt go all the way through. Also unless you bolt was long enough to pass through the original rod hole and grab those new threads on the other side you wouldn't be gaining any added thread strength. Most of this is easy enough for someone like me to modify be is beyond the casual riders tool box.
 

ratz

Wielder of the Rubber Mallet
Email jacob@cruzbike.com about the problem and he can probably let you know if something is amiss with what you were sent. He designed the new one based on Jason's design. Normally this would got to support@ but in this one case it might be best to go to the source
 

super slim

Zen MBB Master
Based on his description you could but it would only get you half way their. Repositioning the rod to the side would let the bolt travel deeper into the clamp so you could use a slightly longer bolt but you'd still need to drill thought the other side and add threads to have the bolt go all the way through. Also unless you bolt was long enough to pass through the original rod hole and grab those new threads on the other side you wouldn't be gaining any added thread strength. Most of this is easy enough for someone like me to modify be is beyond the casual riders tool box.
I have drills, drill press, taps, and a range of metric socket screws, so full length bolts will be used, as I have a rear rack hanging off the headrest!
 

tiltmaniac

Zen MBB Master
Based on his description you could but it would only get you half way their. Repositioning the rod to the side would let the bolt travel deeper into the clamp so you could use a slightly longer bolt but you'd still need to drill thought the other side and add threads to have the bolt go all the way through. Also unless you bolt was long enough to pass through the original rod hole and grab those new threads on the other side you wouldn't be gaining any added thread strength. Most of this is easy enough for someone like me to modify be is beyond the casual riders tool box.

Precisely.
They actually have pictures of the clamp on the site-- looks just like that (CB pic below), though I'm happy to post pics too.

Perez-Clamps-700.jpg


Guide to the pic:
The set screw for the rod is on the same axis as the bolt (which, in this picture, would be on the other side).
The rod comes in perpendicular to both, and the rod's axis intersects with the bolt/set-screw axis.

I'll modify mine by drilling out the set screw, and drilling a new hole for the rod off to one side, installing the rod off to the side where it will not attempt to intersect with the bolt.
For reference, here is the original (imho better) design from the first page of the thread:

E024B919-C625-45E2-9B75-66934C7A790C_zpsoq0xw2nc.jpg
 
Top