Q ring upgrade - Ahhhhhhhhhhhhh......

Robert Holler

Administrator
Staff member
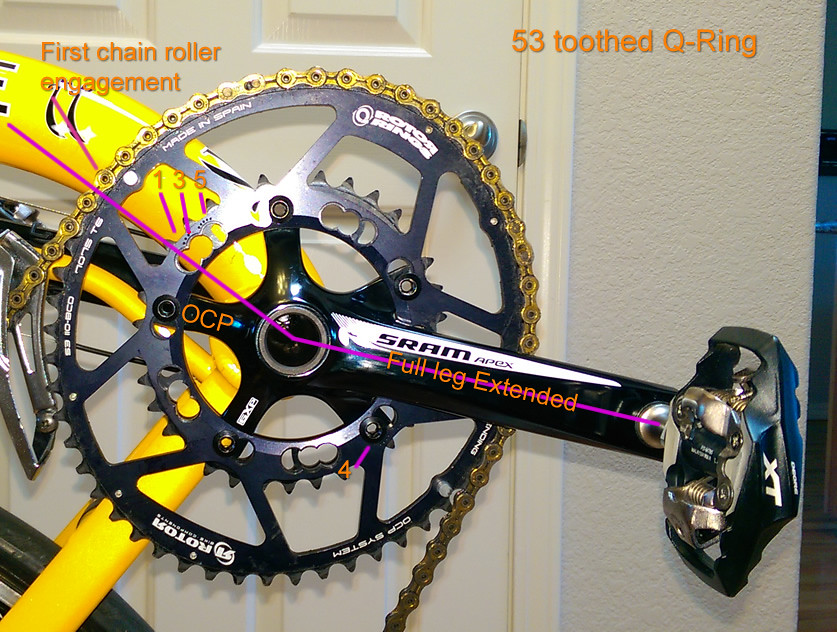
Having ridden Q rings on nearly all my past bikes and my QNT trike for the last three years, I finally upgraded my big ring to a Q.

Went for the first longer test ride this AM with it and it feels nice! As a bonus it looks good too. Likely will tweak the setting a bit but setup per the recumbent instructions as written by Rotor is very good I think.

:)

Robert


Rick Youngblood

CarbonCraft Master
Look good Robert - what size

Look good Robert - what size & tooth?

photo%201_0.jpg
 

Rick Youngblood

CarbonCraft Master
Robert, nice, 53t is hard to

Robert, nice, 53t is hard to find. I like the aero version, that's on my future hit list of upgrades.

You put a lot of work into your V-1, I was admiring your pic's on Facebook. It a beautiful bike. The red looks great with the silver.
 

ratz

Wielder of the Rubber Mallet
Interesting

Robert,

I worked on the same upgrade tonight. Interesting that like you we wound up with the factory etched markings; on the first bolt in front of the crank . That's a nice happenstance as it avoids marking up the ring with a sharpie. Per the instructions we wound up with ocp #2 (as printed on the ring) in the position that you have ocp #3. That was on the Vendetta. On the wife's Silvio we wound up with ocp #4 in that position; but I need to look at that with her on the bike again; ocp #2 might be the more correct dead spot starting point.

Did you pick ocp #3 as an adjustment off of baseline after some test riding? I'm curious since you'd be 180 degrees off from the baseline instructions; assuming we used the same ones. We followed these instructions:

http://www.rotorbikeusa.com/pdf/Q-Ring%20Recumbent%20instructions.pdf

As I understand it; that configuration you posted is valid; I'm just curious if you tweaked it after some rides; or followed different instructions that lead to a different initial starting point.

From a details stand point; the vendetta got a 52/36 with all gears usable. The Silvio got a 52/34 which works; all gears available to the 52 and but the bottom 4 not available to the 34 because of interference from the 52 and the angle of the chain; nothing major though you could ride them if you had to.

Only problem yet to solve is we need some sort of over shift guard on the crank arm; because the ring are rotated away from the DF standard position like your the over shift pin on the ring is useless; and there have been times that pin has saved me with my round rings.


Robert Holler

Administrator
Staff member
Ratz,
Since taking that


Ratz,

Since taking that picture I have moved the ring to OCP #2 similar to yours. I used those same instructions, but actually only did I read them after setting up my rings initially based on how I have set them up in the past on my old high racers and trike.

They feel pretty good and I am going to leave the ring there for the next few hundred. Hopefully it will be a good setup now as-is. I will find out here in early September when I hit Cycle Oregon which this year is over 34,000 feet of elevation over 7 days.

I have the entire cassette usable in the Q ring and all but the smallest 3 cogs in the small ring. With this Q ring I have found I can go up some local hills that previously had me dumping into the small chainring. Bonus. Here soon i will have to acquire a small Q ring to replace my round 34T, but that will have to wait just a bit...

I was a bit worried how the shifting would behave with the double taps - I have always run friction bar ends on everything. But there are zero issues and shifting from ring to ring is very crisp.

Robert
 

John Tolhurst

Zen MBB Master
WIth the different leg to

WIth the different leg to chainstay angles across different bikes, the key figure is what percent through the stroke do you engage the major axis. What is the consensus? Is there a different consensus among riders who lie flat compared to riders to those who sit up more?
 

ratz

Wielder of the Rubber Mallet
John,The Rotor instructions

John,

The Rotor instructions are interesting in their approach. The rings are considered to have 5 possible positions of rotational offset for mounting. Two are on one side of the ring and three are 180 degree opposite. Positiosl 1,3 and 5 are on one side and 2 and 4 are on the other opposing side. They want you to start at position 2 and then adjust based on your performance goals after some riding.

Rather than have you work with angles to do the install they just walk you thorough a physical process that gets you to the desired angles. That approach should help the non engineers do the install. The instructional PDF is convoluted the first time you read it then it starts to make sense as you work through. If you just follow it carefully; it does just work and you really don't have to understand what is going on; just follow along and you get the right answer for each unique rider and bike setup. (I admit to doing it wrong the first time and on re-reading the instructions I found my error.)

The process they use is basically: (a) figure out the crank position that is your dead spot; (b) then psychically align the ring on the crank so that the high point is just engaging that chain when the crank is at the dead spot. (c) They have you mark that as position #2; and you subsequently calculate positions 1,3,4 and 5 relative to that one. (d) Then mount the rings with the bolts.

Interestingly; Robert and I have our Vendetta Booms (from the look of his picture) set about exactly the same and we look to be about the same height. Our independent separate physical setup gave us the same exact orientations. It does seem logical. For me I find it rides really nice. I'll do as rotor suggests and ride it a good 200 miles to acclimate before I decide if I want to move it to higher numbered position.

The pdf notes the following about the mounting hold you select, which they call the "OCP"

A higher OCP regulation number is better for acceleration, and a lower regulation number should give a slightly higher top speed. If you would like to be able to transfer power earlier in the stroke or get a feeling of more resistance (often for mashers), rotate the chainring to a lower OCP number. If you would like to transfer power later on in the stroke or have the feeling of less resistance, rotate the chainring to a higher OCP number.

Now that I have it mount, it makes a lot of sense. They do instruct you to mark the holes in question for reference against a fixed spider bolt. In Robert's case and mine the factory etchings nicely line up at different spider bolt and we can just use that as our reference point; as it really doesn't matter which bolt you use as long as that's the one you always use after the initial setup. Him and I are simply lucky due to our boom Position choice and height.

For comparison, on my Wife's Silvo the BB is higher from her shorter legs. When I do the physical mounting process her alignment turns out one hole position counter clockwise from mine. That position results in the same exact angle and position for the ring relative to her dead spot. Her's does not yield the convenient alignment of the etched markings. That is easy enough for me to track correctly by using the Vendetta as a reference since it's only 1 position off; otherwise I would probably have to mark the holes as per the instructions.

I will take some close up photos and add them to the thread. They should show how the angles wind up the same from slight different mounting points. In the end it's a function of the boom height; and then the riders personal preference for positions 1 thru 5 for power uptake. I think that final choice of position 1 thru 5 will likely tie back to your question about whether that preference is different for riders that lay flat and those that sit up. I think lying flat does at times encourage us to be a little more of a masher. but will we prefer a masher friendly alignment; or the one that encourages use to spin more. That should be very interesting to figure out in the coming miles.

Interesting on Round Round 52/36 was good for me, so that's the Qrings I used; I can already tell that 53/39 would have probably had a near equal low end thanks to the ellipticals. Both bikes just gained more low end; and in the wife case we stepped up to a 52 from a 50 and she gained a lot of range.

Lots to like so far, it makes the Vendetta really smooth to pedal; just like a Quest.


ReklinedRider

Zen MBB Master
Q-rings

When I set up my Silvio I followed Rotor's instructions for mounting the spider on the big ring just as a starting point. Then I followed John T's advice: found the DBC of my pedal stroke, then using the iPhone clinometer app as described by Randy Spann I backed the crank up 70 degrees. I fully expected to have to make adjustments but bless beginner's luck! At 70 deg back from DBC the tallest tooth on the Q-ring was just engaging the chain. So I called it good and left it alone. Had the small ring lined up the same as the big.

It feels completely natural; never noticed any 'oddness' while pedaling, it feels like I'm spinning round rings. Had never used Q-rings before so have no idea how it is 'supposed' to feel. Hope it's right. It sure feels ok. 53/39 rings with 11-32 cassette; I live in an area w few real hills, so far so good. Like others have mentioned I can use all the cogs w the big ring but cannot use the smallest two w the small ring as the chain catches on some protrusions on the inner side of the big.

Shifting is smooth as silk using SRAM Rival shifters, Red Yaw FD and Rival wi-fli RD. I find myself looking down at the chain when going from small ring to big because the shift is so quiet and smooth I am left wondering if it shifted. It always has. Like I said, beginner's luck :)

And! Many thanks to John T for the Q-ring setup advice for recumbents and to Randy S for the clinometer suggestion.

KM
 

ratz

Wielder of the Rubber Mallet
Kline,Were the instructions

Kline,

Were the instructions you follow the recumbent ones or the standard ones? The recumbent specific instructions physical instructions resulted in about a 73-75 degree rotation reverse rotation of the ring from vertical (just measured it with clinometer).; so that would basically jibe with what your results too accounting for differences in bike setups.

If Robert hadn't mentioned the recumbent instructions pdf existence I probably would have been doing a stock setup and then following the back off instructions discussed here previously.

Out of curiosity. Did you wind up with any of the "Etched" number marking on any of your bolt spider bolts; that would give you a location to use for tweaking the orientation using the other numbered positions; or will you have to hand number your rings?

You are right about it feeling like spinning round rings; weather and kids are keeping me off the longer rides, but all the ones I have gotten in; it is actually hard to not spin, which I will call a good thing.

-bob
 

Robert Holler

Administrator
Staff member
If you are curious and rotate

If you are curious and rotate the rings way off the setup that feels right, you can really tell how wonky it is when they are improperly dialed.

:)

Robert
 

ReklinedRider

Zen MBB Master
Instructions

Hi Bob,

I followed the recumbent instructions as outlined by John Tolhurst. With my crank at 'dead bottom center' it was just about horizontal, so rotating back 70d the crank was just forward of vertical.

I will have to look at the rings and bolts when I get home to see about the etched marks. That was several months ago and I haven't given it a second thought since. Everything was working well so I've just been riding. I will try to take a close-up pic and hope I have better luck getting it to load than when I tried in the past.

KM
 

ReklinedRider

Zen MBB Master
Wonky

Robert, maybe that's why a local Bachetta rider told me his Q-rings felt 'jerky' until he got used to them-- maybe they weren't (and maybe still aren't) set up right. If and when I run into him I will have to refer him to John's method so they won't be wonky ;-)

KM
 

Rick Youngblood

CarbonCraft Master
Bob, I'm glad you like the

Bob, I'm glad you like the Q's.

I'm going to post a pic of my setup later today, I followed the rec. setup PDF.

If you guys get a change, please post you's too.
 

ratz

Wielder of the Rubber Mallet
Pictures of the results

Disclaimer I made the garage messy so some of you could actually view the pictures without discomfort. :)


First the vendetta with a 52/36 and a 28/11 on the back. Picture taken at the dead spot with the ring orientated with the Etched position #1 as the first roller that fully sits in the the tooth. You can see my sharpie marks with the up side down "2" and "4" that mark my adjusted OCP#2 per the instructions. That is suppose to be the bolt I use going forward for picking positions 1-5 and I am suppose to mark up the rest of the ring with the sharpie for positions 1,3,and 5. Note that the Etched OCP#2 from the factoring is dead on my first bolt in front of the crank. With my orientation I will be able to just use that bolt instead and the factory marks. This is good because the sharprie will likely wear off.

QringSetup1.jpg


On the Silvo the Dead spot has the pedal just a hair lower. This bike has a 52/34 and a 32/11 on the back. In this setup the Q ring had to rotate 1 hole counter clockwise when referenced against the vendetta. The larger 32 T on the back and the back and the slightly lower BB contribute to that positional shift. Then factory OCP#1 is the first toot to fully engage the roller with the pedal in the dead spot. You can see the Suggested OCP bolt again in this picture opposite the crank arm. Now that I understand what's going on; I didn't mark this ring with a sharpie. I will use; bolt just forward of the crank arm and the factory marks. In this case the factory marks are simple 1 position off counter clockwise ; and that's easy enough to remember. This text on this picture is in error, but I don't seem to be able to replace it. It should say it's just one hole off of OCP#2, so I will use that bolt as a reference.

QringSetup2.jpg


I did my "roller" engagement base on "Big Ring" , "Big Sprocket" on the assumption that setup errors would be most noticable when going slow up hill; when the pedal stroke would spend the most elapsed time going through the dead spot.


Rick Youngblood

CarbonCraft Master
Thanks Bob. So on your Silvio

Thanks Bob. So on your Silvio you are running 110 BCD cranks and 130 BCD on the V.

I like the aero version, and put them on my wish list.

Okay, here is my 53 tooth Q-ring setup on the Vendetta, along with a 34 Q-ring.

Yeah, like Robert, I love these things, they just feel so right.


15066205765_6ba1979677_b.jpg
 

ratz

Wielder of the Rubber Mallet
Both are 110

Rick,

Both bikes are using 110BCD; 130's just don't make that much sense for me; a 52T is about as big as I'd run and I like the flexibility of getting down to a 34 if I need to.

So you're setup match's Mrs Ratz's. Your pedal angle in the photograph is probably more representative of her full leg extension position I just couldn't get it to sit there for the photo.


Rick Youngblood

CarbonCraft Master
Bob, it looks our Vendetta's

Bob, it looks our Vendetta's are within one hole. I'm on #4-DF and you are on number #2-DF which is the next hole counterclockwise, on the first bolt hole below the crank arm. And then I am identical to your Silvio pictured. So we are pretty close.

Aw, 110 both bikes, that makes swapping and changing out much easier then, and you could always go with a 34 chainring if needed on the V.

With my 53x34 chainrings and 13-42 cassette, I have every gear usable, however, in 34 chainring and 13 cassette cog, I have a mild slight chain rub on the inside of the FD, and it does not rub the 53 at all (due to rubbing first on the FD). I like to avoid the cross chaining, but sometimes for short periods it makes more sense not to.
 
Top