Vendetta 2.0 unboxing and build

thebean

Well-Known Member
Eric,
i get butterflies of


Eric,

i get butterflies of excitement reading the description of your ride! Ha, you don't need the granny do you?!! There isn't a hill that the Silvio or Vendetta can't conquer. Can't wait to see pictures!
 

Andrew 1973

Zen MBB Master
Pics please

C'mon now. You can't take us through the unboxing and build without showing us the final product. Let's see this glorious machine.
 

Eric Winn

Zen MBB Master
Gearing with a Road-MTB mix and a gotcha

Lisa:
Ha, you don't need the granny do you?!!

Not yet! John got it right when he says the Vendetta will get better performance at a lower levels of effort.

I've already beaten two of my hill climb segments and my data shows my heart rate was lower while being quite a bit faster. And that is with only 45 miles on the bike so far and currently crappy shifting - read more to find out why.

Here is my Mike Sherman Gear Calculator - Eric Winn Vendetta 2.0 page for the configuration I used on my Vendetta:

  • 53x39 full double front (not compact)
  • 170mm cranks
  • 11x36 cassette
Thanks to the help of Dan Fallon, ak-tux and Charles Plager in Dan's forum post about Mountain gearing setup for my Silvio, I learned you could combine some MTB and Road components to get a wider gearing range than just road components alone.


If you read through that post I tried to compare my MTB low end to what I could get for gearing using a SRAM Rival groupset. I wanted to allow for hills but still not run out of gears too soon at the top end. As far as a compact double vs a full double, I based my decision on Dan's mountain gearing comment about starting with a 53x39 double, then switching to a 50x34 compact, but then switching back once he got his mountain legs .

Andrew Baloga did mention the SRAM Road WiFli rear derailleur (RD) for a larger cog set but it only handles up to a 32T cog and I wanted to try a 36T based on comparisons to gain ratios on my ancient Diamondback MTB.

So, via Cruzbike and Jim Parker's help, I bought a SRAM Rival groupset but swapped in a medium cage SRAM X9 TYPE 2 MTB rear derailleur and a SRAM XG-1080 11x36 MTB cassette.

Here is the gotcha.

  • SRAM Rival Road brifters + SRAM Rival Road RDs include the cable tension adjuster at the cable connection point on the RD.
  • SRAM MTB shifters + SRAM MTB RDs include the cable tension adjuster on the shifters.
  • Combing SRAM Rival brifters with a SRAM MTB RD left me with no cable tension adjuster .
Unfortunately I didn't catch this until I had everything together and was trying to adjust the RD shifting, cussing and tweaking as best I could without the missing adjuster - hence the crappy shifting. I reached out to my LBS owner Sean, who has ordered an inline adjuster for me and we will add it and fine tune the shifting together once the new part arrives. This should eliminate the crappy shifting.


One other note: Sean caught where I screwed up (pun intended) the cable adjuster for the FRONT derailleur, which John does include welded on to the Vendetta boom. I had screwed the thing all the way down like a brake adjuster instead of screwing it in halfway to allow for equal +/- adjustment of the FD tension. I'll re-do that next week with Sean as well.

Technical note: I picked the SRAM X9 TYPE 2 despite being a hefty price increase over a SRAM Road RD because I found these features attractive:

  • The SRAM Cage Lock<sup>TM</sup> - I had already decided to buy a Wahoo Fitness KICKR for winter training, see my thread here and Dan's here. This feature makes removing the drive wheel easier by locking the cage in the open position with a little button.
  • The SRAM Roller Bearing Clutch<sup>TM</sup> - per SRAM, eliminates derailleur bounce and chain slap without sacrificing precision . I figured the longer chain needed for the 36T big cog combined with rough roads would make this a good idea to have. I'll let folks know how this works out as I get more time with it. Also - based on my experience with tossing the chain a time or two on the Quest with the elliptical crank ring and my less than perfect messing with the RD tensioner makes me suspect this roller bearing clutch concept might be a good match for elliptical chain rings too.
Anyway, back to Lisa's comment. I figure I will need the small ring when I get into riding more terrain like Dan describes in his posts here in the Cruzbike forums and on his blog or for ultracycling events like the Heart of the South 500 route which Maria Parker raced a few weeks ago. Hopefully my gearing choices will work for me - I'll let you know when the time comes.

-Eric
 

Eric Winn

Zen MBB Master
Vendetta 2.0 Walk Around Video

Here you go Andrew and friends. This is unedited video of my new Vendetta. See my editorial comments over on the View it on YouTube mode for some corrections and clarifications where my mouth got ahead of my brain:


-Eric
 

thebean

Well-Known Member
Eric,
Great video, and thank


Eric,

Great video, and thank you for posting. Your Vendetta is amazing!
 

Eric Winn

Zen MBB Master
Misc build photos

Front triangle with slider and handlebars separated:


Steerer tube spacers and top cap. Changing the order of assembly lets you fine tune the height of the Vendetta's attack angle so to speak. I started with the pivot clamp at the bottom with the three spacers on top but kept raising the pivot clamp to give me clearance around the water bottle and cage until I got it on top with the three spacers below:


Note you rotate the pivot clamp pin forward to use the most forward pivot cage hole or rotate the pin aft to use the most aft pivot cage hole. Pretty clever way to adjust handlebar reach separate from pedal reach, eh?


Intermediate height, one spacer below pivot clamp, two above.


Two spacers + picot clamp + last spacer:


Pivot clamp all the way on top with three spacers below:


On the Wahoo KICKR:


SRAM Rival 53x39 crankset. 170mm cranks.


SRAM XG-180 11x36 cassette.


Shimano PD-A530 dual platform pedals - I was tempted to get the ones with black platforms but read about of lot of paint chipping off from cleats etc so I just went with the plain ones. Also Wahoo Blue SC (Speed and Cadence sensor), SRAM Rival rim brake, and Zefal water bottle cage - NOTE: I had to elongate the mount holes in the water bottle cage slightly to be able to adjust the position back slightly in order for the H20 cage base to clear the pivot cage weld bead..


Front brake tolerances with the fork are extremely tight.


SRAM Rival brifters with the rubber hood pulled back to run the shift cables, brake cables, and to tighten the handlebar clamp. NOTE: SRAM Rival brifters come with the shift cable already installed on the brifter but you do need to feed and seat the brake cables.


SRAM gives you the option of routing the shift cable in one of two different ways. You can run it to the outside of the bar or to the inside. The brake cable follows the inside path so you can run the shift cable alongside the brake cable or brake on inside and shifter on the outside.


SRAM MTB X9 TYPE 2 roller clutch rear derailleur mounted to the RD hanger.


Nifty Cage Lock feature - makes drive wheel removal easier for fixing flats and mounting the bike on the KICKR. Do you see the little button with the lock emblem on it? You manually extend the RD cage until you can press this button which drives a pin to catch and hold the cage in the extended position.


Rear view shows the RD hanger better


Starting to setup the FD on John's custom FD stalk design. Works really, really well but with the curved piece of housing looped under the bottom bracket and the spring on the FD, setting the initial tension by yourself with no cable puller is a royal pain in the bum.


Cable runs are very, very neat on the Vendetta. Cable housing goes from brifters along handlebars where they will eventually be covered in bar tape, then internally to the slider and out the pivot cage via this oval hole on the bottom of the slider up near where the handlebars mount.


My new Topeak D-Tork DX torque wrench. Pricey little bastard but exceptionally nice piece of kit. 4-80 N-m range, with the ability to toggle between N-m, in-lb, ft-lb, or kg-cm.

Checking the rear brake cable run before cutting some housing to fit. The rear brake cable uses internal frame routing.


Here is the aft end' left side as seen from insode the frame tube. I was able to stick the corner of my iPhone containing the camera lens inside the bottom lightening hole to take this photo. NOTE: It is very, very easy to run this cable. Stick it in the top and push through to your fingers inside the bottom lightening hole on the HF tube and guide it out the rear fitting with your fingers. You can even watch/see this as you are doing it.


You do file and clean up the ends of your cable housing cuts, right? It is hard to get the iPhone camera to focus on the end of the cable housing..


Rear brake cable housing. I ended up trimming this about a 1/4 inch shorter than shown here.


Rear brake assembly. NOTE: I had just installed it but had not adjusted it yet so no lip from the peanut gallery about the brake pad orientation, etc. Those Gator HardShell tires look pretty cool.


NOTE: Do you remember where I said earlier the leading edge of the seat would rub the paint on the frame? This little pad is covering an abrasion made by me just carefully sitting in the seat checking the fit of things - well before riding was possible. This pad came with an iPhone case I had bought. It is similar to the pad on the end of a pool cue but softer. Works perfectly!


Wahoo RFLKT mounted and the cable runs for the SRAM brifters. NOTE: The standard brake cable housing provided in the SRAM Rival DoubleTaps is NOT long enough to do all of the brake cable runs. I had to buy about 3 more feet - so I bought 4 more feet for about $8 USD just to make sure. That left bare cable is for the rear brake. Left brake lever = rear brake and right brake lever = front brake on my Vendetta! And yes, I did ride motorcycles for many years for those who are wondering.


Wahoo RFLKT loading pages. It only does this when you first turn it on. You can customize the number of pages and what each page displays within the limits of the RFLKT's memory capacity. Very, very cool and handy device.


This is just the test utility result. You also use your iPhone to deliver firmware updates to the RFLKT as new features or bug fixes come out. For example, if the Shimano DI2 electronic shifters transmit status via Bluetooth Smart or ANT+, the REFLKT could be customized to display what gear you were in and whatever else the DI2 might be capable of transmitting.


This is my default page:
  • Top left GPS indicator
  • Top right Unit indicator for the first cell which is configured to display total ride miles
  • Next cell is total moving time
  • Left cell with speedometer icon is current speed in miles per hour
  • Right cell with Cad label is current cadence
  • Bottom cell displays my iPhone's battery status, numerically and with a staus icon and text label
All of the above and more are all customizable to whatever you want to display. Typically you can load about 4 pages in memory. There are also 4 buttons. They don't show well in these pictures but they are two on each side. The top two (left and right) are roughly in line with the 5.95 miles being displayed. The bottom two (left and right) are roughly in line with the speed and cadence display cells. All four buttons are programmable to do all kinds of things and within limits can be different on each page.

Button combinations can also be programmed - for example pressing and holding the top 2 buttons for 5 seconds at the same time resets the RFLKT and causes it to reload the pages from whatever app is currently connecting to it. Pressing and releasing the bottom two buttons toggles the backlight on. The backlight is currently set to stay on for 30 seconds and then automatically go back off but this can be changed to longer or to require another two bottom button press to turn back off.

The RFLKT uses a CR2450 coin size battery which is projected to last about a year as long as you don't make prolonged use of the backlighting.


Front SRAM Rival rim brake about to get its cable housing - NOTE the filed cable end!


NOTE: I ran a cable donut about midway along the internal frame routingto try and minimize the risk of the cable rubbing the frame. As you can see in this photo I am using a piece of cable housing to shove the donut to the position on the cable where I want it to be.


In this shot you can see more of the lightening holes in the HF tube as well as a little bit of the sissor-jack headrest clamp John invented.


Sizing my chain. NOTE: I used two methods to cross check I was getting the size correct:
  • Sheldon Brown guide showing chain overlap with new chain set on big-big but NOT threaded through the rear derailleur
  • Park Tool formula to calculate chain length: L = 2(C) + (F/4 + R/4 +1) where L = Length, C = Chainstay length, F = Number of teeth on largest front chainring, and R = Number of teeth on largest rear cog
  • For my gearing and chainstays this worked out to be: L = 2(19.5) + (53/4 + 36/4 + 1)
  • L = 2(19.5) + (13.25 + 9 +1)
  • L = 39 + 23.5
  • L = 62.5 Normally you would round up to 63 inches but comparing the formula result to the overlap method indicated it best to break the chain right at the 62.5 inch mark so the power links would line up.


SRAM PC-1071 chain installed. NOTE: This most commonly comes packaged with 114 links which is not long enough but Cruzebike sends along an extra small length of chain with anothe power link so my chain has two power links to end up with one chain long enough to fit my setup. It still beats a freaking 10+ long chain, no? Koda is supervising to make sure I do it right.


Measuring my wheel rollout length to get the actual circumference of my wheels and tires to plug into my Cyclemeter App.
Koda hair included at no additional cost... Sigh, this is the time of year she sheds her winter undercoat.


Except for bar tape and final tweaks to get the shifting cleaned up she is ready to ride include lighting and my Bachetta Brain Box.


And no, I did not keep the boxes.


Any other questions about how something goes together? Any other photo requests? Let me know and I'll try my best to accommodate.

PS - I am a bit over 5 feet 6 inches. I have a 28 or 29 inch inseam, a 38 or 39 inch xseam and fully reclined and stopped I can fit both feet flat on the ground. Very, very comfy position. Looks extreme but feels way less when actually in the seat.


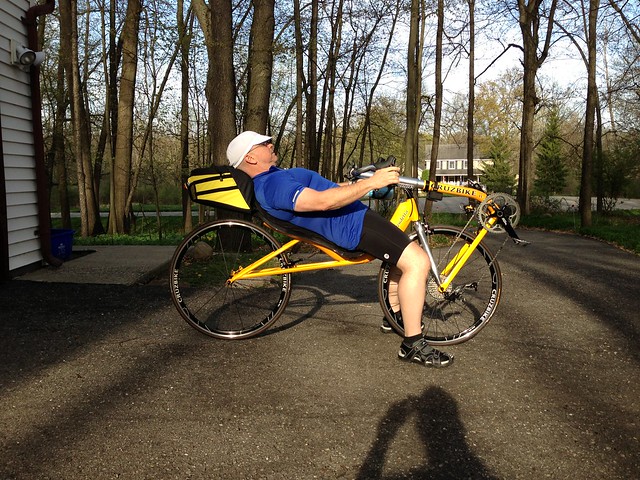
For a different look, here is my youngest son who is about my height but is skinny and not built like USMC Lt Gen Chesty Puller like I am.


-Eric


Eric Winn

Zen MBB Master
In-frame Headrest

The in-frame headrest and end plug installed. This is a little bit tricky to get into place but not too bad.

You can see the wide rubber strap in the third hole from the top. This is where the little scissor jack clamp is located. The rubber strap (recycled innertube?) holds the scissor clamp in place and the rubber sleeve around the outer radius of the two headrest tubes also helps to both cushion the tubes as they are pressed outward against the frame as well as providing a lot of friction to help in preventing the headrest from moving in and out of the frame unintentionally.

There are also two rubber sleeves around the tubes where the headrest frame plug is and serve the same function.

Because of the friction, I found it helps to gently squeeze the headrest tubes together as you insert the headrest and sort of rock it back and forth to insert to the desired depth. Make sure you check seat back clearance before inserting the headrest. In this image it looks like the headrest is still sticking out a lot but this is as far in as you can go without trimming the top of the seat.


Frame plug viewed from the aft end. You can see the rubber sleeves around the headrest tubes, flush with the frame plug. The combination of tubes, rubber sleeve, and frame plug are tricky to get into place without wrinkling the rubber sleeve. As I mentioned above - go slow and work the entire assembly in by squeezing the tubes together right above the plug. You will also need to push on the back of the plug and kind of rock it back and forth and up and down a bit.


You can just see the scissor clamp through the second from the top frame hole. You should install and remove the headrest at least a few times, checking to see how things fit and where they need to go. I recommend sticking the headrest frame in loose without the plug, put the seat on to see how far in you can go, then try and sit in the seat and move the headrest to fit yourself. Note where this is in relation to the frame and the headrest tubes. IMPORTANT: You also need to identify where to position the scissor clamp so that it ends up in the center of an appropriate frame hole so you can tighten the bolt that drives the headrest tubes against the frame walls! You also want to make a note as to where the frame plug needs to be positioned on the headrest as you need to put it in place on the headrest and then guide headrest with plug in place into the frame.


Headrest viewed from above. Note the scissor clamp with rubber band was positioned so it was centered in a frame hole with the headrest set to my desired fit.


Side view.


Looking down at the top of the seat. The headrest is in the same position below as the picture above. I'm short so I have it inserted all the way in. You could go further in but you would have to trim the top of the seat to do so. I would recommend experimenting with additional seat padding to tweak your position before resorting to trimming. NOTE: Just remember to check your pedal fit at the same time as your headrest fit!


Headrest and installed seat viewed from the aft end of the Vendetta. Observant folks will see the subject of my next post in this photo.


Seat, seat cushions, headrest, and headrest cushion installed.


BTW, there are these rubber coated wires called GearTies by NiteIze available in different colors and sizes that are kind of handy. I was experimenting with one of the smaller sizes last night to hold my rear blinky in the correct position on the back of the headrest. Just using the light's built-in clip on the little pocket in the back of the headrest (at least when the pocket is empty) results in the light sagging backwards and pointing more to the ground than straight back like it should. As shown, this will actually hold it just fine but since I was just cruzing around the neighborhood to try it I wasn't too worried. For long rides with rough road I would use a few more twists.


The package I'm holding is a larger size than the one on the headrest.


I saw these in both Home Depot and Lowes and bought them to use to hold my water reservoir drinking tube in a more accessible manner as it emerges from inside my Bachetta Brainbox. This was something Dan Fallon came up with several years ago using something similar to the GearTies and when I saw them in the store, I immediately bought several sizes to experiment with. Thanks again Dan!

-Eric


Eric Winn

Zen MBB Master
Pedal fit not pedal pit...
I


Pedal fit not pedal pit...

I wish this thing would let you edit posts other than the very first entry....
 

Eric Winn

Zen MBB Master
Seat assembly gotcha

In general, the Velcro attachment method for the seat is working very well but I did run into a gotcha with the seat.

I now have 126+ miles on my Vendetta. Three times, perhaps four I had stopped in too high a gear without really recognizing this fact and was unprepared when I tried to start off again.

Not too bad if you are going straaight and can mash your way out but if you are getting ready to turn and you have pulled yourself forward to better watch traffic and then start to go and turn at the same time your weight shifts towards the outer edge of the seat a little. If you are in too high a gear and you suddenly try to mash your way through a turn your weight shifts a lot more toward the edge of the seat and if you are mashing hard enough will twist out of place a little - IF YOU FAIL TO USE THE INCLUDED FASTENERS.

I had done this twice before and ended up twisting the seat bottom slightly out of line. I wanted to ask John about this so I started taking the cushions off to manually reposition the seat to the way it had shifted under me. When I took the cushion off I found this stress crack:


What happens is the twisting motion ends up twisting the seat bottom under you such that the seat horn on the frame provides a point load because you and your butt cheek are mashing a lot of your weight on the tip of that pointy horn. You can see where this lines up in this underneath photo where I just lefted the leading edge of the seat bottom in the photo above and just pulled it straight back.


In this next photo I have re-staged how the seat bottom ended up underneath me twisted. You can also see where I went wrong. See those little holes toward the outer edges of the seat pans at the lap joint?


Well, you are supposed to fasten the seat pieces together with these babies (I had been wondering what they were for...). Not the RD hanger, that is a spare one. The bolts, washers, and nylock nuts were in the bag with two RD hangers and the current instructions don't quite address what to do with these. I suggest using this post in lieu of the instructions until they are updated.


Quick test fit seems to look good...


But, further inspection reveals the need for some filing and fit adjustments to get enough thread to use both washers and the nylock without stripping said thread.


NOTE: See the squared off bulgy curve of the lapped joint of the seat back on the bottom right below? That is preventing a good fit for the lapped seam on that side. Time to get out the file. NOTE: Since this is fiberglass and epoxy resin I recommend filing in a well ventilated area and using a hospital mask or respirator.


Take your time and file a little bit.


Check fit and repeat until the lapped joint fits well enough to get the bolt, washers, and nylock together easily.


I also rounded the trailing edge corners of the bottom seat pan. These were originally very pointy corners:


After filing carefully, everything fits together well enough to assemble the retaining bolts.


Bottom view.


Top view. Make sure you fasten yours like this BEFORE you ride it so you don't do what I did.


Another view. Chances are you will NOT want to tighten these fasteners very tight as then the seat curvature won't match the frame curvature. Just snug them lightly. Even this way, you will need to flex the seat when you stick it on the Velcro to get it to mate fully onto the frame.


Here is where I had tightened that lapped joint up very snug. The seat pan curvature did NOT match the frame curve and flexing it with the fasteners this tight would not have worked so I loosened them.


From the aft end.


After loosening the fasteners a little bit and giving the seat a gentle flex as you line it up on the frame - everything is back flush.


Right before this discovery and remediation, I had finished installing my inline cable adjuster for the rear derailleur that I discussed in an earlier post.


And I adjusted gears and brakes, trimmed off excess cable and crimped on end caps, and put on the bar tape.


You can see the GearTie for my rear light test I mentioned in my previous post.


At this point it was getting late so I stopped for dinner. When I finished it was dark so I took the newly fastened together seat out for a night ride and confirmed the bottom was no longer wanting to twist out of alignment.

I've swapped a few emails with John, Doug, and Jim on some ideas to maybe improve the seat design and how it is mounted. It actually works very well - not counting my screw-up - but it is more fiddly than I like lining it up and securing it to the frame.

The lapped joint pretty much sucks but is at least functional. I think a one piece seat with wider Velcro strips, perfectly matched to the frame curves and with the seat tabs or seat horns re-worked to be square tabs with corners rounded and predrilled in the seat pan and the tabs to accept the M5 bolts John mentioned earlier would be better.

My personal preferred solution would be a factory engineered piano hinge or similar joint right about where that lap joint is now. Bolt the seat bottom to the frame through the seat tabs, and then you could pull the seat back forward for easy access to the headrest clamp, secret stash inside the frame of spare tube, tires, tools or what not. Then you could just plop it back down and since the bottom would be secured and the piano hinge would retain the correct seatback alignment to the frame, the back would always drop right back on top of the Velcro without fiddling with lining things up. E.g. a bent with a boot (trunk for us yanks) - yet another Cruzbike first?

One additional advantage is this would make it super easy for the I don't want my seat reclined that far back crowd , to add a very light weight shim to end up with a custom recline.

John Morciglio lives near me. I may try and chat with him to see if I could engage his services to craft such a seat in carbon fiber unless John Tolhurst pulls off another of his wizarding wonders and comes up with something better first.

-Eric
 
What is the angle of the

What is the angle of the bottom seat pan like? I'm curious if it is angled up at all to form a bit of a aerodynamic wall.
 

John Tolhurst

Zen MBB Master
I guess the aero wall is the

I guess the aero wall is the actual body of the person. The seat merely follows that shape.
 
I don't see it in your photo,

I don't see it in your photo, Eric, but my Vendetta has a hole next to where the FD mount post is. I ran my cable through that.

FD.JPG
 

Eric Winn

Zen MBB Master
Nope, mine doesn't have a

Nope, mine doesn't have a hole there. I even checked to make sure there wasn't a sticker covering it up

Looks like that smooths up the slight bend I have but it doesn't appear to affect shifting so I don't think I'll drill a hole.
 

John Tolhurst

Zen MBB Master
less convoluted cable run

That hole is a pretty good idea. it removes a couple of small kinks. Friction is logarithmic to the accumulated cable bend measured in radians, so a small reduction in angle gives a noticable reduction in lever effort.
 
Top