Andrew Roerkohl
Well-Known Member
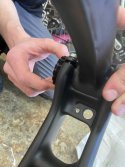
There was no thread locker, the threads were bare. And the drive side BB threaded on very easily
I have a tap to run through - sometimes the paint process gunks it up a little. That large of a tap is a little pricy though - You can probably take it to you LBS and they will probably do it for you for free to cheap - This is the easy way to clean it outThe picture above is misleading a bit because of the reflection of the grease. I have not cross-threaded it, going to my bike shop to run a tap thru the hole to make sure i dont force anything. Anyone else have difficulty here?
surprised your LBS does not have one - just keep trying it - spin it backwards until you can feel the click when it runs past the first thread and then slowly start trying to wind it on. I have had a few that were a little challenging to get started.I have a tap to run through - sometimes the paint process gunks it up a little. That large of a tap is a little pricy though - You can probably take it to you LBS and they will probably do it for you for free to cheap - This is the easy way to clean it out
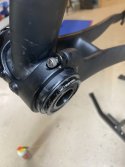
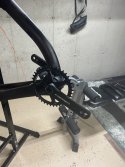
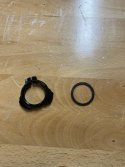
You might need to. Is this ring part of a Rotor crank? If so you might need to keep it on to prevent the crank from sliding back and forth. You really night need to get them involved - or whoever the maker is.After re-reading the instructions I found out the spacer is only supposed to go on the drive side. I also removed the preload adjusting ring that seems worthless. Are you only supposed to use this on 2x set ups? The instructions that were included don’t match exactly to what I got. For instance the instructions and diagram show a crank set nut cap but they were not in the packaging. The crank does free spin now. Do I need the preload adjusting ring?
It depends a little bit on what brand of sealant you use. I use regular Stans, which basically evaporates over time. I don't clean it out or even pop the tire bead before refilling. If the tire is new, I add about 2.5oz. After that, I add 2oz. I do about three such rounds until the tire needs to be replaced (Schwalbe Pro Ones). A friend of mine uses Orange Sealant, which creates a rubbery layer inside the tire casing as it dries. If the tire is off the rim, I will peel that layer off before reinstalling the tire. If the tire stays on the rim, I won't bother to clean out the tire. That thin rubber layer weighs almost nothing. By the time successive layers start to gather a little mass, it will most likely be time to replace the tire anyway.Do you just keep adding or you actually clean it out once a year?
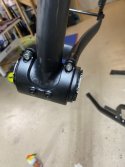
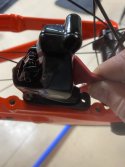
I recently installed a Croder crankset and had similar problems with the non-drive dust cover - the sleeve that needs to be inserted between the axle and inner bearing is a challenge, and I’m not sure why the dust cover has that because other BBs I’ve seen don’t (acknowledge that my sample size is about 5). I used a socket that just fit over the axle to hold the cover in place while using a rubber mallet on the drive side seemed to work.Took your advice and tried again, found i did maybe have 1-3 mm left to pound the drive side crank in and put the adjusting ring back on. Still got a little tight after putting 60nm of torque on the non-drive side crank arm. So i backed it off and only put 40nm of torque on it and tightened the adjusting ring back up and everything spins really nice. I had a hard time keeping the dust cover aligned while inserting the crank shaft so i might be pressing to hard on that when tightened. Since i have had such a hard time with this bottom bracket and now that i know exactly how to do it i think i will just leave it at 40nm and purchase a new BB with ceramic bearings and start over. But this will allow me to keep on going at least. So now i guess its onto the brifters/brakes/cassette mounting.

 docs.google.com
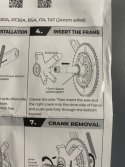
The way I read the Croder instructions was that the drive spacer was used for the 2x system (note by the arrow). I then looked at the CB instructions for the non-drive spacer. I think (don’t know for sure) that adding the spacer to the drive side could affect the chain line. There was discussion of chain line problems in the original short crank topic and I think in other forum topics. With all that said, if it works then keep it.@kizarmynot you are correct about those instructions, but it’s not the same BB as what’s in the picture that comes in the kit. In the instructions it shows the washer on the drive side. See below. Bike building is tough because even the instructions included with the parts don’t match. I am so happy I have an older v20 I can ride while slowly building this one.