tiltmaniac
Zen MBB Master
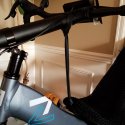
Close-ups of the GPS+horn mount:


")


I love reading about your build. I ride the slightly older S30 version. I also have a Q559 which I do not love. I am debating selling the Q and buying another S. Your build helps me. I go between Ky and Fl and would prefer not to haul bikes back and forth. Was there a specific reason you did not buy the S40 and went with the S30 instead?
I can put the disassembled S30 in a airline-approved piece of luggage, fly across the country or world, re-assemble it, and have a nice long tour on it
Can't do that with the S40 yet.
In this sequence, I install the bottom thermoplastic shim, then the top thermoplastic shim, then I show how the bottom of the seat fits.
If you pay close attention to the 6th or so photo, you can see the Perez clamp installed.
The top seat screw goes into the top hole of the Perez clamp.
This is the modified Perez clamp, where I drilled out the middle so bolts could pass through, and put the rod on the side.
View attachment 6410 View attachment 6408 View attachment 6407 View attachment 6406 View attachment 6404 View attachment 6405 View attachment 6409 View attachment 6411 View attachment 6412View attachment 6444
Where did you get the thermoplastic stuff? That looks pretty solid.
I just installed the anti flop band. Works great! Thanks for sharing.One rubber band, but long enough (18" un-stretched) that it loops over the boom. I've also done it with two or three rubber bands, but that requires either zipties or boom disassembly to mount, or you end up with a wider knot down lower which wears out faster.
I leave it attached all the time. The rubber band isn't strong enough for me to notice it when riding (steering deflection isn't that big during normal riding)-- it mostly helps with moving the bike one-handed, to prevent the bike from falling down when parked (e.g. against a wall), and preventing boom-strike against the rest of the bike.
The rubber band has lasted for 600 miles without significant wear, so I expect it to keep on going for another 400-600 miles more. If you buy 'em in larger quantities, the cost is $5 per 1000 miles. Pretty cheap
Sweet! Which band did you try?I just installed the anti flop band. Works great! Thanks for sharing.
There is no difference as far as I know.I used the black one from the link you sent. I didn't bother braiding but just tied two knots on both ends. I don't think there is any difference between the red and black bands other than color, right?
What size piece of luggage do you use?I can put the disassembled S30 in a airline-approved piece of luggage, fly across the country or world, re-assemble it, and have a nice long tour on it
Can't do that with the S40 yet.