TransAm
Well-Known Member
Flo makes (made) a front disc wheel?
Shown here mounted to a Thor seat. (Hasn’t yet moved to the V20c.) I’m not sure it’ll mount to Cruzbike’s Adjustable Carbon Fiber Seat without modification, though. I had to cut out a square piece for the ICE Hardshell Neckrest.Mathew Fri also mounted one

Yes - just have to ask for it!Flo makes (made) a front disc wheel?
")
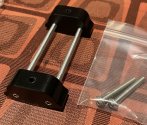
Cool. Could you show some pictures of your mounting adapter for this box?I have mounted a 21 liter M5 race case to my V20 - Mathew Fri also mounted one to his new V20C. Weights only 800 grams! You will need to build an adapter but it easily mounts to the headrest tubing.
Did you make any progress with novosport?Dreaming of a full tail fairing box with 30-70l volume again.
Here is it. I cheated a little bit - the black piece is the current bracket that holds the Cruzbike race case to the headrest tubes (but it could be any piece of metal that serves the same purpose). I used the M5 case as a template and shaped a piece of dense foam to match the curvature, then wrapped it in CF, Then mounted the bracket and the piece to the headrest as shown. I also laminated another layer on the part of the M5 case to give it a little more strength as this is where it is attached to. Had to drill 2 holes in the case also for the bolts.'Cool. Could you show some pictures of your mounting adapter for this box?


Well I l'd be paying in Euro and shipping inside EuropeIt is not cheap, but with Euro to $ exchange at 1:1 - this is a good time to buy it. Is ships from Europe so that is probably another $100.
(Germany. - Getting the bike was very expensive, though, so don't envy me. )Did not find any time for anything… :/Did you make any progress with novosport?
That is the plate that came with the 3rd generation Race Case. (Or is it generation 2b?)Is that a custom plate holding the CF part?
I'm not sure which part you are talking about that is broken? Any pics? I have my box attached to the neck rest bars much lower than most (near where the bars enter the frame? I want to check if I am overloading anything and causing damage. My box is custom made and I was not confident in my Carbon skills to hang some weight in a carbon box that was attached by it's side. So mine is attached by bars that I have added that clamp onto the neck rest bars, but run underneath my box, so not much load on the carbon which is essentially just a "bucket" sitting on top of the bars I added.That looks nice Larry. Is that a custom plate holding the CF part?
1 thing I noticed in all of my attempts at connecting a tail box to the head rest bars and riding a lot is that the extra weight pulling on the bars (and maybe my head) is that the back plate on my frame has become disconnected (broken weld) from the top, flat part of the frame between the holes for the head rest. So, if you guys are going to connect large tailboxes to the headrest bars on your V20 that you expect to put a lot of weight in, keep an eye on that back plate, particularly at the top where it connects to the main frame. The weld at the bottom of the back plate is still fine, but this has caused me to rethink of where and how I can connect a tailbox to my V20, either to the seat or the frame?

That plate normally shouldn’t take much force. Make sure your head rest tube clamps are tight, not broken. BTW, the new Perez clamps are closer to Jason’s original design.Basically the small back plate that the head rest bars go through is welded all the way around to connect it to the main frame. What I think happened is that the pressure mainly from my head pushing the head rest bars down separated the top of that small plate from where it connects to the main frame, right near where the seat and frame meet and between the head rest bars. I could be wrong but that is what I think happened. Since I don't have a welder I bought some 2-part metal epoxy, cleaned up the area as well as possible, and put dabbed it inside the crack with a Q-tip from the inside until it seeped out from the outside. I haven't removed the seat for a while so I don't know how well it is holding up, but I will check it next time I do and post it on my thread as an update. There is no rattling, so it must be okay.
View attachment 13846
My headrest tubes are stuck pretty far in there, and I even slid on a 6-8" piece of inner tube on the bars so they don't rattle if the Perez clamp loosened. 1 of the screws on my Perez clamp came loose and I was able to glue it back on so it's been fine for the past 9 months or so. It's just a matter of time for it to fail though. That new Perez clamps looks snazzy. I will probably order one soon, but since shipping is so expensive I might order it with some other stuff to save on shipping. My friend's LBS guy has a welder and does aluminum so if the epoxy fails then I will take it over there for him to repair it.That plate normally shouldn’t take much force. Make sure your head rest tube clamps are tight, not broken. BTW, the new Perez clamps are closer to Jason’s original design.
One other minor change I forgot to point out is that the rear set of seat lugs on the V20 are not welded to the V20c frame, because the new stock seat uses a yoke around the hydroformed tube. These lugs can get in the way of the new adjustable seat if you try to retrofit it to the V20.
Bizarre, I did ask for it and was denied....Yes - just have to ask for it!

Do you have pictures posted somewhere? Interested to see how it looks.Your should try to Monokote your own wheel Derek. I did a shoddy job the first time on my Campagnolo Bullet 80 non-drive wheel but it has held together for easily over a year. Just yesterday I Monokoted my Bullet 50 non-drive wheel and while this effort was better you can save quite a bit of money doing the same for cheaper than buying a new wheel, and still get about 90% or better of the aero improvement at a very small weight penalty.