Vendetta 2.0 unboxing and build

floridabike

Active Member
Hanger for the derailleur

Eric, you are doing a great job. I'm curious as to what the hanger for the derailleur looks like. Haven't seen it yet or did I miss one of the pictures.

Phil
 

JustTooBig

New Member
Derailleur hanger?

Good catch, Phil, and appropriate question.

Page 1 and 5 of the Vandetta 2.0 Assembly Manual both appear to show (in illustrations, not photos) that the hanger is on a tab extending below the dropout on the fork. Other illustrations in the Manual do not show the hanger at all, and none of Eric's photos show any kind of hanger either.

Inquiring minds and all....

-Carl
 

Eric Winn

Zen MBB Master
Vendetta RD hanger

Hi Phil, I have not gotten to the components yet but here you go:

John includes a spare RD hanger with the framekit for a total of (2).

Inside right chainstay dropout pocket and hanger:


Other side of hanger:


Hanger in place from inside the chainstay. The black thing holding up the end of the hanger is the plastic shipping tab that fits into the rear wheel dropouts to hold them in alignment during shipping. I've just put it here to hold the RD hanger in place for this photo.

Note the assembly instructions state, " Optionally fix with Cyanoacrylate (Supa glue). " It is a loose fit. I can see it will be easy to misplace. I'm not certain I want to use superglue but I may experiment with 3M Spray Mount Artist's Adhesive to see how that works or look for something similar.

In my case, I want to try using my Sea Sucker Talon bike rack to transport my Vendetta so I will probably want to remove the RD during transport like this. I hauled my old mountain bike on a 2500 mile round trip on top of my Honda CR-Z Hybrid two seater last year and had no problems whatsoever.

I'm not sure of the aerodynamics of the new Vendetta tube sans seat. I will probably wrap parts of the frame to keep the bug splats off the finish and to avoid playing those lightening holes in the top rear of the frame tube like a flute while I'm driving 70mph down the freeway (motorway) - then again depending on the melody it played, it might be worth leaving them uncovered.


Here is how it looks from outside the chainstay. Pardon my thumb.


Thinking of my bike rack suggested testing the fit for inside the car .

I'll take some more photos in the daylight but as you can see there is a surprising amount of space in the back of a CR-Z. It is actually pretty easy to disassemble the Vendetta to this state. Both front and rear wheels use QR skewers and the front triangle (not shown here) is only fastened to the bike by the front wheel skewer and the pivot clamp pin (and brake and shift cables).

So if I packed very light for myself and a passenger, the Vendetta and us, including wheels could all fit inside the car - sweet. I will need to consider brake and shift cables but it looks doable. I will revist later when everything is assembled and do a separate write-up on transporting a Vendetta using a CR-Z.

40+ mpg to get to places like Sebring is a huge money savings plus I get a twofer - a really cool car and a really cool bike going places together...


-Eric


JustTooBig

New Member
now it makes sense...

ah, a simple answer to the derailleur hanger question. What had appeared to be a tab on the fork (solely because of similar color) turns out to be a replaceable hanger machine-fit to the (as of yet unfamiliar) chainstay.

Makes perfect sense now. Thanks.
 

floridabike

Active Member
Hanger Pictures

Eric, thanks for the pictures. The CR-Z is nice but if you want to be cool, this is the way to go. The Cruzbike will be on rear this year and the Vendetta would look especially nice. Not sure if the color would match?


bug1.JPG

bugbike.JPG height: 667px;


Eric Winn

Zen MBB Master
Lesson #1 Don't push the slider too far into the boom

Do NOT push the slider as far into the boom as it will go as it will probably get stuck!

I'm short at 5 feet 6+ inches. I used to be about 5 feet 7 inches when I had more hair. My inseam is 28 or 29 inches and my xseam is 38 or 39 inches depending on how you measure.

I had ordered a small Vendetta frameset based on John's sizing chart and other fit guidance but Jim had met me in person at Sebring this year in February and sent me a medium which he felt I would like better and would fit me. The small frameset uses a really short chainstay and the slider has a downward kink aft of the pivot cage.

My introduction to Cruzbikes began with a test ride on a v1 Silvio with the straight boom. Neither I nor the seller could manage to adjust the thing to fit me. The pedals remained a bit elusive no matter what combination of loosening and adjusting we did.

This created a quandary. Riding the Silvio is to fall in love with the darned thing. Even more amazing was how a brand new potential customer (aka total stranger) could communicate directly with the designer, John Tolhurst, who reassured me the v1.5 model which added the curved boom would most assuredly fit me. How cool is that?

I was all set to pull the trigger and buy a Silvio but the more I looked at the Vendetta the more I saw that I liked so that is how I ended up here.

On with my lesson learned. I was a little apprehensive about getting a good fit with the medium triangle (boom, slider, BB/chainstay) because of my Silvio experience and hearing about some of Lisa's efforts to fit her Silvio especially since it sounded like we are similar in size.

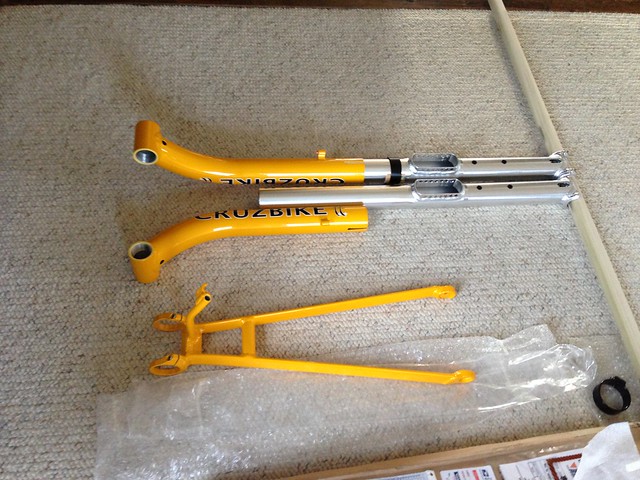
So I carefully assembled the frame to this point:


When I inserted the slider into the boom, I pushed it smoothly but firmly until it stopped figuring it was going to be close. I then grabbed the bottom bracket in one hand and the center of the handlebars right at the slider clamp in the other hand and squeezed together to check to see if there was any more give to seat it a little further. DO NOT DO THIS! You have been warned.

I then set the bike on the carpet and carefully sat in it to check to see how far the pedals were from my feet. They were too far.

I went to pull the boom out and it wouldn't budge. I got my son to help steady the bottom bracket end, while I detached the slider at the pivot cage and tried to use the handlebars to twist and work the slider out. Turns out this required a huge effort for movement of only a few degrees.

I spent a few days trying several things in consulationt with John and Doug but failed to free the darn thing. Long story short, John shipped me a replacement slider and boom and I sent Doug the one I got stuck so he can get it unstuck with his greater arsenal of tools and mechanical wizardry.

Stuck and not stuck. The large wooden dowel is clamped to the stuck one to try and give me more leverage to twist it but this didn't help.


Here is what I've learned since.

Yes, the medium frame can fit a 38 inch xseam but it requires trimming the end of the slider.

Details:

Based on some photos I sent to John, he recommended I start of with trimming 50mm off the end of the slider and assemble the top of the fork steerer tube with the pivot clamp on the bottom and the three spacers on top. More on this in another post.

So I made marks at both ends to keep track and monitor what was happening:

Starting at the tip of the slider, I measured to 50mm and then added more marks for each additional 10mm inboard up to a total of 100mm from the tip.


I also added the same marks starting from the leading bevel where the tube widens for the pivot cage underneath.


I also measured how far I had inserted the slider in the stuck set as a reference guide on how far was definitely too far.


John admitted to me that he had gotten his boom stuck and Maria's stuck but was able to get them unstuck. Apparently I'm more talented at the sticking part... According to John, bending to create the nice curved boom results in the tube getting a somewhat oval cross section some distance before the curve.

Also according to John, minimum recommended insertion distance is 50mm (approx 2 inches), ideal insertion is 75mm or more (approx 3 inches or more ).

My recommendation is not to exceed 178mm (7 inches) insertion AND still test carefully as you approach this length.

Here is where I lopped off the initial 50mm recommended by John. I used a miter box and a hand held hack saw. Pretty easy to do. Dressed the edges with a metal file and also used a sandpaper coated sponge thingy I had left over from several years ago designed to sand non-flat surfaces. Worked well to smooth and round the edges of the tube. I squished it in half and stuck it inside the tube, then let it expand and twisted it around to make sure the inner edges were smoothed over a bit too.


I reassembled everything, checked fit and my feet were still not reaching the pedals so I lopped another 25mm off and checked again.

Each insertion was very ginger. I pushed in a little, pulled back to make sure it would release. Pushed a bit more, pulled it back, etc.

With 75mm lopped off I could comfortably get the slider and boom such that I could reach what seemed to measure as 39 inches from pedal axis to seat crease. I marked this on the tube and measured how far the trimmed slider was inserted - 7-1/4 inches:


It was still feeling a bit tight and my foot to pedal reach was still feeling a little long so I went ahead and trimmed another 25mm off the slider for a total of 100mm being lopped off. In this next photo, you can also see where the tip was still binding some when inserted to 7-1/4 inches - this was really more compelling for me to trim a little more so I could make the pedal length even shorter, if needed.

Note the striations running at least 15mm from the tip toward the aft end. I am still seeing a little of this with the slider trimmed back 100mm and inserted up to 6-1/4 inches into the boom but it is much fainter and the slider feels more smooth inserting and removing to this length.

Note: This is after trimming off 75mm.


With 100mm trimmed off, the slider ends up being inserted 6-1/4 inches or about 160mm into the boom to reach my 39 inch mark. Well within John's limits and still a lot of room to extend it out for a taller rider.

Results:

Here the slider inserted into the boom up to my 39 inch xseam mark : As in my posts above, this mark is from a fine point Sharpie pen. The mark can be removed with a little rubbing alcohol.


Below is a short video with a viewpoint from the cockpit checking clearance, reach, etc. I'm moving very slowly and carefully because the bike is sitting on the wheel dropoutss on carpet with me sitting fully on it. Fittings are just barely snugged as I am waiting on a new smaller torque wrench I ordered. My current one is a Sears Craftsman Digitork 44597 1/2 inch drive with a 35-340 NM (25-250 ft-lbs) capacity. I've been meaning to get a nice small capacity one anyway so I ordered a Topeak D-Torq Wrench DX with a 4-80NM capacity and a really nice case with accessories.


-Eric
 

thebean

Well-Known Member
Eric,
Wonderful job


Eric,

Wonderful job documenting everything in such great detail. Eric, I am curious as to why you went with the medium triangle? I know you said Jim thought you would like it better. I ask as I will of course be ordering the Silvio 2.0 and would lean towards ordering a small frame as you and I have the same x seam.

thanks!
 

Eric Winn

Zen MBB Master
Bottom bracket assembly

This is how you assemble the bottom bracket (BB) into the chainstay assembly with the external BB bearing clamps.

Note, I am assembling a SRAM Rival groupset.

First you align the BB housing in the boom inside the chainstay mounted clamps and only then start threading the external bearing cups in. Note the BB clamp bolts should be just barely finger tight. You will be wiggling these components around during assembly.

In this photo the drive side and non-drive side of the BB have been inserted and just barely started on the threads inside the BB housing.


As you slowly thread the cups in you will end up sliding the boom as far to one side in order to expose the grooves of one external bearing cup when it is nearly all the way in so you can get a BB wrench on it to tighten to recommended torque.


Below you can see that this side play (with the clamps loose) allows just enough room to put a BB wrench on to torque to spec. I have a socket BB wrench coming that will hopefully fit so I can torque to spec since my calibrated elbow isn't accurate enough to get this right.


Once you have the one side tight, shift the BB clamps the other direction to expose the ends of the remaining side to tighten. The external bearing ciup on the top has been snugged down (awaiting my new torque wrench to do it right) and the cup on the bottom is now exposed to be able to tighten it.


Both cups fully snugged down and clamps back centered. Note you want to keep the clamp bolts loose as you will be rotating the chainstay and clamps around the BB cups when fitting the slider and boom length to your leg reach to the pedals.


Side view:


Assembled and ready for fitting:


-Eric
 

Eric Winn

Zen MBB Master
Small vs Medium Vendetta Frameset

Lisa said:
Eric, I am curious as to why you went with the medium triangle?

Basically, Jim made the decision for me after seeing a small frame in person for the first time. Apparently it is a lot smaller than he expected and as I mentioned, we met in person in February as well as Jim and Maria seeing me riding the Quest at Sebring and he felt the medium would fit me better. John also mentioned that the small chainstay is quite short and would drop my feet too much.

Trimming the boom is easy and gets me a good fit so I'm a happy camper. Jim also had the small waiting to swap with me if I really felt the medium was not going to fit.

-Eric


Andrew 1973

Zen MBB Master
^ Above and Beyond Customer Service

It's rare that you receive customer service like that. It's not the first time that I have heard about the people behind Cruzbike going all-out to ensure that the customer is satisfied.

As for trimming the boom, this is no different than having to cut an ISP on a road bike. While the adage of measure twice, cut one comes to mind, I'd also have no issues in doing the same if that's what it took to dial in the fit.
 
Hey Lisa,
  I've got a size


Hey Lisa,

I've got a size small V on order and am expecting it to ship within the next week or so. I am 5'8" and have a 40" X-seam. Don't expect as detailed of a build thread from me as we got from Eric (thanks Eric!) but I will at least reply here to report on how it fits.

-John
 
John T,
  I am sure you have


John T,

I am sure you have probably already thought of this - but what do you think about adding a stop inside the slider just before the curved section, to prevent the boom from getting stuck if inserted too far?

-John D
 

thebean

Well-Known Member
Eric and JD,
You guys are he


Eric and JD,

You guys are he best! Thanks so much! Cruzbike team, you have two guys here with similar x seams who ordered two different sized Vendettas. Any other body measurements that can help you fit folks to each size (arm length, torso length, etc)?

thanks

Lisa
 

Eric Winn

Zen MBB Master
Small vs Medium Vendetta

Hey John,

I think you are going to want a medium frame if you are 5'8" with a 40" xseam.

I have a 32" waist with fairly decent sized thighs and I find the cockpit is pretty snug with the medium frame the way I currently have the pivot cage and steerer tube top adjustments set. I need to raise it more.

The small frame slider has a bend down from the aft end of the pivot cage to allow short riders to see over the boom and slider better: I think this will make the cockpit too snug for most people unless you are pretty small.

I currently have the steerer tube top set with one spacer on the bottom followed by the pivot clamp and then the remaining two spacers on top. This is how it is set in the short video in my prior post. I started with the pivot clamp at the bottom of the stack but this was too low.

I put my bottle cage on this morning, stuck a water bottle in it and hopped in the seat. While I can slide under it, I don't see being able to pull it out and put it back in like this while riding. I'm going to try working the pivot cage up with the different combinations of spacers and pivot clamp until I get just enough clearance to comfortably use the water bottle during riding.

-Eric
 

Ivan

Guru
Hi all,  This is my first

Hi all, This is my first post. I've been following all of these threads for a long time, deciding what to purchase. I am finally settling on the Silvio 2.0 as it was nicely "in between the Vendetta and Silvio 1.5". Thanks for the detailed posts Eric.

Lisa, I think the Silvio 2.0 only comes in one frame size with a much wider range of adjustability as compared to each Vendetta size (see below). You would not have a problem. Medium or taller riders buy the additional chainstay extension. For me at 5 ft 7.5" and 39.5" x-seam I would likely get the 100m chain stay extension as I think the position with higher BB would suit the lower recline better...more like the V!

http://cruzbike.com/sites/default/files/Silvio-Vendetta_sizing.jpg
http://cruzbike.com/silvio-15-pictures

John, after all my measurements and thinking in the past few months I figured I would also have gotten the medium Vendetta, if I went with that. Definitely agree with Eric that you should go for the medium. The small frame has a bend in the slider which, to me, doesn't look as good as the medium frame size.

Ivan


thebean

Well-Known Member
Ivan,
Those links are


Ivan,

Those links are probably not updated. When I purchased my Silvio v1.0 used, I went by the website that it would fit as low as a 36" x seam. This is not correct. I have made my Silvio fit only by adding a lot of padding on my seat to push me forward. While it works, its not the glove fit that I would prefer. But I DO LOVE her anyway!!!

Websites are expensive and a pain to maintain. One of the forum member here, Firecracker, has a 38" x seam and did not order her Silvio "off the shelf." She worked very closely with the Cruzbike team having it customized to fit her short x seam.

It will be interesting to see if Cruzbike will offer different frame sizes on the Silvio. I think they will because of the more reclined seat.
 

Andrew 1973

Zen MBB Master
A pain, but not expensive

Websites, that is. They can be built and maintained for not much cost, but you are right about it being a pain. Luckily John, Maria, jim and Doug are here to help with their expertise to make certain the customer is satisfied.
 

John Tolhurst

Zen MBB Master
Those references are correct

Those references are correct and apply to the stated model.
This reference is current:
http://cruzbike.com/how-choose-your-vendetta-setup
and this reference applies to the Silvio 1.5; also, the front triangle of Silvio 1.5 applies equally to Silvio 2.0
http://cruzbike.com/silvio-15-pictures

Cheers,
John
 

Eric Winn

Zen MBB Master
Shazam! These Vendettas

Shazam! These Vendettas really can climb!

I Just got done doing 5 short shakedown runs to see how this thing feels. Oh man does this thing have legs or what! I'm telling you she climbs, she runs like a cheetah, handles as sweet as can be.

I really, really love banking at steep angles through turns on this beautiful machine.

Truthfully, at the moment I'm not sure why I have the small ring. I didn't even thinking about shifting out of the big ring on the steep hills.

Here is what is absolutely freaky cool. I'm on my first full ride. I use Cyclemeter. It posts status to my Facebook page. My friends can comment on the posting and/or Like the post. Then in real-time my phone will speak their comment to me. This has never worked up until now.

So I'm riding and I hear my phone speaker kick in and I hear "Cruzbiking Australia likes your ride" or something to that effect. I couldn't hear it very clearly as my phone was in my right Cruzbike jersey pocket and I had wind in my ears - Vendettas go fast you know? :)

So cool.

I'll post some more build info in the next few days. I've taken a lot more photos and ran into a few things to keep an eye out for.

-Eric
 
Top