Mathew Fy
GRU
PLA+ with nozzle at 230* C. Spray painted. I just need to avoid leaving it in a hot car. Because I measured a little off for the front I had to (easily) reshape it on the slider using a heat gun.Is it done in PETG?
PLA+ with nozzle at 230* C. Spray painted. I just need to avoid leaving it in a hot car. Because I measured a little off for the front I had to (easily) reshape it on the slider using a heat gun.Is it done in PETG?
Thanks. I am having consistently good miscellaneous hobby prints with Hatchbox brand PLA at 220C. Will be trying PETG as cores for carbon fiber overwrap (have all the supplies) or maybe even PLA (thick wall with 50% infill triangular) as compression forms for some structural bike parts using chopped carbon fiber. Even if it is not for the bike, it is so much fun just to try stuff. Easy Composites LLC has some great videos.PLA+ with nozzle at 230* C.
Very cool! Just started working on a crude design for my edge 1040. Would you mind sharing the CAD file? This looks so much better than what I started developing.As promised:
View attachment 14319
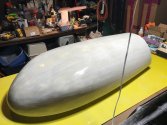
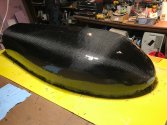
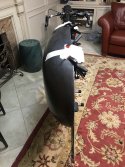
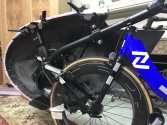
Two things I would change to that Easy Composites procedure. I did some adhesion and smoothness tests for the carbon fiber layup and I think that just using 2" wide strips of polypropylene tape (~.002" thick) is much better than the vacuum bagging film as a barrier. You get near perfect conformity to the male mold and it is not such a disaster as when I was spraying tack adhesive and handling a large plastic sheet. Be sure you have hard-coated the polystyrene foam with epoxy first and done a Bondo-type smoothing, otherwise the tape will not adhere properly. I left out the peel-ply cloth because in the test I did it always got buried in the epoxy and would not peel off. It just takes a little sanding/alcohol to prep any areas you may want to bond structure. I put two coats of spray mold-release agent on the tape. Next thing I need to do for this (right) side of the fairing is to sand and polish the outer epoxy to a perfect finish and then see if it pops off the tape like it did in my tests. Attached are a few views. The cloth-layup outer epoxy needs some sanding and polishing, the other pic is foam with tape on it that the cloth was placed over. I went with two carbon fiber cloth layers instead of three because the stiffness felt right and it drops the left + right sides shell weight from 21 to 14lb. There are 3D printed attachments to the V20 frame and other stuff that will add ~3 lb. Even if this thing does not work, it is a lot of fun to work on.Bill, thanks for reminding me of Easy Composites LLC's Youtube channel. Watching him build this was great...
That looks like a good printer. These printers have really matured. They are like toasters. I would suggest starting with basic filaments without all the matte, shine or other added features. They seem to weaken the filament. HatchBox is a reliable brand at a reasonable cost. I will be printing first PETG soon so cannot talk from experience on epoxy bonding. Looks fine if you give it a good 60 or 120 sandpaper grit key at the epoxy bond and wipe down with alcohol. You could even model or grind in surface features to help bonding. Also curing the epoxy at 100-120 F for a 2-3 hours makes it hard as a rock. Treat the bond like you would a Velcro hold, good in shear, poor in tension. Here is a link I found:Ok, you guys better be right.The Ender 3 S1 Pro should arrive in the next few days. I like the idea making small molds and brackets with the 3D printer. Especially would like to know how well epoxy bonds to PETG. Thanks for the inspiration!
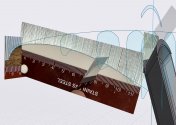
Not printed, but here’s an okay box.I got the Ender 3 S1 as well - for Xmas for my daughter but I’ve been using it more than her.
I got the Ender 3 S1 as well - for Xmas for my daughter but I’ve been using it more than her.
Ooooo, that's a start! You have a CAD file for that? Trying to learn the ropes of FreeCAD over here.Hi,
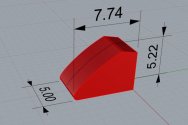
Its a start, but have to do my Garmin 1040 holder 1st. Maybe someone can suggest a better name?
Hi, yes and happy to share. Tell me what format FreeCAD can accept for import and I can post it or send me a PM. Cheers!Ooooo, that's a start! You have a CAD file for that? Trying to learn the ropes of FreeCAD over here.


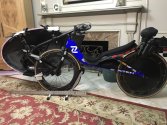
Me too. Its one of those "do a little bit each day" and it magically starts to take shape. If it turns out close to the simulations then it should add another 30% reduction in wattage at the same speed, similar to the V20 advantage over DF bikes. I have had those HED wheels for about eight years. They are tough. Blew out some front spokes twice with a chain drop and the wheel was fine. I have had good luck buying expensive wheels and riding them until they become obsolete, as in cannot get replacement bearings or hubs. Never have taco-ed a wheel but have hit some big potholes riding fast at night.Can't wait to see how it fares,