Bill Wightman
Well-Known Member
I have access to SolidWorks Flow that I use at work and run hobby models during non-work hours.
Cool! FYI-Time to move from Rhino.Giving SolidWorks Maker package a try.I have access to SolidWorks Flow that I use at work and run hobby models during non-work hours.
I like the wide opening of yours compared to mine. Also very clean lines. If you want to get your tire pump out of the wind, I recommend a small pump like a Lezyne. I can vouch for the "small" Alloy Drive model. It fits in that cubby along with my other repair stuff. I've had the misfortune to use the pump on the side of the road or trail a few times. Not as convenient as one you're toting, though.I ended up just making my little rear triangle cover/moosepack combo out of coroplast and vinyl wrap...seems to work ok so no need to 3d print one I guess...but sure would be sweet if we did.
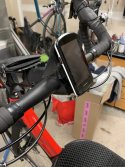
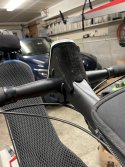
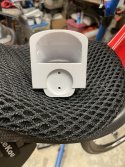
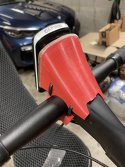
Ok, months later and a box of “trial 3d printed parts” have a version 1.Working through the design for my edge 1040 holder. This first version isn’t as cool looking as Matt’s. Wanted mine a bit higher in my field of view. Might use the top as a layup mandrel for some carbon plies and then bond these to the 3D printed base. Slicer software estimated 90 grams for the full 3D printed part..bit heavy. Thanks to all for the inspiration.View attachment 14498View attachment 14499View attachment 14500View attachment 14501
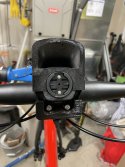
") Just needs black paint. Lower holding block needs to be reduced in size. Trying to keep tie wrap path in a straight line of action. Version 2 will include an integrated back plate for bonding garmin receptical in. BTW - bonding on PLA with MAS epoxy seems to be excellent in carrying load. Time will tell.
Just needs black paint. Lower holding block needs to be reduced in size. Trying to keep tie wrap path in a straight line of action. Version 2 will include an integrated back plate for bonding garmin receptical in. BTW - bonding on PLA with MAS epoxy seems to be excellent in carrying load. Time will tell.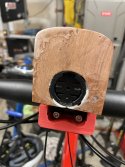

Looks great Randy! Can't wait for the weather to get better so that we can go out and ride together again!Ok, months later and a box of “trial 3d printed parts” have a version 1.
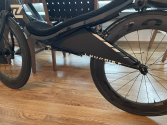
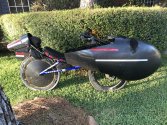
So as an update on this fairing project, I have mounted it and done a number of trims and adjustments and it is bolted in place now so road vibration does not let it migrate. I added some .3 mm thick flexible side panels to improve the aerodynamics and the overall look. Went out and rode it and it rides very solid even in gusty wind. I did some analysis that showed that some turbulence generators near blunt trailing edges helped so that is what the three PLA 3D printed taped-on objects are supposed to do on the top. They do help but it is subjective since it seems that the carbon fiber shell prevents any ANT signals from working (so my power pedals do not work from inside the shell). HRM works and speed is by GPS/Strava. The shell weight is a little over ten pounds because it is only two layers thick but has a loop ring stiffener built in near attach points. It has a healthy amount of room inside for shoe clearance and clipping out and feet go straight down for stopping. I fit it for original 165 mm cranks. Requires some gymnastics getting in and out of but I will perfect that so that I do not unceremoniously fall over in public. Max speed is too fast now for my neighborhood versus the un-faired version but I need to get back in shape from 6 months ago to see what it really will do. It is weird coasting at 28 mph and not feeling any air flow over the lower torso. Like being in a car with the windows open.Can't wait to see how it fares, and with both sides on.
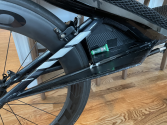
I tried to get some good shots but it is a little bit buried in the cave. There are two adjustable struts forward mounted at the crank region. One goes up, one goes down. There is a fixed length strut aft near the steering tube. All of the three struts are on centerline. They all have pivots with 6"x6" pads that contact the fairing. I have stiffened the fairing with a composite ring shaped beam with pink XPS foam as the core. I used fiberglass as the inner strength layer just because it is easy to work with. There is high strength Velcro at the three interfaces to the fairing. In the bottom and aft interface I match drilled and place two black 1/4-20 nylon bolts to ensure no road slippage. I did not do that to the upper forward interface because I did not want the bolt heads sticking out in a forward part of the fairing.Would love to see the mounting points too if possible.


Those look alright Bill! Love it, and I bet it is going to be quite a bit faster.I tried to get some good shots but it is a little bit buried in the cave. There are two adjustable struts forward mounted at the crank region. One goes up, one goes down. There is a fixed length strut aft near the steering tube. All of the three struts are on centerline. They all have pivots with 6"x6" pads that contact the fairing. I have stiffened the fairing with a composite ring shaped beam with pink XPS foam as the core. I used fiberglass as the inner strength layer just because it is easy to work with. There is high strength Velcro at the three interfaces to the fairing. In the bottom and aft interface I match drilled and place two black 1/4-20 nylon bolts to ensure no road slippage. I did not do that to the upper forward interface because I did not want the bolt heads sticking out in a forward part of the fairing.
I rode a nice quiet 45 miles tonight in very low wind conditions. It rides very stable at speed. I made a new "no tailwind" record of 32.3 mph. That will definitely improve as I get my fitness back. Wish my power pedals worked, just not compatible with a graphite cage. The fairing gives the V20 a nice feeling like you can go a little faster at lower effort while at the same time it is strangely cozy and quiet. I think interfacing with Velcro and preloading with the nylon bolts helps keep it quiet. I am also running 1/4" shock chord, 3 per side from the fairing aft part to the widest part of the seat. I mount the flexible fairing sheet on it. These chords have the added benefit of keeping the front from flopping but do not interfere with steering at speed.
View attachment 14722View attachment 14723View attachment 14724
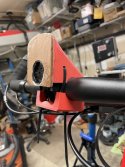
Version 2, integrated the Garmin receptical into holder and rotated the 1040 by 5deg for better viEwing. Made the mistake of sanding PLA and not happy with the finish. Next 3d printed part I’ll use a higher quality print setting and no sanding.Ok, months later and a box of “trial 3d printed parts” have a version 1.
Yes, about the only PLA that looks better sanded is white or light colored "wood". With a little more work, you can sand and do a couple light epoxy coats. You can get alcohol-based epoxy inks for two-part epoxies. It is best to just print in the color you want to see and don't sand the results. Still, a spray clear coat of something would give it a gloss and fill in crevices. I love 3D printing because of all the trial-and-error you can do.Made the mistake of sanding PLA and not happy with the finish
Bondo Glazing and Spot Putty for rough spots, Bondo Filler Primer spray next. Wet sand. Then final color spray.Version 2, integrated the Garmin receptical into holder and rotated the 1040 by 5deg for better viEwing. Made the mistake of sanding PLA and not happy with the finish. Next 3d printed part I’ll use a higher quality print setting and no sanding.
Thanks!Bondo Glazing and Spot Putty for rough spots, Bondo Filler Primer spray next. Wet sand. Then final color spray.
All is well. I have been out riding 40-50 miles mostly at night 1-2 times per week in a 6.3 mile loop close to home. Sustainable with effort (say 50 miles) flat land speed seems to be 23-24 mph in cool still air at a 150 bpm heartrate (my power pedals do not work with the fairing but that should be about 150 watts for my 64 year old body). The bike is more stable and predictable with the fairing than without. That is in part because of the six 1/4" diameter bungee chords that run from the back of the fairing to the seat at the chest region ( I attach my flexible fairing extensions to them). Sort of like a Viscoset effect inhibiting front wheel flop. There is a performance sweet spot when headed directly into a modest to strong headwind where the fairing improves bike speed by 5-10% over other wind angles. I was riding 160 bpm heartrate doing 21 mph into a 16 mph headwind the other night when I figured this out. I confirmed it during a slow group ride today when the group headed home into a modest headwind and my heartrate dropped as the group ostensibly maintained the same level of effort. I was not drafting in the peloton. It loves a super strong headwinds the most. The added total weight is about 13 lb which brings the bike total up to 40 lb. I don't notice that much extra effort on the overpasses around here. I have added a ~30" long 3D printed turbulence strip along the top and that reduces the effects of strong side gusts by 50-75% so that it is not a problem unless gusty winds get above 16 mph and that is only a problem if it is raining because of reduced tire grip. It is easy to get in and out of once you know the drill (way easier than a velomobile or streamliner). I am going to add a covering where my knees pop out that goes back just beyond the handlebars. In hindsight I should only have cut holes where my knees want to go and retrofitted with "knee bumps" like you see on velomobiles as that is much more efficient than a full open cockpit cut. I will model the most efficient knee bump shape. It is all fun stuff. Will ride with a faster group next weekend to get a better relative feel for the improvements. One little side effect is that your knees do not get sun burned in the hot Texas sun, as they are covered much of the time. Also the structural PLA parts do not have problems in the 90 deg F sun. It will get hotter here. PLA begins to weaken above 140 deg F. Generally it is harder to accelerate from a stop with young racers (big wattage capacity) on 17 lb bikes, but much easier to cruise at a sustained and higher speed. You can see that in Strava plots of heartrates around red light starts and stops versus open country road where poor aerodynamics restrain the DF bikes. No structural issues yet.How are the rides going Bill? Have you been taking her out for some testing, and if so can you let us know how it's going?